Search the Community
Showing results for tags 'led'.
-
 Here's a few Clears I did: Led controller - SP107E + RGB Strip from BTF Lighting and 24 Led Center Jewel
 -
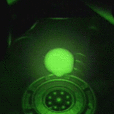
I finally got around to installing one of the LED kits that I've had lying around forever. Not sure why the colors are so off, but it actually looks cooler in the pics lol. It's swappable between blue and green or both at once. I was amazed that I actually glows through the silver jewel. Didn't feel the need for controller ports since it's already pretty bright. Photos
-
Fuck the wires and shrinkwrap. That's retarded. I wire up the negative so I can anchor the LED in place with the resistor. MUCH easier to anchor from one hard point instead of between two hard points. I make sure it all fits under and within the metal shielding.
- 11 replies
-
- 2
-

-
- how
- controller
- (and 3 more)
-
I'm not sure what it's actually called (jewel?) but the LEDs that light up the ring around the eject button on my Xbox v1.0 doesn't work. I took the Xbox apart and tested the LEDs with my multimeter set on diode mode and the LEDs do light up (for those that might not know diode mode on a digital multi meter will usually provide enough power to light a LED). I then did a continuity test between the 3 legs on each of the LEDs to the connector pins on the back of the board and found not problems. I then powered up the board to test for voltage going to either of the LEDs and there is none., My guess is that corrosion damage from a bad clock capacitor (now removed) has caused an issue with the power traces going to the LEDs.. Is there a guide anywhere on fixing the trace(s) that provide power to the LEDs? or would it be easier to pick up power from somewhere else like from the leg of a voltage regulator or somewhere else? thanks
-
Hey guys, looking for some ideas to troubleshoot the red HDD activity LED on my X3CP. It stays on and is not blinking to show activity. I just did a DVD drive swap from a Samsung to a Hitachi, and I repasted the CPU/GPU. Made sure the jumper on my startech sata adapter is set to Master. not really sure why its staying on all the time. You guys got any ideas? After messing around with swapping DVD drives, I have figured out it's my 80way IDE cable that's causing the issue. When I swapped out the cable the LED worked like it should. Does anyone know a fix for this? The IDE cable I'm using is the perfect length, so I really want to use it. I noticed some jumper pins on the back of some of the DVD drives, the Hitachi and Philips drives have these pins, are they used for serial connection or are they master/slave jumpers?
-
Does anyone have a link for an LED strip made for a modded Og xbox case? Saw a you tube video of one being made a few years back but it seems they are no longer available. The DVD cables were tapped to power the strip. Would like to find something similar. Any suggestions welcomed. Thanks
-
Hello all i have stripped my Samsung DVD drive to its bare essentials and made a clear Perspex Lid Mod. I want to add a LED to this feature but don’t want long cables crammed inside can I get power straight from the DVD drive? this would be beneficial if I want to take it apart I can just unplug from the cable. I have found a pin layout but it’s for the motherboard & I’m not sure if I’m correctly thinking I can copy the wires to what looking at on the bottom of the DVD drive
-
Hey all, I recently ordered a 1.0 motherboard and hdd off of ebay and went to mod it. Before modding, I booted them up and found them to be working properly. The clock cap was leaking bad so I replaced that. I soldered up the pin header to the LPC, connected a wire to the D0 pad and routed that to the Open Xenium I have, and went to boot it up. I'm greeted with a solid red LED on the modchip, and the xbox booting up into the normal bios. Attempting to boot into XeniumOS by pressing the eject button yields the same results. This modchip did originally come out of a 1.6, flashed with Evox M8+ 1.6. Just to rule out the modchip going bad on me, I wired it back up into the 1.6 and it booted perfectly. I threw an Aladdin chip, that's also flashed with Evox M8+ 1.6, into the 1.0 also, and it will not boot into custom bios either. I've reflowed my joints multiple times, and my D0 solder job is good (I believe lol), so I'm really not sure what's going on. Any tips would be greatly appreciated. LPC solder joints have been reflowed like 4 times so they look bad lol, forgive me.
-
Hi, I'm currently try to install strip led lights in my OG crystal case, it need a 12v source. IV tryed the 12v direct from the power supply board and also from a hard drive power splitter. The problems I'm have is it keeps blowing MOSFETs on the motherboard? Is there a limit to how many LEDs can be installed? Thanks
-
I have a 1.0 and I flashed XBlast to the TSOP then tested each chip as I went. Once all 4 were passing I reinstalled OpenXenium and attempted to boot iND-BIOS-5003. Only, the LED flashes green and it doesn't boot. I tested several homebrew BIOS loaded from OpenXenium and they all have the same problem. I'm considering triple-checking for shorts (or reflowing with hot air) yet I'm surprised because XBlast boots and says all 4 RAM passes. I found a couple of Reddit posts with the exact problem: https://www.reddit.com/r/originalxbox/comments/7fppvw/attempted_128mb_upgrade_wont_boot_flashing_green/ https://www.reddit.com/r/originalxbox/comments/epel27/no_soundvideo_flashing_green_light_after_128mb/ I'd like to avoid doing anything drastic as XBlast finally states all 4 RAM are passing. The only other oddity is (even before this above error) when FTP to OpenXenium the drives (C, E, F) do not show up. Yet, the drives were available when FTP to a homebrew dash like UnleashX. Tested a different XBOX and FTP to OpenXenium all drivers were available.
-
Hello I'm looking at doing my first case mod and really need to get an understanding of what i'm working with. Looking at some 5mm Blue LED's from ebay, Specs Not sure if I am working this out correctly so would these work with eachother? Many thanks in advance
-
I recently did a softmod to my xbox and now it's using unleashx. Once done, the led changes to the orange color while running. Is there a way to change it back to green or does it do that on purpose because of it being modded and running a new dash?
-
Hi all Tonight I finally got round to swapping out my HDD. Thought it was all going swimmingly until I tried to boot it up and all I get now is the a blue Xbox logo and the eject switch LED flashes between red, orange and green The box is a v1.4 fitted with an Aladdin chip and I had previously flashed the chip with a Evox M8+ bios which was working fine So tonight I swapped out the HDD for a Toshiba 500gb sata drive, fitted a sata\ide adapter and switched the jumper to the Master position and changed the ribbon cable for a 80 wire version Booted up the box with an OGXboxInstaller 2021 disc and it detected that a new HDD had been fitted, formatted this and went with the F: drive option Rebooted and used the standard settings in xboxpartioner to allocate max space to F: The rebooted again and installed xbox4gamers as the single default dashboard Thought that I'd be all good to go after that but no the xbox won't boot, just get the flashing led issue Any ideas of what I've done wrong? Thanks
-
Trying to get rid of all these controller ports I have. 20 shipped in the us for a complete set for the xbox, choose from red, green, blue, yellow, white, or any combo of the five.
-
@Rocky5 Unfortunately, the LED color on the powerbutton switches automatically back to it's regular "green color" if you start a game. (LED1) Can you fix this or is there any option to "lock" the color in the system setup? Big issue for Consoles with LED Mod Just to make sure, I know how to change the color in the system setup, but you can change it for example to red and if you start a xbox game it switches to green, it stays red in any other emulator or homebrew or the main menu of XBMC4Gamers.... but not in XBox games. Thanks for your kind attention!
-
it's a v1.4 hard modded xbox. i had sonic heroes on pause for several hours while i watched tv and did other things(in other words, i was not watching the xbox screen to see if it shot an error code or something). i have the xbox sitting behind my tv so i don't see everything that it does. i looked behind the tv and a saw the the eject led had turned yellow. i shut the xbox off immediately because i feared it was overheating so i didn't look on the tv to see if it was displaying an error code. anyway, what causes the yellow led? btw, it was a solid yellow led, not flashing.
-
 So i tried to upgrade my 1.1 xbox to 128mb. I installed the first chip successfully and xblastOS flashed to TSOP said "Success". Then i attempted to install second chip on bottom side, but xbox started fragging. I fixed up some shorts i found, but it still fragged. Then i measured according to datasheet, that power to RAM is shorted to ground. The shorted pins most likely were: 66 and 65. However it's possible, that i used the chip pinout wrongly and i measured short between VDD and VDDQ, which should be fine. Even after fixing the shorts, it still fragged. After (destructively, but fortunately without ripping any trace) removing the both installed chips, it still does very weird frag. Basically the LED lights up only for short while and then turns off. Xbox's fan runs for a while and then it reboots. This gets repeated indefinitely, but rarely you get normal FRAG and xbox stays on. I measured 2.65V going to the VDDQ pin and the RAM power rail or any of the main power rails are NOT shorted now. ANyone knows if i can fix it? All my other xboxes are either fragging (i have 1.0 i got fragging, but it might be TSOP issue as there are no signs of tracerot, no leaking caps and apparently TSOP might naturally degrade now, so i ordered modchip and will try to install it) or they are 1.6, which suck IMAGES: https://imgur.com/a/z74Mzxe Here is reference image how i installed one of the chips, that worked well (the first one). I guess it was pretty good: https://imgur.com/a/6DlSKuY. The residue is either flux or denaturated ethanol i used to clean it up. VIDEO:
 -
I plan to light up a clear jewel when the xbox is in stand by with one or two led's. I searched the web, found a pic (some weeks ago and forgot where i found it) which say nothing to me. So maybe some could help me out here with a simple drawing or a picture for non electricians?
-
I wasn't sure where to put this, but here goes. I installed a XeniumICE massive bundle by Nemesis recently in a Halo blue console and a skeleton black (transparent gray). Everything is connected including the wires for the dim function on the controller ports. It looks absolutely awesome, but because the console is transparent the front panel LED's are brutally bright in a dimly lit or dark room. So bright that they distract from the TV while playing. This wouldn't be an issue if I was using a solid color console as the LEDs aren't directly visible, but that isn't an option. I found the demo too dim that was included in Nemesis' Xenium Essentials which dims during boot and in XeniumOS, and I found the setting in XBMC where the "Off" setting dims them, but the moment I load a game they are back to being staring into the sun bright. I know this is because once the game is loaded, XBMC is dropped until IGR is used to exit. I have searched endlessly and cannot find an answer as to how to dim the front panel LEDs all the time. Is this even possible? Any help at all would be greatly appreciated as I'm almost at the point where I'm going to remove the front panel and put electric tape in front of the LEDs, but I know that would look like hell and would drive my OCD nuts. Thanks in advance!
-
 SO when I turn it on, it starts and stops a few times before it finally gets going and then when it does I get no image or sound and the light just flashes red and green. At first I thought it was my IDE adapter on my new hard drive, but when I replaced the unnamed brand one with a startech it still did it. To be clear, my xbox DOES work if I keep fucking with the power button and I can play games normally (Have not extensively tested to see if it randomly shuts off or anything after a long period of time. Anyone know what the problem could be?
 -
 Hey guys, I decided to rig up a tutorial for everyone who's looking to try out or install an insane LED controller chip in their Xbox. These chips are now for sale for 45USD, please contact me directly for availability and purchase. XERC CME (Case Modders Edition) was manufactured by Sickmods back in 2005. This chip has disappeared off the market a long time ago and is very difficult to obtain a real one. With a bunch of research and work and finding contacts this chip was able to be cloned. Installation Manual PDF: http://www.mediafire.com/file/2v72kovhkxk3am2/xerc_users_manual.pdf/file If you haven't downloaded the PDF file i can give you a run down on what the chip can do. Power Console On and Off via Xbox remote. Eject or close DVD tray on the fly with remote. Audio LED pulsation, LED's pulse to the sound of your Xbox. Remote configuration, setup and configure the buttons the way you want. LED chaser Mode, toggle through modes changes the LED chase patterns with remote. Speed up or Slow down led sequence. SmartXX OS boot Support Connects to MS DVD Dongle internally for menu browsing with remote (Perfect for XBMC media) Installation - (Motherboard to Chip) There are points on the Xerc CME chip which need to be connected to the bottom of the Xbox motherboard depending on which version you have. Details of Chip: LED +/- (Indicator light for the chip used for configuration of the remote and initiation when plugged in.) +5V (5 Volt Power Source, connect to the 5 volt source on the Xbox mother board, Powers LED's) PWR (Power, connects to the power on the Xbox motherboard) GND (Ground, connects to the grounding on the Xbox motherboard) PO (PowerON or RF, detects if the console is powered on, connects to the PO on motherboard) DB (Drive Button or Eject Button, the chip is able to eject your DVD drive by Remote, connects to the eject button port on motherboard) PB (Power Button, the chip is able to power your console on or off via remote if connected to the motherboards PB point) IRd (Infrared Signal, connects to the IRd point on IR receiver.) IR- (Infrared grounding, connects to the grounding IR-minus point of the IR Receiver) IR+ (Infrared power, connects to the power IR+ point of the IR Receiver) PB5 (Not Used, mainly for people who want to program in another mode) PB4 (VU Meter for the chip, Connects to the Audio L point on the motherboard) PA7 (Not Used, mainly for people who want to program in another mode) +5V Square (power point for the LED's, connect the power side of your LED's directly to the chip. H1 (Port 1 of the led Chaser mode (Grounding point for LED's)) H2 (Port 2 of the led Chaser mode (Grounding point for LED's)) H3 (Port 3 of the led Chaser mode (Grounding point for LED's)) H4 (Port 4 of the led Chaser mode (Grounding point for LED's)) H5 (Port 5 of the led Chaser mode (Grounding point for LED's)) H6 (Port 6 of the led Chaser mode (Grounding point for LED's)) H7 (Port 7 of the led Chaser mode (Grounding point for LED's)) - if Firmware Supports (P12 & Higher) Installation - (Chip to LEDs) you can essentially use your own schematic for LED's but this is a diagram on how they connect in sequence. the chip simply shuts off one of the chaser ports and turns on the adjacent port making the LED's chase each other in a pattern, according to this diagram its for 3mm blue LED's with a total of 34 LED's in the top Lid. H1 port requires a 22 ohm Resistor and H2-H6 requires a 15 ohm resistor. Port H7 is not used in this diagram but could be rigged up in parallel. if you are unsure about what resistance to use per LED here is a link to calculate what ohms you need: https://www.kitronik.co.uk/blog/led-resistor-value-calculator/ In Color: In Power/Ground: Installation - (Chip to Microsoft DVD Dongle) Connecting to the MS Dongle requires a 1N4148 Switching Signal Diode so the chip is able to detect and switch over to menu browsing. you can buy these on E-bay for dirt cheap. This is the Installation of it in an Xbox: Final Result
 -
title
-
Hi all. New into modding xboxes. Iron man was my first go, not the best quality but a good starting point.
-
Hi all, I’ve just noticed that the blue leds are not lighting up on my X3 control panel bios bank switch buttons. They should light up blue when pressed in (on). Anyone come across this before? Know how I can fix it?? Ill take it apart and see if theres a lose cable cable or similar but that won’t be for a few days....

.thumb.png.f42da7287d0f269627e60f69c2f54ecc.png)


Board Life Status
Board startup date: April 23, 2017 12:45:48