Leaderboard


.thumb.png.f42da7287d0f269627e60f69c2f54ecc.png)
Popular Content
Showing content with the highest reputation since 06/29/2025 in all areas
-
This is a little project I worked on from October 2024 to January 2025 with help from Skye and HoneySoakedSegull. Original idea by Siktah (he had been nagging me about this for a year). Before anyone comments or asks, yes this just transfers the solder skill requirement from the repair person to the board assembler/merchant. This isn't something everyone needs, and I think it's rather pointless, as I just do my own trace repairs. That being said; not everyone has precision soldering equipment, not everyone has fantastic magnification to do their solder work, and not everyone has the effort for traditional front panel trace fixes. Without further ado I present Hugin and Munin trace fix cards and the D0-ET board. Siktah and I entered these as an exhibition entry into Xbox-Scene Modfest 2024: https://www.xbox-scene.info/articles/xbox-scene-modfest-2024-celebrating-homebrew-innovation-and-the-modding-scene-for-xbox-xbox-360-xbox-one-and-xbox-series-x-r54/ The boards are to be used in pairs, 1x Hugin (A) board and 1x Munin (B) board per repair. all 1.0 and 1.1 boards use one set of boards, all 1.2-1.6 boards use a different set. They require a 25cm ish 0.5mm pitch, 4-pin flex cable to jump between the two boards, and you only enable the trace repairs you require on the Munin (B) board. The flex connector must be folded 90 degrees one time to for the contacts to like up correctly. The red front panel LED is the least likely trace to fail, but it also doesn't have nearby "friendly" test points either. So a wire going from the RED pad on the B board to an alternate test point on the motherboard will be required. Unfortunately some boards don't have an easy to solder test point for the Red LED, so it may be easiest to solder right to the SMC. I am currently writing up install instructions and gathering fresh board images for every board rev. Here are some early "quick and dirty" images for 1.4 and 1.6: I made the FPC connectors quite large to support a huge variety of connectors, though I do include documentation on the bottom of each PCB for the needed resistors and a compatible FPC connector. You can also use top only, bottom only, or top+bottom FPC connectors as long as you use a "reverse direction" flex cable with one set of contacts on the top, and one set of contacts on the bottom if you use top or bottom only FPC connectors. As an added bonus, EqUiNoX repeatedly requested a simple, multifunction D0 board. So alongside Hugin and Munin I designed D0-ET as part of this set. Aside from protecting your D0 point from accidental damage from pulling on a wire the D0-ET (pronounced duet) has 3 possible functions: grounding out the D0 point directly giving a larger pad to solder to, to connect to a modchip with a simple D0 pad like an OpenXenium, ModXo boards, or an X2 / X3 wire harness giving a JST-SH 1.0mm 2-pin connector to connect directly to a modchip like Xenium Ice, Xenium Gold, or various ModXo boards An earlier (less well fitting) revision of this board can be seen installed on the 1.4 motherboard picture above. I am finally learning more about git and specifically github with the release of the Skeleton Key branded USB adapters (based of xbox7887's USB adapter, with support, permission and an overly permissive license). https://github.com/OGXHarcroft/Xbox-Skeleton-Key-USB-Adapter The gerbers for all 5 of these boards are already on the Xbox-Scene discord in the Modfest channel as of roughly 6 months ago and some sellers have already started selling them. Hugin and Munin FP Trace Fix boards are also coming soon to a github near you!3 points
-
Correct. The one with the blue mark. They are notorious for leaking electrolytic fluid on the boards and causing degradation to both components and traces on the mobo not to mention the mobo itself. You don’t really need it anymore so it can just be removed on the pre 1.6 revs like this. Be sure to clean the area with some 91-99 percent ipa after removal and remediate any leakage that has occurred on the top and underside of the motherboard.2 points
-
I have been made aware that these are contentious bits of software as well. Do not link on this site to where to download them. Do not upload them to your post if that's possible. If you find them here somewhere, report them.1 point
-
There's no real advantage to using a separate disc; it's just a habit I've gotten into over time.1 point
-
Your hypothesis is correct. Here's the process, step-by-step: Burn a CD with Xblast and a dummy file. Cerbios BIOS (renamed to bios.bin) located in C:/Bios. Boot your Xbox with the CD inserted. Toggle the switch on your modchip to select the other bank. Initiate the flash process.1 point
-
@KaosEngineer I'm unfamiliar with the Duo. Can he flash Xblast to bank 1 and use it to flash bank 2?1 point
-
Here's a few Clears I did: Led controller - SP107E + RGB Strip from BTF Lighting and 24 Led Center Jewel1 point
-
Happens mate, I've rebuilt a shell 3 times here and certainly prefer homebuilt for main PC. I did a little synopsis for the Halo Alpha / beta stuff for my own drive and shared it in the OGX facebook file section if it helps.1 point
-
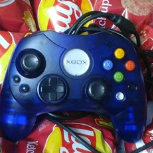
Duo X2 Blue (no White Cromwell): This modchip comes with two pre-flashed BIOS banks. Bank 1: Features the X2 4981.67 BIOS, compatible with Xbox versions 1.0 to 1.4. Bank 2: Features the Evox M8 BIOS, compatible with Xbox version 1.6. Looking at the photos in post, the TSOP is visible, which confirms we're dealing with an Xbox V1.0 to V1.4, as the V1.6 versions don't have a TSOP. This is why discussing the X2 4981.67 BIOS. X2 4981.67 BIOS Capabilities: The X2 4981.67 BIOS supports hard drives up to 2.2TB. It can utilize partitions F and G, with proper partition balancing achievable using XBPartitionner. Dual-Bank Advantage: The Duo X2 modchip has two independent BIOS banks. This means you can safely flash and test a new BIOS (like Cerbios) on one bank without risking your primary, working BIOS on the other. It's perfect for experimentation! Flashing tools, FlashBios, Cromwell, Eurasia, and more. Cerbios truly is a revolution in Xbox modding. It's a real game-changer that brings unprecedented capabilities: It supports hard drives up to a massive 16TB. It introduces the CCi compression format, which optimizes storage by deleting dummy files and applying other improvements. It can force 480P output, ensuring better video quality for compatible displays.1 point
-
That's WEIRD. Thank you for posting in case somebody else has this odd issue.1 point
-
I installed Nichicon caps but still had 3 boot frag. Reinstalled old CPU caps and it booted. I decided to go ahead and recap the whole board. Unfortunately, still 3 boot frag after full recap. I again put the old CPU caps back in and it booted. I decided to try replacing CPU caps one by one and ended up figuring out that moving to one of the open cap locations allowed it to boot. My CPU caps are installed as shown below and it now boots, which is fortunate because I managed to damage one of the vias in testing with the all the soldering and desoldering. I'm not really sure why, but at least it boots now.1 point
-
That’ll definitely make it easier for those users that don’t have the experience, equipment, etc to do the trace work. I can see a decent group of people who would absolutely find that useful if they were a relative neophyte to the og Xbox scene. I’ve always thought it’s better to do the things to gain the experience and get my hands in the devices but I know not every user feels that way nor has the inclination, time, equipment, etc to do so. This would definitely be a great route for them to use. Good work as always!1 point
-
@ToxicMedz (TruHexen) Wanted to see if he could come up with a casing/mount for the front panel PCB for the chips. He did, and it came out AMAZING. That way it's not just a PCB Double sided taped to the underside of the front panel. Next up is the X-Array PCB!1 point
-
This post is the best! thank you all for your contributions.1 point
-
Flashing Cerb won't brick you unless you interrupt power. It is important to determine what you have inside. Have you ever opened it up before? If not, no better time than the present! But you should know this so that you can flash in whichever way you need to.1 point
-
No luck, still working on it.1 point
-
Hey all. It’s time I start to get rid of some of my pickups over the past year or so. I have around 25 or so, fully working consoles that have all been cleaned and modded. Clock caps removed on all boards under 1.6. I have all different sizes of HDDs in both SATA and IDE from 80GB up to 2TB. SATA options will include the needed adapters and 80 wire cables from Kekule. Everything under 1.6 is TSOP or has a mod chip. Most chips are xecuter 2.3 & 2.6. Prices of course will vary depending on HDD size and type and wether they have a chip or not. Most of them are empty mods waiting for games and emulators of your choice. I can also add those if needed. Again everything is tested and working and will be a clean, fresh mod, without old game saves and such. Couple of these are Crystal edition. For those that just want soft mods, that can be arranged too if you’re not capable or don’t have the necessary tools to do so. I also have 3-4 PAL PSU in different models for those that acquire imports and need replacements LEDs are also optional for controller ports. I also have some pretty cool spare parts that don’t pop up very often. I’d much rather let them go here than dump them on FeeBay. Located in Virginia, USA. Feel free to send a DM or post here directly. Everything needs to go, but I’m not doing lowball deals.1 point
-
I just restored the latest V1.6 with the Samsung ram that I've ever seen, 2005-07-06, 1098021-52805 serial #. Has anyone else seen a later date V1.6?1 point
-
So.... after an extended spell of absence due to PC issues, I am now back. Will be back to creating artwork soon. (pre built PC was crap, returned it. Built my own from scratch, cost more but worth it)1 point
-
Anyone having problems with this I have made a quick how to video .thanks1 point
-
HI All, XycloModGUI Ver 0.51 has been released today. Ver 0.51 fixes a timing issue with sync establishment that @Prehistoricman found during B01 testing with the developer branch. No users had reported the issues with public version in the wild - but the issue was theoretically possible in 0.50 public version if a previous Xyclops interaction was interrupted unexpectedly. Ver 0.51 update is now available for download here!1 point
-
THIS PACK DOES NOT CONTAIN CERBIOS OR PROMETHEOS! I have been rebuilding a few of my Xbox HDD's recently and have built myself a little starter pack for use with FatXplorer. I thought I would link it here just in case anyone else finds it useful. Cerbios HARDMOD New HDD setup files updated.7z Cerbios HARDMOD New HDD setup files updated (GDRIVE) Includes a folder for C, E and F, that just need to be pointed to when formatting a HDD in FatXplorer or extracted and manually copied to an already formatted HDD. C contains a Cerbios.ini (set to HDD and DVD with no other changes from stock), the Cerbios BootAnims folder, a full MS Dash with Dashloader as evoxdash.xbe. E contains the XBMC4Gamers install, an Apps folder, A recovery/backup dashboard and the necessary TDATA and UDATA folders. F has an Apps folder and an empty Games folder. Dashloader is setup as below- Default dash is E:/XBMC4Gamers/default.xbe Recovery Dash is E:/Dashboard/default.xbe (UnleashX) Button shortcuts (Hold at power up)- Start = Boots recovery dash Back = Boots MS Dashboard Other buttons can be setup using Dashloader Customiser in E:/Apps. Apps provided in E:/Apps Dashloader Customiser DVD2Xbox Unleash X Evolution X Controller Tester Enigmah Videomode Switcher XBMC Apps provided in F:/Apps Xbox Artwork Installer 3.2 (If you have internet connection on your Xbox you can delete this and use the Online version available in XBMC4Gamers - Settings - Downloader) After copying across to a HDD you can edit the Cerbios.ini to your specific needs. If anyone has any suggestions of anything useful that they think should also be included please let me know and I can add it. Updated 20/03/25 to include the latest pre built XBMC4Gamers from Rocky5 PS I know this isn't an Installation Disc but it didn't seem to fit in any other category1 point
-
XCM Red without the faraday cage1 point
-
Hi. I was wondering if the XCM ruby red has different tints of color; are there different batches of it? See how in the second picture, it looks a lot duller in color??1 point
-
Update: I've managed to transplant a A02 cyclops into a motherboard that had a B01 and managed to flash Cerbios on no issues. Booted up to XBMC4Gamers1 point
-
The awsome team released the newest PrometheOS 1.5.01 point
-
I have just installed UIX Lite from the XBMC4Gamers downloader and successfully recovered my Insignia account using it. I can access friends list etc without issues. Have just logged into Halo 2 and am currently downloading map packs All working great on my end My Insignia tag is Nikeymikey Feel free to add me1 point
-
Cheers mate, still usefull for downloads in 20231 point
-
Thank you!1 point
-
Each of the three games have their own DEFAULT.XBE All you need to do is create a folder named Chihiro in E:, and you need to create two subfolders - mbcom and mbrom. These folders are empty, but are required by the Chichiro games.1 point
-
Does that Chihiro game pack need to have a launcher file?1 point
-
It would be easier for you to visit the site.1 point
-
could u screenshot so we can see other stuff on there?1 point
-
I don't know how people feel about it, but when I went to download CoinOps 8 from the h4ck.se ftp server it had pretty much any xbox game you could want1 point
-
Thank you!1 point
-
Sega Chihiro Game Pack.rar (916MBs)1 point
-
Gonna bookmark this forum very helpful in finding iso files so thanks1 point
-
Hello, I am uploading myself games and emulators on the most popular torrent websites, look on 1337, ettv, demonoid, torrentgalaxy, torrentfunk... Also, here are some useful links: https://archive.org/download/XBHomebrew https://downloadgamexbox.com/ https://xbins.org/index.php?action=catsearch&searchtxt=XBOX http://xbmcxbox.blogspot.com/2013/03/complete-list-of-emulators-for-original.html https://drive.google.com/drive/folders/1ySJR7jZqX_7sGDocN21BOBfPT4AERFRH1 point
-
Edit: To clarify, while legal concerns were raised, we were not directly threatened. They have reached out professionally in the past to express their concerns without any DMCA or legal action. We have worked with them to resolve those issues. Due to ongoing disputes over IP infringement claims, we have decided to attempt to stop all discussion of Xbox HDMI HARD mods on this site. We will not be discriminating based on brand. All discussion is hereby banned in an effort to not be sued. The HDMI mods are really for people trying to build the ultimate modded Xbox. The results yielded by the HDMI mods are very slightly sharper than the component to HDMI converters by reputable brands. They are almost indistinguishable and so are hard to justify for many due to their expense and installation difficulty. If the truth were really told, the installation difficulty is the main reason anyone has them... so they can show off their skills. The quality of the video output simply isn't that much better than component. (These comments are specific to the Original Xbox. Other consoles can actually have a dramatic improvement.) Component to HDMI adapter discussions are allowed. Hard modded adapters that intercept the raw video signals prior to the built-in video encoder discussions are disallowed. The threat of lawsuit against us is that we allegedly choose what can and cannot be published on our site. We are actually protected by law as media and exempt from most litigation due to our First Amendment rights to publish whatever we want as long as we are not directly providing something unlawful. We aren't, but this is also a public forum. We don't have the time to constantly monitor it nor are we attorneys. We don't intend for anything unlawful to be published on this site or to allow it to remain, but we simply can't catch everything and even if we could we do not know what is in compliance with the law and what isn't. Quite frankly, if you're not an attorney, neither do you. I'm referencing section 230 here. Section 230 protects this site from most things third parties (people posting to this board) could expose us to. One thing it doesn't protect us from, are claims of intellectual property theft. I have no idea who owns what intellectually property, who may or may not have used it unlawfully, etc. So, we've had to look at what to do about this. We can't continue in the current state because I cannot afford to be sued simply because I chose to create a site covering a topic I once loved when the main site had gone offline or was about to. So since we have no protection from this specific claim and since there is no clear indication of what is right and what is wrong I have only this one option to protect this site. The only reasonable thing for this site to do is attempt to stop all discussion regarding the HDMI mods creating all of the controversy, the company threatening litigation, the main person behind said company, any products they offer, AND any competitors to those products. I don't know what HDMI HARD mod is legal and what isn't, so the best way to protect this site is to block discussion of all of them. If you can sue us for (passively or unintentionally) allowing certain discussion, then we will attempt to comply and attempt to disallow all of it. There is absolutely no way for us to find every mention of every HDMI device that happened in the past. Please report those if you find them and if they are indeed HDMI HARD mods we will take them out of public view after we see the report. There is a lot of content on here and we can only do so much. -HARD mod means some part of the adapter installation requires the original hardware be modified in some way. HARDware was added to the circuit board somewhere OTHER than a port designed for devices to be plugged into it in order to modify the behavior of the device. Usually this means soldering was required, or traces on the circuit board were cut in order to intercept or redirect certain signals to make that modified behavior possible. -HARD mods vs SOFT mods. Hard mods mean hardware was added. Soft mods mean the mod was achieved via some form of software exploit. Soft mods aren't relevant here, but to understand the term HARD MOD it's important to understand the distinction.0 points
-
I'm not really sure what not purchasing from me is supposed to do to me. Considering the fact that I have never sold any of my creations, and have been very public about my desire to never do so. All my work is open sourced under a license that lets *other people* sell it too. So I guess you can spite me by not giving me stars on GitHub or something? That'll absolutely ruin me. As far as "getting rid of competition" isn't it a little hard to have any desire to do so when such a thing doesn't exist? I literally have nothing to gain from anyone using my PSU or not. Frankly I had no reason to even reach out to Andr0 on Reddit. (Which I did publicly and I invite you to read that reply again) I did so because I noticed textbook issues with the PMIC layouts and wanted to make them aware of them, or assist in redoing the PCB should that have been something they were willing to accept. They did not, and to be honest I felt like my concern was just brushed off. And I will admit I got mouthy amongst those feelings, but the fact of the matter is nothing I said was untrue, and if you read up on power layout and design practices you will find that to be the case. PMICs require very specific designs and the recommendations made in datasheets are very literal and concise about what you must do or they won't work correctly. High current power designs can even become dangerous if you don't understand these requirements. I said exactly this and feel like you viewed this as baseless insults. The "meanest" thing I'm going to say, and the meanest thing I did say is I do think the PCB needs redesigned before it can ethically be sold. The issues with it are extremely textbook and completely objective. If you think that is "anticompetitive" to say I'm not really sure how else I can explain how little I care about money or any other motive you're trying to apply to me. And finally to get to how I've been feeling for quite a while now: I have absolutely no desire to design hardware for the Xbox anymore, there were a bunch of things I wanted to do with it still but I don't feel like it would do me any good to keep putting stuff out for it that I spend dozens and hundreds of hours on and slapping such a permissive license on it if the "scene" will continue to just go after it with weird tribalistic territorial rhetoric. I gain nothing from anything I put out and perhaps less than nothing, and I'm just undervaluing myself and my work to give it away to a community that so blatantly disrespects it and my intentions. I truly don't believe this is a community that respects developers, I don't think it understands what it takes to make stuff, and I don't think it cares. It's not a place for someone passionate about making cool stuff and especially not someone passionate about doing it correctly. Don't worry about boycotting my future Xbox work cause there won't be any.0 points


.thumb.jpg.926686e935310eae9234f93588b0e1f4.jpg)


Board Life Status
Board startup date: April 23, 2017 12:45:48