Search the Community
Showing results for tags 'cable'.
-
 When it comes to component to HDMI adapters I've seen a few people say there will be a noticeable loss in quality, however does this apply to modding an hdmi port onto the board and is it even worth it to do it?
 -
I'm getting a shimmer/interference and a line slowly moving vertically on screen, using component cable. What are the thoughts on cause & fix? I read the best visual out for xbox original is component, so I ebayed a component cable, plugged in. (https://www.ebay.com.au/itm/1080p-Component-HD-TV-RCA-AV-Cable-Cord-Lead-For-Original-Xbox/143318317450) I checked TV supports YPbPr. (manual https://assets.kogan.com/files/usermanuals/KALED55UHDUA-A.pdf) I've wiggled the connections, and tried green only - the same shimmer&line. Also the TV says 576i@50hz, I thought component would do 480p? The composite cable it came with works ok, but looking to improve on quality. Thanks
-
Hi everyone, my IDE cable upgrade finally come after faffing about trying to get it to fit I get error 09, swapped back to stock IDE boots perfectly. I've attached a screenshot of the cable I used and people in the reviews say it worked for them but I'm not sure there true as the IDE connectors seam the wrong way round. Thanks all for your advice.
-
 Hey Everyone, I used to have the official xbox component cable, but like a fool didn't understand their value until now. I just recently got back into xbox, purchased a system I'm working on repairing and modding, and I was able to locate a advance high definition AV pack with the component connections. just curious, is the breakout box better than the cable? or about they the same? Thanks! ~John
 -
Need asap mine broke. thanks
-
 Hi everyone! What started out as a "simple fix" for an Xbox I won at SEGE last month has turned into a full passion for getting the most our of it. To that end, I decided to up my game out of the back of the console by going the HDMI route. I invested in the Pound Technologies Xbox HDMI HD Link Cable, and I am thrilled to report that the results are great! I think you'll be pleased with it, especially if you're still connecting to an HDTV through composite. Here's my complete unboxing, setup, and comparison of the original Xbox composite cable and the new HDMI Pound cable. Enjoy, and please share your thoughts on it. Thanks! Blaine I
 -
 So a member of the group was asking for a Dport to dport wire he was asking other members if they had one available because he had one of those LCD screens that go on top of the Xbox and use a proprietary wire that connects from the Xbox to the intec inc screen.. I told him it was easy enough to make that it was just a few wires he could not be bothered. This got me thinking maybe I should make an easy-to-follow schematic for this. I did not do any YouTube searches or Google searches. I clearly went off my HDMI schematic and figured out the rest for myself. There was an image going around that shows the dport but it is backwards it shows the front view so in this image you will see that it's been deciphered so it's easier to follow well soldering. I did make one of these wires and had great success I used all brand new hardware that I purchased a little while ago. It is working great very basic wiring. I'm pretty sure this LCD does not provide video over 480i I think that's pretty much the max resolution I could be wrong on that this wire is designed to Output in 480i or your typical composite video signal. This pinout / schematic can potentially save a lot of money. I have not seen one of those wires alone on eBay it always comes with the screen so if somebody is looking for that wire it could be very costly pretty much what they want to pay for it. Not only that the same schematic can apply to somebody who has an RCA entertainment series Xbox Ready TV which has the proprietary dport input. In order to make this wire you can follow the diagrams exactly. Just make sure you add a few extra feet to the length in between. I know I bought one off Amazon and I think it cost me around 35 with shipping. This wire can be easily made from 2 $5 RCA wires. The schematic itself was made and designed by me maybe that's why it does not look the absolute greatest. I'm more of a Hands-On guy than the computer guy so I apologize but it looks pretty self-explanatory easy-to-follow what you do on one end you want to do on the other end. You should be fine the only concern is the jump wire pin 8 to pin 20... I have found if you only do one of the Xbox connections with this jump that connection has to be the one that's plugged into the Xbox itself. If you hook it up the other way around it will not display. So you can either remember to always plug that one in your Xbox or just make sure you jump both sides on both connectors. In order to not have to worry about that. In any event I hope somebody somewhere can benefit from this schematic took me a couple hours to wire up in a couple hours to make the schematic itself. But if it helps at least one person in the community save money than it was totally worth it 4 wire I just used regular RCA's. I'm guessing if you wanted the best kind of quality on this you can always use Xbox 360 shielded component cable wire since that is a high build grade for sure..for 5.1 audio out just tap into pin #3 ...thank you very much Frank
- 3 replies
-
- 2
-

-
- xboxready tv wire
- xbox ready tv wire
- (and 22 more)
-
It seems recently that the LCD screen mod has gained some renewed interest. The x3 (John7272 posted the pinout for connecting an x3 to the crystalfontz LCD) and xenium ones (with Ryzee119's spi2par2019 board) specifically. The xenium is all good, I already use/build and sell the Spi2Par2019 boards on my site (https://www.chimericsystems.com) but I wasnt willing to solder onto my x3 chip to add the LCD. The problems was that no one had any idea what connector the x3 used, so I set out to find it. Well, after months of ordering all the connectors that looked right (and being wrong lol) I have finally found it: The connector is a standard JST connector (SHDR-20V-S-B, which you can get from digikey for likw 20 cents https://www.digikey.com/products/en?keywords=shdr-20v-s-b) and the pre crimped wires you can get from digikey for 54 cents each (https://www.digikey.com/product-detail/en/jst-sales-america-inc/ASSHSSH28K305/455-3077-ND/6009453) I have 25 of them I will have for sale on my site (https://www.chimericsystems.com) in the next few days for $6 plus shipping.
-
Hey guys, I’m new here, and was inquiring how to purchase the N64 freak external HDMI cable? If someone can guide me in the right direction, I would really appreciate it. Thank you
-
Hi - I ordered a Star Tech IDE to SATA connector and have a spare 500GB SATA drive - will the IDE cable in the xbox work as it is a 500GB drive or will I need to invest in a 80 Pin cable?
-
Hi Does anyone have some current eBay links to suitable cables? I have an 80 way cable but to get it to connect to the bits the cable is twisted all over the place and the orientation seems wrong compared to the original 40 way cable. So links to something that fits tidily and sensible orientation would be great, thanks.... (Global shipping, I'm in UK not USA!)
-
I just got in a pound HDMI cable, and it runs most games just fine. I played Mech Assault and the screen is green. I tried switching back to the composite cables (RWY) and I still have a green screen on Mech Assault. I have went through with the pound and made sure all video settings matched on MS dash and UnleashX dash. Still have a green screen. The Mech Assault I was using was Platinums Hits. I loaded up the original non PH disc and I have no green screen. I would like to use my pound cable, but I have no clue how to get rid of the green screen if it comes on the original disc. Any ideas as to how to resolves the green background? -Rocky5, UnleashX, 1.6 Xbox.
-
Hey do you guys recommend the hdmi pound cable if not what are some good ones
-
Is there any benefit to using a Cat6e crossover cable vs. any other type of crossover cable? I expect that the limiting factor would be the NIC in the Xbox, but I was curious to know if there are any benefits to using newer cabling standards for X-Link and FTP.
-
Wondering if perhaps my DIY 360 component cable tutorial should be moved to the official tutorial section as it has more views than all of the official tutorials combined. I posted it in the hardware mods section originally.
-
 Hi. I ordered a Monster Cable Lightwave 100X Optical Cable from eStarland to connect to the Monster Cable component cable I also purchased for the original Xbox but the dunces sent me just the 10' Monster Cable optical cable and no toslink adapter to connect it to the component cable so I can get 5.1 surround sound with my OGXbox. Is this a standard toslink adapter that is readily available or is it one of Monster Cable's proprietary monsters? In either case, where can I get one? Thanks for any help. ETA: added photo of what the toslink adapter looks like, btw.
 -
hey everyone does anyone know where to find a 80pin ide cable that is the same as the original in terms of shape etc?
-
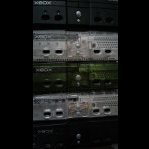
Hi Guys. I received the Hyperkin HDMI cable today that I ordered a few days ago. Unfortunately it didn't perform any better than the Pound cable, in fact I think the Pound cable is better. I have five XBOXs; three v1.0s, one v1.3 and one v1.4. All of my XBOXs have the Conexant video encoder except for the v1.4 which has a Focus video encoder. Of the five systems I have, two of the v1.0s work well with the Pound cable and the Hyperkin cable, (no interference or noise in the signal). But with one of the v1.0s as well as the v1.3 and v1.4 there is noise and interference with both the Pound cable and the Hyperkin cable, although it's worse with the Hyperkin cable. Also, when I called Hyperkin today to discuss this with them and ultimately request a refund, they were quite rude. I had high hopes for this cable but was left very dissapointed. Just wanted to share this with everyone incase you were considering getting one. I wouldn't recommend it.
-
I have a 1.0 xbox that was working perfectly up until the sound output quit. I have tried different cables, different TVs but...nothing. I'm thinking hardware issue...does anybody have suggestions for where on the motherboard I should start looking? Thanks.
-
I'm in the middle of a small project to repair a spares or repair Duke and I'm thinking of converting it over to a USB connection (as one of the problems is a frayed cable) and everything I've read says that I don't need the red wire that's in the original cable. Obviously you couldn't get it to work with USB if you did, but I'm curious as to what it's used for if I don't need it. So far I've seen it called "Video Sync", +12V and VCC, but that doesn't tell me why it's there. Except maybe for "Video Sync", but why would a controller need video sync?
-
Hi Guys. Have any of you tried the Pound HD Link Cable? Here is a link to their site: https://www.poundtechnology.com/xbox-hd-link/ I have watched YouTube reviews from Metal Jesus Rocks and the Immortal John Hancock and they seem to like it. I have heard it has issues with a v1.0 XBOX. Just wondering if you guys have any experience with these cables and if you would recommend them or not. Thanks.
-
best source for 80-wire cable? anyone tried this sort of thing? https://www.ebay.ca/itm/18inch-Ultra-ATA-33-100-133-Dual-IDE-40-Pin-80-Wire-Black-Round-Cable-FI-R18K/280862414714?hash=item4164b4577a:g:jVsAAOSw~OVWznhE
-
Here is a step by step tutorial for making a high quality component cable using an Xbox 360 component cable and a standard original Xbox Composite AV cable that pretty much everyone will have. I was looking for an original Xbox component cable recently and my options were a cheap Chinese non brand component cable, a monster cable or an official HD kit. The latter being crazy expensive nowadays. Since I have a background in electronics I thought why not make one from a 360 cable if a standard AV cable has all the pins present but not wired. I did a quick Google and I am not the first to have done this but thought I'd throw up this step by step for anyone who isn't afraid of some small soldering. You could just splice a 360 component cable onto a Chinese component cable but this way you have a pretty much official cable that is very high quality.. Here goes. Get yourself a 360 component cable and a standard AV cable with the 3 RCA plugs, red, white and yellow. . Cut the head off your original Xbox AV cable. Take a hair dryer to it now to make the plastic sleeve malleable and remove the sleeve from around the socket. Use a screwdriver to help pry it off if needs be. It should come pretty easy but don't be too rough as we want to get it back on at the end. Now loosen off the clasps around the cable by prying them out with a screwdriver and then with a long nose pliers if needed. Again don't go too mad as we will need to squeeze these back on at the end. Now you should be able to remove half this casing. The socket itself with the pins will still be secured inside. Update: before opening the metal casing as per the following instructions and image you can actually remove the pin connector without opening it, you can push the pin connector out. This is the preferred method but I am leaving the previous instructions here. Now take a long nose pliers and carefully separate the remaining casing. Do this carefully and slowly just enough so you can remove the pin housing. The less you bend this the nicer it will look at the end. Take note of the way the two sides lock into each other. The little tabs click in from the top. So grab the side with the tab and pull up. So pull up the right hand side then turn it around and again pull up the right hand side. Patience, remember this has to go back together. Try to open this up less than I have here if you can. Don't worry about the black shield cables soldered on to the casing. We will be removing these anyway. Once you get the pins out if you're lucky you'll just have a piece of black tape over the pins. If you're unlucky you'll have a blob of hot glue over them both sides. Don't despair....you can get this off with some small effort. If you are met with the glue you can again soften it with a hair dryer and get a screwdriver and gouge the majority of it off carefully. I would then get some sticky stuff remover and spray it on and leave it for 5 minutes. Then carefully scrape lengthways down along each pin with the corner of your small flathead screwdriver until it is all gone. Take your time and make sure it's all off. This is the stuff I use for that. Here is the pins that the lucky people will get with the tape. Lovely clean pins straight from the factory. Now take your 360 component cable and cut the head off this just below it's socket and get the sleeve off your original Xbox socket and put it onto your 360 cable. Just keep turning it until it goes on. It's pretty much the exact fit. And a second time...PUT THE SLEEVE ON YOUR 360 CABLE BEFORE YOU START TO SOLDER!!! You do not want that sinking feeling when you've just done lots of tedious work to find you've to de-solder everything because you forgot to put the sleeve on. Now take a sharp knife and about 2 inches back from the end score a ring around the insulation. Take your time and bend it a bit and let the sharp knife do the work. Don't go mad here. You want all of the shields inside to be intact. Again. Patience. You'll be met with a load of cables with a braided shield around them. The cable with the colour is the signal every time and the shield wrapped around it is that signals ground. It is possible you could find two cables, a signal and ground both insulated and not braided shields. Either way it's the same thing and actually easier if you don't have the braided ones because the braids are trickier to solder because they are bigger. You will also have some white fibres up the middle. Cut these off. And an overall screen, the one that's on it's own. Don't cut this off. For each cable push the braid down a bit to loosen it and make a hole as near the base as you can by separating the braid and pull the coloured cable through. Then pull the braid and twist it nice and tight without breaking it. The idea is to get it as thin as you can. When you've separated each signal from it's screen measure it against the length of cable already soldered onto the original Xbox pins and give yourself a bit extra and cut them all. Strip the ends of each signal. Only about 3 or 4mm and be careful not to pull out strands while stripping the insulation. Make sure there are on stray strands by giving the ends a little twist and tin the ends and also tin about a half inch or so of each braided screen. Try keep them tight with no loose strands. To tin put a small bit of solder on your iron and use this to heat up the wire and flow the solder with the transferred heat of the wire, not the iron. This makes the strands basically into a solid cable. Now desolder all on the cables from your original Xbox pins. Also I highly recommend you use Weller solder or similar decent quality solder as it will make life easier than using cheap stuff. Now to the good stuff. I have taken this diagram from an online search and did not create it myself. It is the best diagram out there and credit to the Creator. I will find the name of the guy on YouTube that has done this and credit him. So you have already tinned your cable ends and braided screens. Now you want to go and tin each pin you will be using. Just a tiny bit of solder and heat the pin for a second. Do not stay on the pins with your iron for anything over 2 seconds or you'll melt plastic. Take your time. Everything one by one. When you've tinned all the pins all you need to do for every solder joint is put a tiny bit on your iron and press down gently and the tinned cable will marry into the tinned pin. Do not use extra solder, no need. The tiny bit I suggest for your iron is simply to transfer the heat. Go ahead and tin pins 1, 2, 6, 7, 9, 10, 11, 12, 14, 15, 18, 19, 21 and 22. That is for audio right and left signals and grounds, two jumpers for the mode and red, green and blue signal and grounds. To note the connector I've used here is one that was covered in hot glue so it looks a bit bashed up but is electrically sound. Audio right - red to pin 1 and it's ground to pin 2. Also make 2 small jumper wires and tin them as previously. Solder these as shown to pins 6 and 7. Bend the jumper wires around to the other side and solder pin 6 jumper to pin 18 and pin 7 jumper to pin 19. Ignore that strand to the right, that is the overall screen and it's not soldered to a pin, just a bad picture. Blue signal to 9 and it's ground to 10. Green signal to 11 and it's ground to 12. Audio left - white signal to 14 and it's ground to 15. Be careful that you don't mix up the pink with the white, they look very very similar. Last but not least the pink signal wire to 22 and it's ground to 21. Careful with this one. All the rest were 'signal, ground' and this one is 'ground, signal'. Tape up the yellow cable. Nice to have a spare socket at the end of your cable so you can fix this in years to come if one of the rca plugs every gets broken you can solder the yellow up instead. Take the yellows ground and twist the thin overall ground wire around it. Bend it as shown and then tin them together with some solder. We will use this to ground the metal housing on the plug. Scratch up this part on the plug housing with a screwdriver. Now turn your iron up a touch if needed and flow solder onto the part you just scratched up. Solder the screen from the yellow that we tinned together with the overall screen to this part of the case. Cut a strip of electrical tape. The width of standard electrical tape is perfect to cover the pins. I recommend you do this instead of hot glue to insulate the pins. At this point plug it in to your OGXbox and see does it all look good. (Troubleshooting tips at the bottom of this post if it doesn't look quite right) Put this guy back into the other part on the plugs housing and carefully crimp back on the cable grips after around the outer insulation. If you were careful taking apart your plug top earlier you will be happy right about now. If you weren't don't worry, just get a long nose pliers and carefully form it all back together. Remember these tabs click in from the top. They won't sit right if you try click them in from the under side so you'll have to do a touch of light convincing with a long nose pliers again. Be careful of the pins inside now. Don't want to break it now after all of that. Don't lose the cool once they are almost snug you can put a bit of pressure on the tabs with a screwdriver to secure the housing. Once it is fairly solid slide your sleeve back down to cover it up. Now what you have is a top quality fully Microsoft component cable for your OGXbox. In my opinion it's better quality by a mile than the old HD kit and and the monster cable. It's also two fingers up to the cretins that want 70 quid for a cable. You'll get a brand new 360 component cable for around the price of one of those horrendous terribly shielded Chinese component cables and everyone has an AV composite 3 plug standard cable lying around. Also the 360 cable is about 2 metres long. Hope this is of some use to someone. I originally threw a few of them pictures up on the Facebook group but thought I'd post it up here as a reference for anyone who is interested. TROUBLESHOOTING: When you have finished soldering all of the pins do a continuity test with your multi-meter between each pin that are next to each other, You may have one strand from the shield bridging the pin next to it. If this is the case you can try run a sharp knife between the pins to separate any stray strands. A quick multi-meter test is to test between each tip of each RCA plug to the pin you soldered for that signal on the plug. Also check the tip of each against ground (outer ring or barrel the of RCA) make sure there is nothing bridged out. Note that all ground will be connected together. If you plug it in to your OGXbox and it doesn't look right, go back and check each cable you soldered against the diagram again and if needs be reflow any dodgy joints. If you plug it in to your OGXbox and you are missing a colour again go back and check your wiring/soldering. The colours are RGB (Red = Pink cable, Green = Green cable, Blue = Blue cable) For example if you see only Greens and Blues when you load up a game the issue is with your Red colour (Pink cable) and you may have mixed up the ground and signal. The same is true for any colour you seem to be missing. Also do a test of the Audio Right and Left by plugging one out at a time and see do you still have sound. Any issues, the fix will be as above, re-check your wiring against the diagram and re-flow if necessary. Try the cable with a game you know well so you know how it should look colour wise. If it all looks and sounds good close it all back up and enjoy!! Note also that there is a perfectly good optical audio pcb inside the Xbox 360 head, maybe someone could have a go getting that usable. You can also connect the yellow to pin 24 and it's ground to 23 instead of connecting ground to the overall screen and leaving yellow spare. I rather keep it as a spare, means your cable will last long into the future and I don't ever plan on using it as a regular yellow, red and white composite.
- 94 replies
-
- 16
-
-


.thumb.png.9f1172f8f3c96f292594247a50c4c1f3.png)


Board Life Status
Board startup date: April 23, 2017 12:45:48