Search the Community
Showing results for tags 'video'.
-
Dvd drive power cord got shorted out now the xbox turns on and off twice then stays on with no video. No visible damage to mother board could I have wiped the tsop by shorting out the cable? Tryed swapping power supply from working xbox samething
-
Hello new to the Xbox modding scene I picked up a hard modded xbox and everything works great except for sound and I can’t figure out why... I have tried different cables and different tv’s still no luck Don’t know to much about chips and what it has to be honest I’m still learning lol
-
So today I got my composite with toslink cable and hooked it up to the TV . My dashboard works fine but when I insert a xbox game the screen is jumbled badly. Is there something I can do here ? Im assuming the cable is fine . It shows up as HD A V pack . I only had the standard A V pack before and am looking forward to seeing an improvement. Hardmod 1.6 Thanks Ryan
-
https://www.youtube.com/watch?v=v62zNt891bM&t=177s This is 10 years old. Wanting to get back in to it.
-
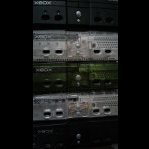
Heyyy Soo I finally got some xboxes succesfully tsoped etc. So Im finally actually playing games!!! BUT, I see realy differences in the quality of the games..... Like there are some stripes trough the screen of the game ( sorry for bad explanation). Just see it for yourself: (first picture is GOOD Need for speed underground 1, Second picture is BAD need for speed underground 2) Does any1 know what causes this ugly stripes??? some games have it , some emulators have it and some don't.
-
Hello, fellow OGers! That thermal compound from the factory is failing in our beloved consoles. It can lead to rising temps and possible chip failure. It's s pretty straightforward process to replace it, and I've put together a tutorial video to help you out if you haven't done it yet. Enjoy, and please share any comments you have. Thanks!
-
I have a xbox. I softmodded then removed softmod. All went well. Softmodded with unleashx and later removed. All was fine. Then yesterday went to softmod with sid. In middle of process or at end xbox shuts down like normal. Then turned back on and now red/green flashing ring and video is not working. Any ideas? I have tried letting the clock reset but made a sure not to leave the console off more than about 5 to 10 minutes. I have left it on all night trying to find a solution. I am worried if I unplug it or power it off much longer it may turn into a brick. Any ideas? I loaded and backed up everything correctly. I have 2 video cables and checked that as well and no dice any help would be appreciated. The video im sure went out with the new softmod install. Not sure why. Any help would be appreciated. Id rather fix than throw it at the wall lol.
-
Hi everyone! I TSOP flashed my Original XBOX 1.0 and everything went great. I put together a video about it to share my experience and help you out with it if it's something you want to do to your XBOX 1.0 or 1.1. Enjoy!
-
 Any suggestions as to why this is the case? the path i'm using is on partition F, could that be an issue? Thanks in advance.
 -
Hey, everyone, I was hoping some of you might have an idea of what might be wrong. I'll start off with it's a tsoped xbox running unleash X and has been running strong for the past year or so since I did that mod. Recently I took it out and decided I wanted to play it again and it booted up just fine did it's normal stuff the dashboard loaded and then after playing one game went to a black screen. Since then the system will not output a signal at all. No error lights are displayed on the front of the console and I've tried booting with and without a disc. The hard drive sounds like it spins up and tries to access just fine. So I'm not quite sure what could have gone wrong for it to not output a video signal? Any help or ideas would be greatly appreciated.
-
Hi. I lost ability to use component cable in my one project xbox. It worked fine at first but now it only shows black at my screen. It only works now with composite cable. I have two component cables and they are fine, I tested them with my other xbox. Is there a possibility that some component in the motherboard is damaged or should I look problem at software side? I'm running unleashX with aladdin modchip on a 1.6 revision xbox.
-
Hey guys if anyone would like to Archive video game console modding files and games and such please pm me if you want to join the team cause im looking for new members to help not lose all of the video game data please only contact me if you are really serious about working on the project thanks.
-
I'm new to the xbox modding scene. Is there a way to play video previews of my games on the default skin for Unleashx. I've been able to play them on other skins like BlueShapes - by Kthulu, but not the default skin
-
PROBLEM SOLVED check the thread for the answer. Hello, an unusual problem shown up. After ram installation, Xbox started to frag, decided to resolder every leg. After this, system does nothing when the Power Button is clicked. Tried with another power supply, same result. Removed the ram chips, cleared the joints, same thing. It only tries to boot, the led on the Ethernet port blinks once - then nothing else. - Xbox Motherboard 1.2 - TSOP-ed with ind bios 5003 - Ethernet port led blinks once (the front panel leds are not active at all) - RAM chips look to be counterfeit because they have SAMAUNG on it, not SAMSUNG (but after their removal, the problem is still here) Can somebody point on where I should dig, please?
-
A decent amount of research, recording, money, and fun went into making this video! Haven't done one in this style before, but it seems to be getting an overwhelmingly positive reception. It might not be perfect, but I figured it would be fitting to post here. Enjoy~
-
Hi everyone, I recently dug out my barely ever used original Xbox. I've bought it brand new in 2002 and used it for about few weeks. Anyways, I was able to successfully softmod it (using Krayzie softmod via Hexen disc). Everything works great! It plays copies of my games from HDD etc. but I have one huge issue, namely the video cuts out randomly for about a second and comes back. I've tried multiple cables, 2 component cables, regular AV cable which I've had for it as well as just bought Xbox HDMI link cable. All of them do that. Basically, no matter which game do I play, the screen randomly flickers black for about a second and comes back. I live in the UK so I used PAL to NTSC switcher to be able to play games in 480p as PAL is 480i only in pretty much 95% of the titles. In the beginning I thought that maybe it is the issue with the PAL to NTSC switcher, but even when I revert it (games are then playing in 480i) it still happens. I'm seriously lost and don't have a clue why is this happening. I can live with it, but you can imagine how annoying it is at the end. Is there anyone who experienced a similar issue and knows how to resolve it? PS. Funny thing is, that while I wasn't able to find a similar issue on that matter about the original XBOX while googling it, I noticed that people have had similar problems with X360 and Xbox One. Thank you in advance for help people.
-
I was wondering if anyone has had any luck mixing a debug bios with a Focus based motherboard. I tried recently doing a retail to debug xbox conversion and the unit that I tried it on has the Focus video encoder and I ran into video issues as soon as I used PBL to switch to a debug bios. I have tried with both the complex 4627 BFM and also with the 5388 stock one that comes with the dev files and they produced the same result, scrambled video.. I have tried this with an xbox that has the Conexant video encoder and it seems to work though unfortunately due to some screw ups with some DVD drive testing, I have fried the DVD control/power from the PIC meaning I have to power the drive from another xbox for it to work (leave it for another topic as to what I was doing). Anyways , I was wondering if anyone knows of any workarounds for getting the debug bios to work on the Focus video encoder. I have a feeling since there arent any since all debug units to my knowledge had the Conexant video encoder, but nonetheless worth a try. Thanks
-
Sorry if this is a total noob question but I couldn't find any info when I searched, Looking through various HDMI mods and converter threads I see peoples video options on the MS dash having settings for 480p, 720p and 1080i but when I look in my video options they aren't there. I only have Screen size - Normal, Widescreen etc. and PAL 60 on/off. I assumed this was because I had to connect to my TV via a Scart cable as that's all I have on both my consoles. I've just received a Pound HD-Link cable and hooked it up but I still don't have these options available. I've looked on both my TSOP'd 1.3 and my currently stock 1.6 and neither of them seem to have these options. Changing the options in the system of the TSOP kit doesn't seem to make any difference either. Am I just being blind and missing something obvious;?
-
I wasn't sure whether to post this here or in repair, but since it happened during a TSOP mod I though I'd try here first. Picked up a 1.4 version at a Salvation Army today, green model worked great but filthy inside. Cleaned it up, removed clock capacitor and did the two TSOP points. Reassembled and before I even load into Hexen my video signal has lines going across the screen. After messing around I find that the problem is only with component output (hd output) and standard def av works fine. Thing is, component worked fine before I disassembled so I'm convinced the problem must have been caused by something I did - but all I did was pull the clock cap and do the 2 tsop points... Tried another component cable.. same result. Tried another tv, got a glitched looking display or 'mode not supported'. I'm convinced it's now outputting some garbled attempt at an hd signal that neither of my tvs can process correctly. Have 2 other xboxes and both display hd perfect with the same cables and tvs. I guess I can just sell it with some standard cables but losing the hd kinda kills the awesomeness so I'd really like to fix this if possible. This is like the second weird obscure xbox mystery for me in like a week, sheesh:)
-
Hi Guys. I recently picked up a Halo Edition Original Xbox that has not been modded. It is completely stock. It powers on and has a solid green light around the eject button, however the drive will not eject and it does not output video or audio. I have tried both component cables as well as composite cables that work with another Xbox. I have also searched the web for help but have not come up with anything. Do you guys have any ideas as to what could be wrong? Could I possibly have bad video and audio output chips? Thank you in advance for any help or suggestions you might have.
-
I am using the xbox classic skin for XBMC 3.5.1 Does anyone have a XMV of Shadow Ops Red Mercury? Seems to be missing from all of the download packs. Thanks
-
Cool video about xbox development, i wonder what your thoughts are, and has anyone got more of this content to share? I'm curious about what PC ports exist and what may have been possible Just read through RandySlims post here, he has a good list of games... nice to run into 'digthatbox' again... its outside of my oxbox TUNNELVISION so i guess i forgot about it
-
Here is a step by step tutorial for making a high quality component cable using an Xbox 360 component cable and a standard original Xbox Composite AV cable that pretty much everyone will have. I was looking for an original Xbox component cable recently and my options were a cheap Chinese non brand component cable, a monster cable or an official HD kit. The latter being crazy expensive nowadays. Since I have a background in electronics I thought why not make one from a 360 cable if a standard AV cable has all the pins present but not wired. I did a quick Google and I am not the first to have done this but thought I'd throw up this step by step for anyone who isn't afraid of some small soldering. You could just splice a 360 component cable onto a Chinese component cable but this way you have a pretty much official cable that is very high quality.. Here goes. Get yourself a 360 component cable and a standard AV cable with the 3 RCA plugs, red, white and yellow. . Cut the head off your original Xbox AV cable. Take a hair dryer to it now to make the plastic sleeve malleable and remove the sleeve from around the socket. Use a screwdriver to help pry it off if needs be. It should come pretty easy but don't be too rough as we want to get it back on at the end. Now loosen off the clasps around the cable by prying them out with a screwdriver and then with a long nose pliers if needed. Again don't go too mad as we will need to squeeze these back on at the end. Now you should be able to remove half this casing. The socket itself with the pins will still be secured inside. Update: before opening the metal casing as per the following instructions and image you can actually remove the pin connector without opening it, you can push the pin connector out. This is the preferred method but I am leaving the previous instructions here. Now take a long nose pliers and carefully separate the remaining casing. Do this carefully and slowly just enough so you can remove the pin housing. The less you bend this the nicer it will look at the end. Take note of the way the two sides lock into each other. The little tabs click in from the top. So grab the side with the tab and pull up. So pull up the right hand side then turn it around and again pull up the right hand side. Patience, remember this has to go back together. Try to open this up less than I have here if you can. Don't worry about the black shield cables soldered on to the casing. We will be removing these anyway. Once you get the pins out if you're lucky you'll just have a piece of black tape over the pins. If you're unlucky you'll have a blob of hot glue over them both sides. Don't despair....you can get this off with some small effort. If you are met with the glue you can again soften it with a hair dryer and get a screwdriver and gouge the majority of it off carefully. I would then get some sticky stuff remover and spray it on and leave it for 5 minutes. Then carefully scrape lengthways down along each pin with the corner of your small flathead screwdriver until it is all gone. Take your time and make sure it's all off. This is the stuff I use for that. Here is the pins that the lucky people will get with the tape. Lovely clean pins straight from the factory. Now take your 360 component cable and cut the head off this just below it's socket and get the sleeve off your original Xbox socket and put it onto your 360 cable. Just keep turning it until it goes on. It's pretty much the exact fit. And a second time...PUT THE SLEEVE ON YOUR 360 CABLE BEFORE YOU START TO SOLDER!!! You do not want that sinking feeling when you've just done lots of tedious work to find you've to de-solder everything because you forgot to put the sleeve on. Now take a sharp knife and about 2 inches back from the end score a ring around the insulation. Take your time and bend it a bit and let the sharp knife do the work. Don't go mad here. You want all of the shields inside to be intact. Again. Patience. You'll be met with a load of cables with a braided shield around them. The cable with the colour is the signal every time and the shield wrapped around it is that signals ground. It is possible you could find two cables, a signal and ground both insulated and not braided shields. Either way it's the same thing and actually easier if you don't have the braided ones because the braids are trickier to solder because they are bigger. You will also have some white fibres up the middle. Cut these off. And an overall screen, the one that's on it's own. Don't cut this off. For each cable push the braid down a bit to loosen it and make a hole as near the base as you can by separating the braid and pull the coloured cable through. Then pull the braid and twist it nice and tight without breaking it. The idea is to get it as thin as you can. When you've separated each signal from it's screen measure it against the length of cable already soldered onto the original Xbox pins and give yourself a bit extra and cut them all. Strip the ends of each signal. Only about 3 or 4mm and be careful not to pull out strands while stripping the insulation. Make sure there are on stray strands by giving the ends a little twist and tin the ends and also tin about a half inch or so of each braided screen. Try keep them tight with no loose strands. To tin put a small bit of solder on your iron and use this to heat up the wire and flow the solder with the transferred heat of the wire, not the iron. This makes the strands basically into a solid cable. Now desolder all on the cables from your original Xbox pins. Also I highly recommend you use Weller solder or similar decent quality solder as it will make life easier than using cheap stuff. Now to the good stuff. I have taken this diagram from an online search and did not create it myself. It is the best diagram out there and credit to the Creator. I will find the name of the guy on YouTube that has done this and credit him. So you have already tinned your cable ends and braided screens. Now you want to go and tin each pin you will be using. Just a tiny bit of solder and heat the pin for a second. Do not stay on the pins with your iron for anything over 2 seconds or you'll melt plastic. Take your time. Everything one by one. When you've tinned all the pins all you need to do for every solder joint is put a tiny bit on your iron and press down gently and the tinned cable will marry into the tinned pin. Do not use extra solder, no need. The tiny bit I suggest for your iron is simply to transfer the heat. Go ahead and tin pins 1, 2, 6, 7, 9, 10, 11, 12, 14, 15, 18, 19, 21 and 22. That is for audio right and left signals and grounds, two jumpers for the mode and red, green and blue signal and grounds. To note the connector I've used here is one that was covered in hot glue so it looks a bit bashed up but is electrically sound. Audio right - red to pin 1 and it's ground to pin 2. Also make 2 small jumper wires and tin them as previously. Solder these as shown to pins 6 and 7. Bend the jumper wires around to the other side and solder pin 6 jumper to pin 18 and pin 7 jumper to pin 19. Ignore that strand to the right, that is the overall screen and it's not soldered to a pin, just a bad picture. Blue signal to 9 and it's ground to 10. Green signal to 11 and it's ground to 12. Audio left - white signal to 14 and it's ground to 15. Be careful that you don't mix up the pink with the white, they look very very similar. Last but not least the pink signal wire to 22 and it's ground to 21. Careful with this one. All the rest were 'signal, ground' and this one is 'ground, signal'. Tape up the yellow cable. Nice to have a spare socket at the end of your cable so you can fix this in years to come if one of the rca plugs every gets broken you can solder the yellow up instead. Take the yellows ground and twist the thin overall ground wire around it. Bend it as shown and then tin them together with some solder. We will use this to ground the metal housing on the plug. Scratch up this part on the plug housing with a screwdriver. Now turn your iron up a touch if needed and flow solder onto the part you just scratched up. Solder the screen from the yellow that we tinned together with the overall screen to this part of the case. Cut a strip of electrical tape. The width of standard electrical tape is perfect to cover the pins. I recommend you do this instead of hot glue to insulate the pins. At this point plug it in to your OGXbox and see does it all look good. (Troubleshooting tips at the bottom of this post if it doesn't look quite right) Put this guy back into the other part on the plugs housing and carefully crimp back on the cable grips after around the outer insulation. If you were careful taking apart your plug top earlier you will be happy right about now. If you weren't don't worry, just get a long nose pliers and carefully form it all back together. Remember these tabs click in from the top. They won't sit right if you try click them in from the under side so you'll have to do a touch of light convincing with a long nose pliers again. Be careful of the pins inside now. Don't want to break it now after all of that. Don't lose the cool once they are almost snug you can put a bit of pressure on the tabs with a screwdriver to secure the housing. Once it is fairly solid slide your sleeve back down to cover it up. Now what you have is a top quality fully Microsoft component cable for your OGXbox. In my opinion it's better quality by a mile than the old HD kit and and the monster cable. It's also two fingers up to the cretins that want 70 quid for a cable. You'll get a brand new 360 component cable for around the price of one of those horrendous terribly shielded Chinese component cables and everyone has an AV composite 3 plug standard cable lying around. Also the 360 cable is about 2 metres long. Hope this is of some use to someone. I originally threw a few of them pictures up on the Facebook group but thought I'd post it up here as a reference for anyone who is interested. TROUBLESHOOTING: When you have finished soldering all of the pins do a continuity test with your multi-meter between each pin that are next to each other, You may have one strand from the shield bridging the pin next to it. If this is the case you can try run a sharp knife between the pins to separate any stray strands. A quick multi-meter test is to test between each tip of each RCA plug to the pin you soldered for that signal on the plug. Also check the tip of each against ground (outer ring or barrel the of RCA) make sure there is nothing bridged out. Note that all ground will be connected together. If you plug it in to your OGXbox and it doesn't look right, go back and check each cable you soldered against the diagram again and if needs be reflow any dodgy joints. If you plug it in to your OGXbox and you are missing a colour again go back and check your wiring/soldering. The colours are RGB (Red = Pink cable, Green = Green cable, Blue = Blue cable) For example if you see only Greens and Blues when you load up a game the issue is with your Red colour (Pink cable) and you may have mixed up the ground and signal. The same is true for any colour you seem to be missing. Also do a test of the Audio Right and Left by plugging one out at a time and see do you still have sound. Any issues, the fix will be as above, re-check your wiring against the diagram and re-flow if necessary. Try the cable with a game you know well so you know how it should look colour wise. If it all looks and sounds good close it all back up and enjoy!! Note also that there is a perfectly good optical audio pcb inside the Xbox 360 head, maybe someone could have a go getting that usable. You can also connect the yellow to pin 24 and it's ground to 23 instead of connecting ground to the overall screen and leaving yellow spare. I rather keep it as a spare, means your cable will last long into the future and I don't ever plan on using it as a regular yellow, red and white composite.
- 94 replies
-
- 16
-

-

-
i have a bunch of old videos on my xbox i want on my computer, but i don't know how to do it.. do i have to record it through a capture card or is it possible to take the hard-drive out and get the videos
-
I'm interested to know once the original Xbox is modded what can can the king of emulation play?for movies what kind of movie formats can she play? For example MP4 Avi Etc. Also would be nice to know what kind of music and picture files will work with the original Xbox for example MP3? Wave? Jpeg? Either a list or a link would be great. I got a lot of cool stuff that can go on the Xbox and we all know how FTP speeds are..lol Thanks Frank


.thumb.png.9f1172f8f3c96f292594247a50c4c1f3.png)


Board Life Status
Board startup date: April 23, 2017 12:45:48