
.png.7b5607b4d83b4bbbaebe3f8317b847f5.png)
Bowlsnapper
-
Posts
4,838 -
Joined
-
Last visited
-
Days Won
147
Posts posted by Bowlsnapper
-
-
This is so unbelievably sick. REALLY nice work.
-
 1
1
-
-
3 hours ago, nikeymikey said:
I've been considering going down the make my own cable route. I want a short one. I have @NeMesiS Dual fan caddy and that relocates the HDD to the left hand side of he console. Obviously no DVD drive either so only need a short cable with the connector at both ends and that's it. Cannot find anything like it anywhere.
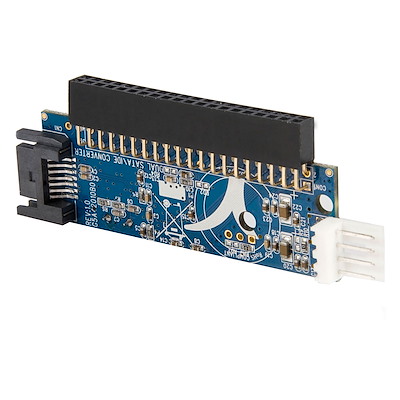
There's also this thing. I could've sworn I've seen people use it before. No IDE cable whatsoever.
") That would be a good candidate for the Nemesis Dual Fan Kit.
That would be a good candidate for the Nemesis Dual Fan Kit.
https://www.startech.com/en-co/hdd/ide2sat25?srsltid=AfmBOopWd9DLTktm0UrvFIDlnlfEX9iQ_GocpmIGZnO26s6itMNyAUTWHGk
-
On 7/22/2024 at 11:07 PM, properauthority said:
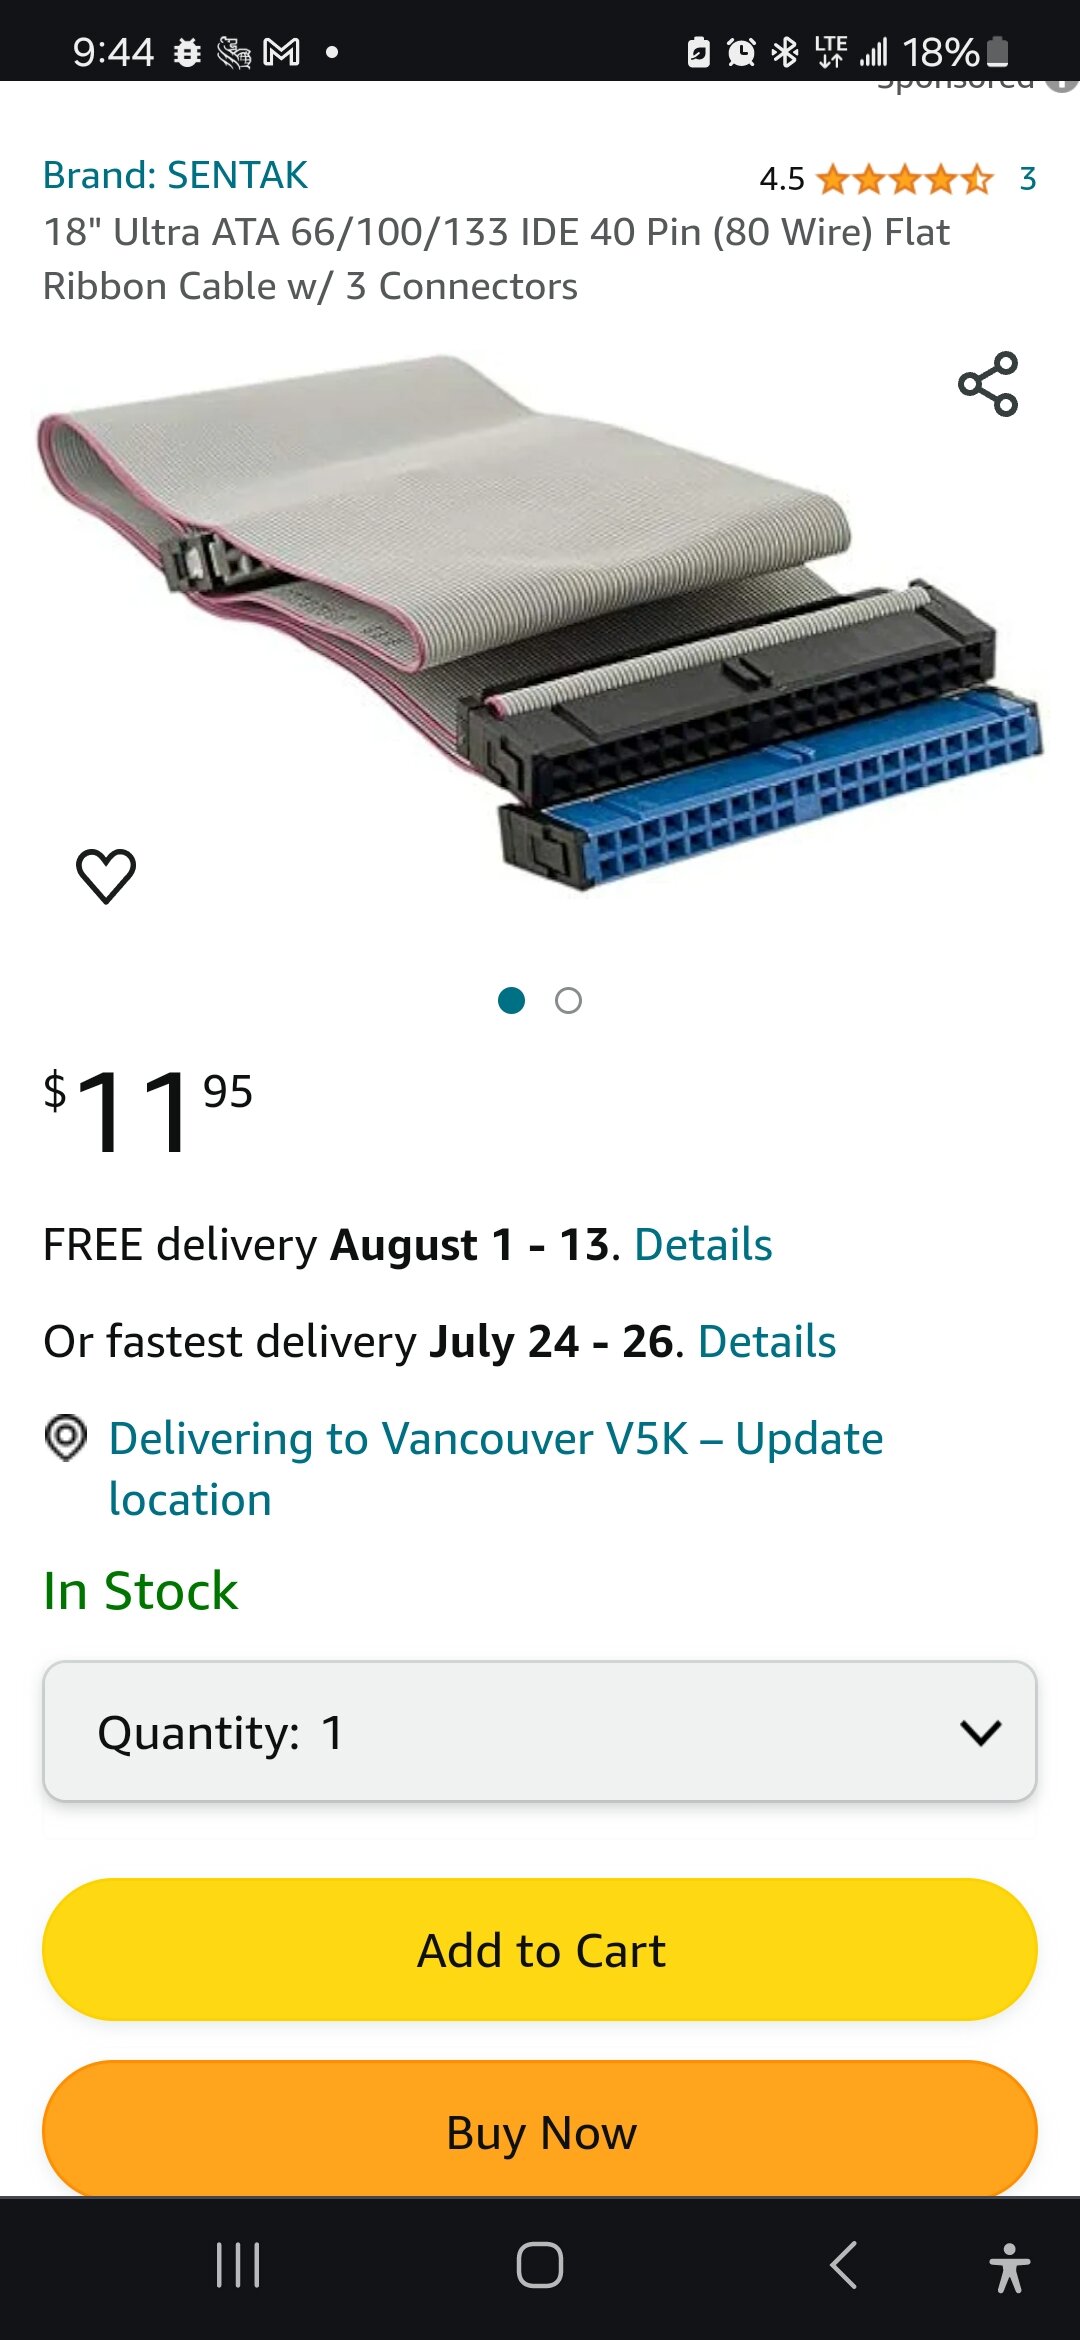
Will this IDE ribbon work as a replacement for the Original Xbox? Is the length, 18" long enough for both optical and hard disk drives to be connected?
Listing link here: https://a.co/d/4RtKmg0 "18" Ultra ATA 66/100/133 IDE 40 Pin (80 Wire) Flat Ribbon Cable w/ 3 Connectors"
Also, keep in mind that if it is a normal IDE cable not designed for the Xbox, its connectors will be backwards and mirrored, which means you will have to do a lot of folding. and it will be messy looking. If you are able to order from the links I provided above, they should be a direct drop in.
@properauthority Didn't know you were in Canada. I thought there may be a reason why you were trying so hard to locate a seller.
-
1 hour ago, Zagman said:
I'm the OG owner. I must have over tightened the Xapt3r when installing it. And I'm sure I just threw the thing in box without regard for instructions. I wanted to play games man! Since it was along time ago installing this thing, I do remember there was an issue where the X3 would not boot and I would have to go in the box and push down on the top of the X3 to get the spring loaded pins to contact. It eventually just worked. But I had to keep the top cover always unscrewed to get access. I don't remember there being those bushings on the Xapt3r. Anyway I'm glad it's removed and I'm hopeful I didn't do any damage getting those bushings out and soldering the new pin header. Thanks for everyone's interest and comments. Thanks again to Fox for the gear.
I'm glad you got yourself soldered and are doing an X3 hardmod 100 percent!
Rock on.
-
1
-
-
1 hour ago, phrunt said:
Thank you so much, that will get me going. Perfect flashing with cerbios, that in my opinion is the only bios ever required again too. I've found a PDF inside a few older TSOP methods showing which points to solder, but if there is a more recent link to a better one I'd be happy to have it.
@OGXbox Admin Posted this guide several years back, showing what points to solder. Once you do, the flashing options will be your only concern. Other than that, there is really no need for an updated guide. It's thankfully relatively simple.
-
 1
1
-
-
8 hours ago, phrunt said:
Does anyone still have a copy of this? I'm planning to do my first ever TSOP flash and figured it would make it a whole lot easier.
Thanks in advance.
There are a couple options. The first is a roundabout way of doing it and requires utilizing a game save exploit, whereas the Endgame exploit only requires you to be running the MS Dash at that moment. Both accomplish the same end. You know how to TSOP your console and have found a worthy and helpful guide?
-
1
-
-
2 hours ago, Zagman said:
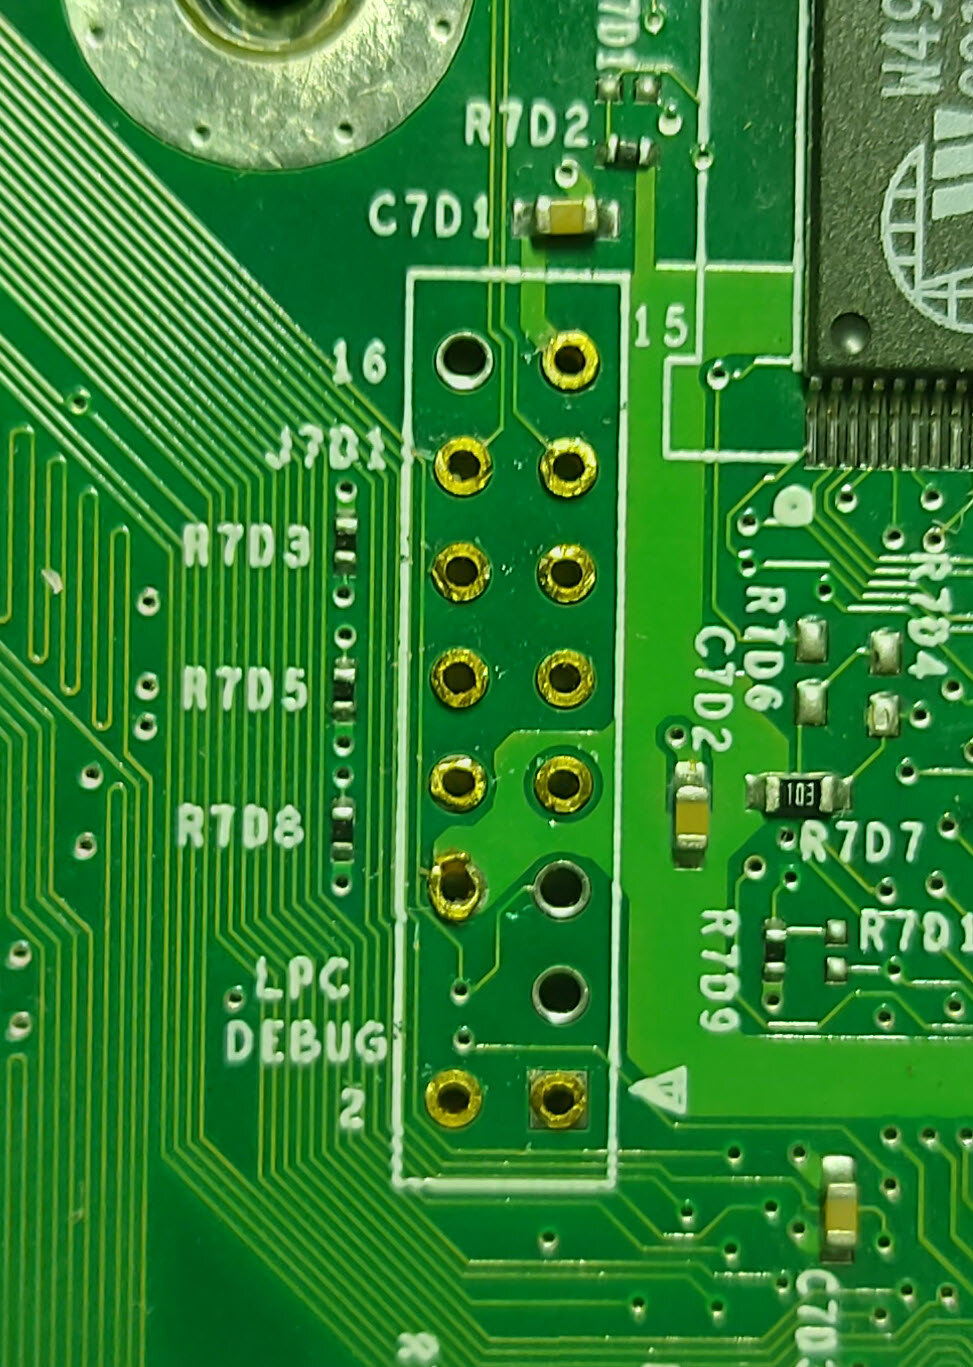
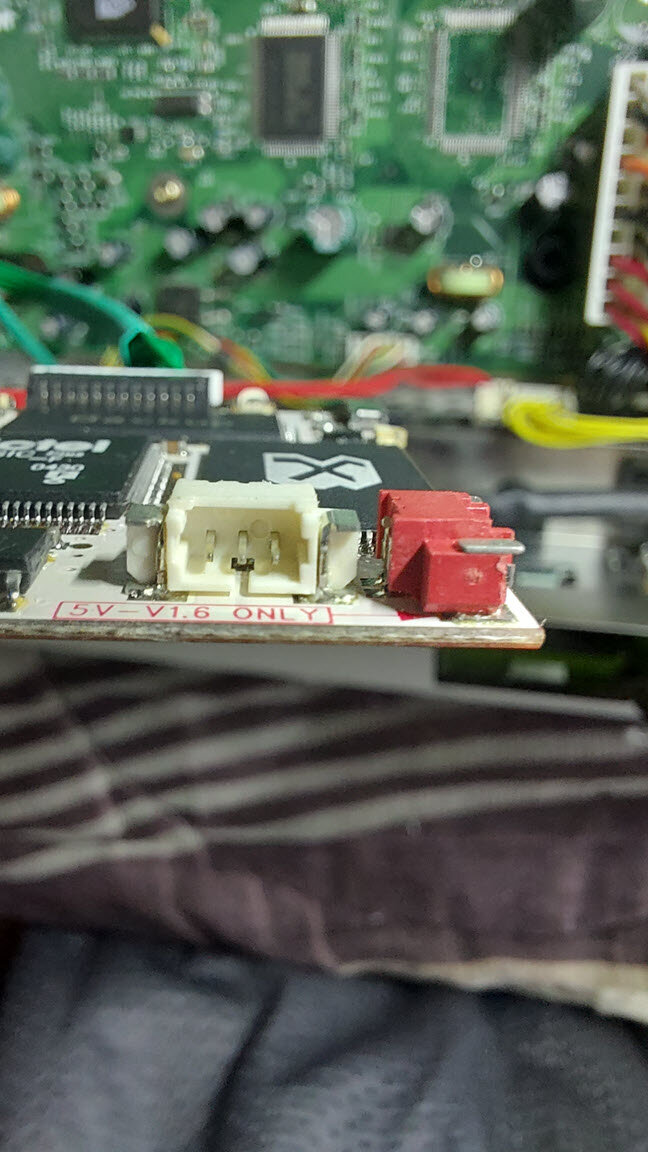
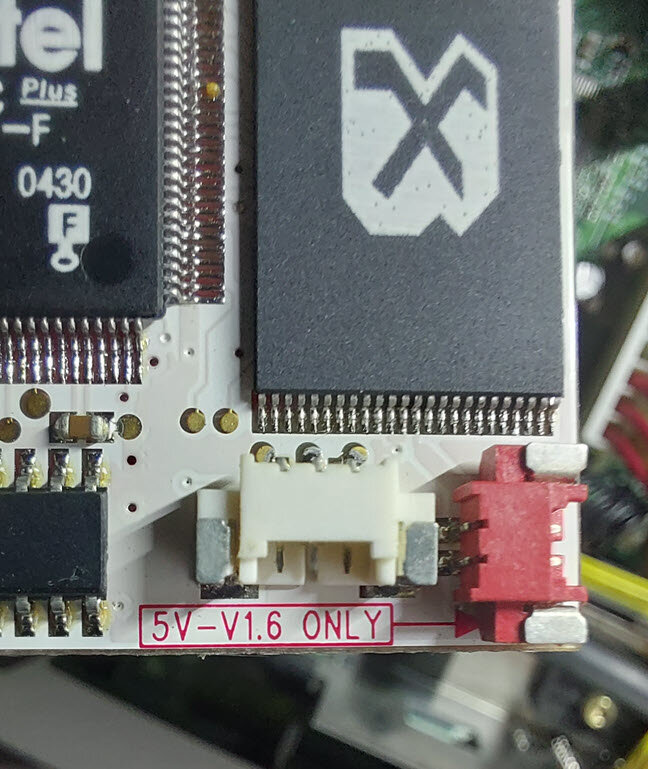
Hi All, I want to replace the Xraptr solderless adapter for the X3 on my 1.4 board. The pin header I bought for the swap was this -> https://www.amazon.com/dp/B00X77A472?psc=1.
The pin headers I bought won't go through the LPC port through holes. The holes seem unusually tight. Or did the Xraptr bork the holes being attached for almost 20 years?
The pins are the same thickness as the pin header I received with an Open Xenium chip install I bought recently for another Xbox I own. That board was a 1.6 with LPC rebuild.
See the pic of the 1.4 board LPC port and let me know if this looks unusual.
Thanks for the advice,
Zagman
What the HELL? It looks like the Xapter inserted some kind of sleeves to your LPC holes. Those are not normal. The spots you see open are what they are supposed to look like.
-
10 hours ago, AndyB said:
Hello there,
I have an old OGXbox rev 1.0 with a homemade modchip with an executer bios (don't know which version as of yet) and the EvolutionX dashboard on a 120GB PATA HDD. I'm gonna put in a new SSD instead, and reinstall everything and possibly flash another custom bios.
My question is, which installation disc is most recommended to use? I have HeXen 2018, TruHeXen 2021/2024, OGXbox 1.5.4, 1.9.3, 2.3.2, SlaYers 3.5 etc...
And which custom bios is recommended to use?
Best regards
OGXbox Installer and Cerbios 2.4.1.
-
1
-
-
14 minutes ago, Zagman said:
Here's the Ebay link https://www.ebay.com/itm/195004564574
Hell, it's only a few bucks. Try it!
Worse comes to worse, you could get one female and one male with wires, solder one end onto the contacts on the chip and then solder the other fitting to all the solder points you need, then just plugging the two together.
-
36 minutes ago, Zagman said:
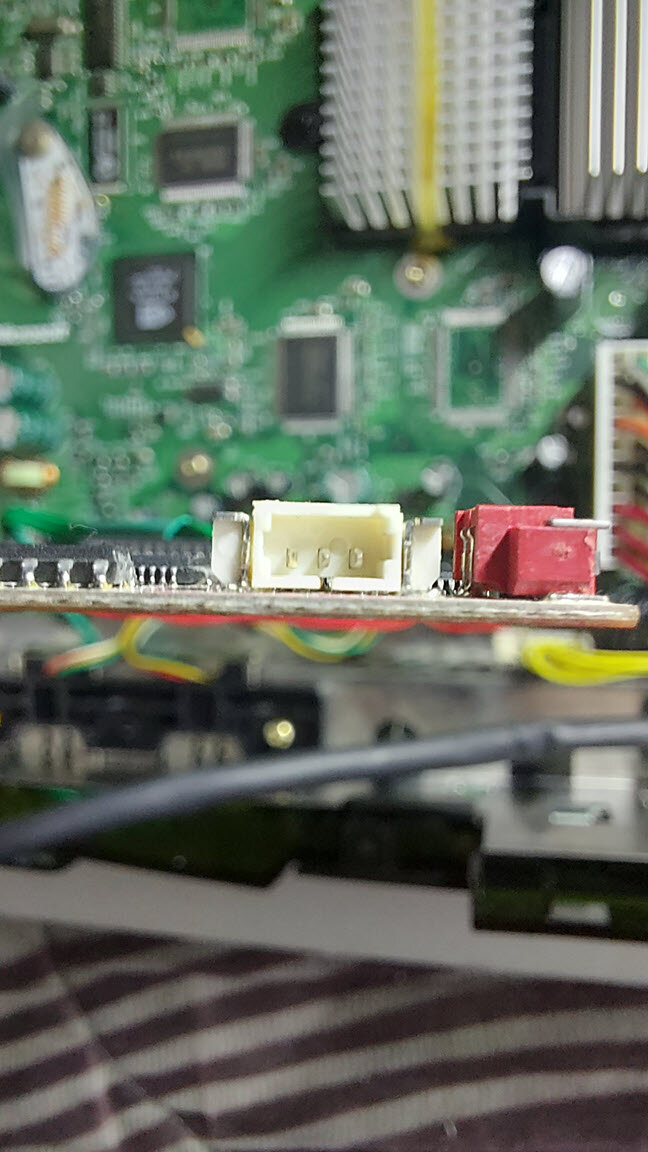
Hi All, I have an Xecuter 3 CE with the Xraptr solderless adapter. I want to replace the adapter with a real pin header. Doing so will require to add the 3 pin connector for the modchip with wires for the D0, HDD and LAN led's to be soldered to the MB. I bought this gear almost 20 years ago, and do not have that connector with wires for the 3 points. Did they (team xecuter) use a proprietary jack for the 3 pin wire connector? I looked on Ebay for a 3 pin 1mm jack with foot long cables and found one that should work. But if the X3 jack is keyed a certain way it won't fit. Any advise or suggestions will be helpful....Zagman
Link to the Ebay one.
-
Sorry, I had no idea what you were asking at the time. Why is LFRAME me necessary, even on non-1.6 consoles?
-
9 minutes ago, hussen said:
no , I watch a video and one of the steps required to download this
Which video? What are you trying to do?
-
3 minutes ago, hussen said:
now download not working
Yes, the member pulled his links late last year. The download no longer exists and does not work. Why do you need Evox? Does Cerbios not meet your needs?
-
6 minutes ago, nikeymikey said:
That eBay link only works for the US by the looks of things.....
Good point. I failed to catch the ".ca" in his Amazon link.
-
1
-
-
2 hours ago, QVannatter said:
The following is a guide for 2024 to format a new HDD without a mod chip for the Xbox Original. This assumes that the original hard drive is gone and extracting the eeprom is required. This was a pain for myself so I'm documenting what worked for me.
Hardware required:
40-Pin 80-Wire Ultra ATA 2-Drive Ribbon Cable - https://www.amazon.ca/gp/product/B003IDF0JC/ref=ppx_od_dt_b_asin_title_s00?ie=UTF8&psc=1
IDE to SATA Hard Drive or Optical Drive Adapter - https://www.amazon.ca/dp/B00EOJNGC2?psc=1&ref=ppx_yo2ov_dt_b_product_details
(These above components are getting scarce, just FYI)
A Raspberry PI - https://www.raspberrypi.com/products/raspberry-pi-4-model-b/
(I used a Pi 4)
Solderless Breadboard Jumper Wires 3x (male to female) - https://www.amazon.ca/dp/B08151TQHG?psc=1&ref=ppx_yo2ov_dt_b_product_details
A SATA to USB adapter - https://www.amazon.ca/dp/B09LQNRKG5?psc=1&ref=ppx_yo2ov_dt_b_product_details
A new HDD - https://www.amazon.ca/dp/B07MX8GH2F?psc=1&ref=ppx_yo2ov_dt_b_product_details
Guides followed:
For extracting the eeprom, follow this guide: https://github.com/grimdoomer/PiPROM
If using Pi 4B, use "make p1"
Formatting the hard drive use xboxhdm23usb - https://www.xbmc4xbox.org.uk/forum/viewtopic.php?t=4789
Get a build of the softmod tool - https://drive.usercontent.google.com/download?id=1deMKfDVk6vGMDHub4DRLolXc511yGmDl&export=download&authuser=0
^ (We need more copies of this on the internet)
Follow the instructions to populate the C folder with the above build
Update "listdrives.bat" to remove | find /i "USB" from line one (This will allow the HDD to be recognized)
Just do Launch xboxhdm and choose the HDD. Build the xbox partitions from scratch
For locking the HDD, use - https://fatxplorer.eaton-works.com/3-0-beta/
HDD Security Tools - Choose the HDD - Set Password - Import the eeprom.bin
If you use the amazon IDE cable, it will work, but will require much folding and back tracking, as the connectors are mirrored and backwards. This ebay cable has the proper orientation and length.
https://www.ebay.com/itm/264927666468?hash=item3daeeb6124:g:fDoAAOSwYVZfNwU1
I would NOT want to do this without a modchip!
Good guide on doing so. I hope it helps people.
-
On 7/15/2024 at 10:07 AM, Pete1408 said:
hi all im new here nice to meet you all
i have a crystal and a few other hardmodded systems (all bought 2nd hard after MODDED) and i was told the crystal was working
unfortunately ive been scammed for a big amount
by the end of this i just want one good xbox (with the crystal shell) with upgraded storage
ive ordered an IDE / Sata adapter, plan to buy a 4tb drive tommorow
is there anything else i need to
1) swap the working hard modded / tsop flashed system into a crystal case
2) not hurt myself witih the live PSU?
3) upgrade the drive and how do i change the bios to make sure it supports 4tb or higher? (cerbios iirc?)
not sure what chip any of my xboxs are using as i havent opened any of them up, but ill likely choose the most silent sounding xbox and just swap the board from that. (or try to repair the crystal if theres a way to diagnose the apparently working system from FRAG)
i have no idea what revisions my systems are either ie 1.6 1.0 1.1 1.2 1.3 1.4 1.5 etc?
thankyou!
You should verify what revisions these motherboards are, as putting a 1.6 into any previous revision case can kill your motherboard, as a transistor grounds out into one of the screw posts that does not have a corresponding "screwhole" in the motherboard.
Identify your motherboard: https://consolemods.org/wiki/Xbox:Versions#:~:text=The official PCB version markings,is found in 1.6 Xboxes.
You can tell which screw it is by comparing the motherboard footprint against the screw posts that exist. You will find it. Remove/break off the RF shield linking at the post and it should be safe to install the 1.6 into a 1.0 - 1.4 case, if that is your situation. The AV port posts are also shorter in the earlier revisions, so take care not to overtorque the screws there. Swapping a 1.0 - 1.4 motherboard into a 1.6 case has no risk of shorting, however, the AV posts will be too tall and will need to be clipped/shortened in order to have the motherboard sit flush in the rear and become mountable.
-
18 hours ago, trappy76 said:
Yep, I agree and totally fine with wiping it all and starting again. If the DVD drive was working then I was ready to run the Installer disc.
TBH I bought this Xbox more as a collector than a gamer. I probably wouldn't even play games on it much, due to life taking up all my time. I'll think about the next steps. I do like the challenge of solving this problem, but I'm also tempted to ditch this and buy another console that has already been refurbished and is ready to go. I've seen a couple of FB Marketplace and the price isn't too bad. More of a time thing for me really. Decisions…
I'll have a think and let you know how I go. Thanks heaps for your input and time.
If you do decide to buy a new console, I usually buy mine in the "Parts" category. Usually I go for "stuck" DVD drives, because this is easily fixed with either refurbishing the existing belt (by cleaning the spindles and boiling the belt) or by just replacing it since they are so cheap. I have like 20 sitting in a drawer ready to go.
Sometimes I'll get other consoles if I am familiar with the issue and know that it will be an easy fix, such as dashboard or HDD error codes, if the seller is actually honest and posts what the issue is instead of simply pulling that "untested" nonsense and hoping that their console sells. Lol.
-
20 hours ago, SpaghettiCat said:
Thanks so much for the reply! I got a lot of useful information out of it. I love the way the installer looks, it's so scene-like and professional actually
It even implements a screensaver when idle for a bit
I have a couple of points in case you're interested:1. The WinXP VM is super useful to me: saves so much time setting up the OS and installing the right developer tools! But it's strange that what is provided is a VMWare image, but the instructions say to also install "VirtualBox Guest editions". The image is for VMWare only: Virtualbox cannot open *.vmx, *.vmfx, etc. files. I was going to convert this image to .OVF which is a non-proprietary VM image format that Virtualbox (and VMWare) are designed to import, and upload it for others.
2. You make a good point about "I don't want to make the disc seem like a ticking time bomb". But as a user who read and re-read the forum post, the old thread, and the README on the disc I got to say that some clarity is needed.
When I boot the disc it shows me the 2 options:- Easy XDK Installer (IP: DHCP) - Default
- Easy XDK Installer (IP: DHCP) (BFM)
OK, which one wipes my Xbox? The BFM or the "non-BFM"? How can I tell which one is the "app" and which is the "standalone" that will wipe my Xbox?
Good, the first menu item "Boot Menu Read Me" says in the description "In case you're new here, you should really give this a read to get a quick overview about the options you have". OK, great, I open that README and in it it says "Select the IP or DHCP versions of the installer" and to peace out and smoke weed and that's it
 OK, but it still doesn't tell me which menu item is the app or standalone, or what the difference between those two is.
The menu items are called "Installer" so I'm assuming the installation script will start immediately and install, so now I'm sweating scared not to pick the option that will wipe my Xbox. I make a guess that "Default" is the non-wiping option since I trust the developer to be sensible and so I take the risk and select it.
A new menu opens and I open the "Welcome Read Me" and inside it it still doesn't say anything about whether this will install in "app" mode or "standalone" mode. This is where yesterday I stopped because things were unclear and sounded too risky.
3. Today I can see that entering "XBox XDK Setups" shows the options to install App or Standalone; finally a bit of clarity. OK so what's the difference between BFM and non-BFM in the first menu?

4. The previous release thread scared the crap out of me because it said:
So is that risk only there if I have a 1.6 softmodded Xbox? A 1.4 softmodded Xbox won't have that risk of bricking?
MVG made a video on how to convert an Xbox to a Debug Kit, but mentioned nothing about softmodded Xboxes being at risk.
How can it be bricked anyway if it's installed as an "app". Worst thing is you boot up your normal dashboard, run the Debug Dashboard, and it crashes because out-of--memory. Restarting the Xbox will boot the normal dashboard again.
5. In that same release thread someone mentioned this warning:
That's a good thing to write into the OP. I have no idea what "running the recovery disk" or "remote recovery tool" are or where they're accessed, but I'll look out for them.
6. Depending on the answer to "4.", if it's clear my Xbox won't be bricked, I'll install XDK as an App and test if 64MB RAM is enough. I only want to start retail games in a debugger or somehow dump the memory of running games so that I can create trainers: if I dump the memory I can find the address of the value I want the trainer to change.
Thanks so much for this tool!!
The readme does not say to "Smoke Weed". Lol.
 It says "4:20". I am Bowlsnapper, and so that is what I put as my signature. "Peace Out" Is Dark's signature. Although I've put in a few things already that make a small statement here and there at random just for fun, telling people to smoke weed is not something I would feel comfortable with saying outright and I think this would make the installer look unprofessional. Now, if people see this and decide that they wanna' smoke a bowl at that particular moment, I would not be opposed to this one bit.
I actually noticed the VMWare/Virtualbox discrepancy in the OP there and I planned to address that. I use the HDD image with VirtualBox, but it can be used with VMWare as well. The point I was making is that virtual PC software has its own software that enhances the VM experience, with VM video drivers, as well as LAN and a few others so that the user can have a more complete experience without generic drivers. I absolutely recommend this. I imported the HDD image file into VirtualBox and I use it myself. The disk image provided is VMDK file format and should be perfectly usable for anybody else as well. I loaded the image into my new virtual machine and then installed Guest Additions. It works perfectly. What the OVF will have however, is settings for the VM so the user does not have to configure them manually. This would be helpful and I will try to get it done before the week is over.
https://smallbusiness.chron.com/open-vmdk-virtualbox-28847.html
The "Default" or "BFM" options are not a point at which anything is wiped. It is simply selecting what environment you would like to boot the installer into. Formatting occurs when you would like to use the standalone option of the installer, and this is well into the menu of both the BFM and Default selections. "Default" will boot you into the installer using the bios you have booted your Xbox with. "BFM" boots the installer by loading a Cerbios BFM bios into memory and booting the installer with that. The installer is identical, using both options. The readme's of the Standalone and Application modes of the installer describe the differences between both methods. This is not in the readme of the opening screen because you are not at that point in the installer yet. Perhaps I will add this information into the readmes so that there can not possibly be any doubt as to what is being done and what is offered at every step. I am looking at the Boot Menu readme now and I understand why you are bringing this up... the readme is practically blank. I don't know how I overlooked this. I will update this and make sure people are able to know what to select and why.
I am now seeing that it does not state anywhere in the readme or the interface/installer that formatting will occur, so I will remedy this in a hotfix, hopefully by the end of the night. Hopefully the OP will tide people over for the next few hours.
Like I mentioned, when softmodded, you have no risk of bricking your xbox attempting to install as an application. I believe that the application mode loads Cerbios Debug through PBL and should reveal the true C partition allowing for the boot of the XDK Launcher. Installing using BFM mode should also reveal the true C partition and allow people to access the true C partition and install the XDK Launcher. A standalone install is what is problematic. That's all. It can be done, but there is no reason to go through all the effort to do so when most people will be running on 64MB of memory anyway, and running a retail game is not guaranteed to work. Maybe somebody can convince me otherwise, but I feel that trying to debug retail games on 64MB of RAM reliably is something that would necessitate even MORE support and cause even MORE problems for people. "Heeeelp. I used your XDK installer because you said you can run it on softmodded consoles and the game I'm trying to run is crashing. What do I do pleeeeeeze!?" If you are softmodded, I would say that the installer is probably not a great option, even though it can theoretically be done. There are limits within reason for when this installer should be used and not be used and people should rely on common sense and reason in this instance. Nothing is stopping them. I assume MVG did not mention softmodded consoles in his video because this was an obscure use case. Anybody wanting to create a Debug Kit using a retail Xbox should do so after installing 128MB of RAM and this is what he covered.
The Microsoft XDK recovery disc and remote recovery are tools meant to restore a damaged or blank HDD with a debug/development kit. The reason that this bricks your Xbox is that it flashes an MS debug bios that is meant to run on an Xbox that uses an MCPX V2. Commercially sold Xboxes use a V3 MCPX. This incompatibility causes the unit to brick with an MS debug bios.
You seem like an intelligent guy and I have faith that you will not brick your Xbox and I feel confident that you have no reason to be scared to do anything since I'm sure you understand how this installer works, at least to some extent. I'm sure you can understand that the thread already contains much explanation and if my readmes are too long in the installer, people may get bored or overwhelmed and simply exit them and just proceed without reading everything. I do not want this to happen, so I will create a zip instead of simply hosting the ISO and put a lot of this information in there. I will also update the readmes so that things are as clear as possible in them. This will benefit the project in the end and I am glad that you have raised the points you have, as I stated in the OP that I am welcome to suggestions so that I can make the installer better.
The thread that you are linking to was deleted for a few reasons. I made an effort to clear the slate and start anew. That is why this thread was created and this is the one you should reference from now on. The thread you are linking to is a google cached page. This means that you have been following the thread for some time and actually went out of your way to recover it. I am not sure why. I appreciate your suggestions as they are helpful and I am glad that you have taken such a strong interest in the XDK Installer in particular, especially for an extended period of time, but lets try to focus on the here and now, as opposed to the past, okay?
-
1
-
2 hours ago, Pete1408 said:
i just bought the HDMI adapter +30 dollars shipping to my c ountry from his video, i hope its good at least
i have that startech adaptor on the way and plan to buy a 4tb version of the drive he linked, how do i find the 80w wire cable which he also didnt mention?
thanks!
What country do you live in and from what websites are you able to order? Amazon, Ebay, etc?
https://www.ebay.com/itm/264927666468?hash=item3daeeb6124:g:fDoAAOSwYVZfNwU1
These are direct clones, since the cable is a bit custom and is reversed and mirrored, compared to a standard IDE cable.
This is a cable that many people use, however, it is standard IDE, which means that it will have to be folded quite a bit and will not fit as well as one custom designed for use with the Xbox.
@nikeymikey I think that MVG may see it as an impressive technical feat, since the Stellar is capable of things that nothing else has been so far and I would like to think that he is impressed with it and wants to cover it, knowing that he has great enthusiasm for the Original Xbox. That being said, I find it surprising as well, for the reasons you stated. "Pimping" that Xbox was done rather incompletely, with that 40 wire IDE cable. Using something that is very closed off and not open-source is something that is unexpected from him and I can understand why that would raise people's eyebrows and have them wonder why. Even with Stellar's huge technical showcasing, what the scene has done in response to the product releases, with no real funding behind it, is jaw-dropping to me and worthy of its own special video by him, and there is much to talk about pertaining to this; much more than a 17 minute video could provide. You could go on for hours about the OX, ModXO, OXHD and other various things like Cerbios, ElpisHD and PrometheOS (let's not forget about XCAT!) that unlocks the potential of this hardware and provides some decent competition to MakeMHZ products... and there is no real money to be made here, which makes it all the more impressive. The motivation behind them would seem to be enthusiasm for the scene and a genuine desire to progress things, rather than to make a profit or corner the market, as it were.
Lantus has thrown me for a loop for the first time ever. I'm sure he's watching the comments and understands that this is probably going to be a bit of a divisive video. I would be surprised if he does not have a beat on the pulse of the scene/community.
-
3 hours ago, SpaghettiCat said:
This looks really awesome and just what I needed, thank you.
But the "Welcome Read Me" text file on the disc says that this is only for Xbox versions 1.0-1.4 that have 128MB RAM? Is that right? It would be good to explain the requirements for this disc upfront because most people don't have the 128MB mod. Also would be good to explain what are the requirements in terms of softmod or TSOP/hardmod.
Also it's not clear from the menu which of the menu items correspond to your main options 1) and 2) above. This is something important to document so that nobody wipes their Xbox doing option 2) by accident.
I really don't want to brick or wipe my very nice Xbox, so some simple steps on which menu options to choose to install the XDB dashboard as an app would be nice
Thank you! I will attempt to actually put some of these things in the OP and try to be very clear about what options to choose and why. In the readme's in each section of the disc, I did try to be a bit descriptive about what each item was and how they were being performed, but perhaps the project release would benefit from some clarification. I appreciate your input and would be glad to do so. I'll work on it tonight. Option 2 above states that the installer "wipes" the partitions (As well as the readme of the Standalone" install section), so I was hoping that this would be clear in it's own respect, but perhaps not and could have been a bit too brief, allowing the reader to glance over it if they were not reading too closely.
Yes, the readme states that it is for those versions of the Xbox, and that is because the RAM upgrade is so difficult to pull off on the 1.6 that it was just intended for those consoles, since most people would not have a RAM upgrade on a 1.6. Softmodding is tricky, since things need to be done a certain way in order for this to happen. As an application (utilizing PBL), I think it would work fine, but a standalone install needs to be done a certain way and there is no reason to do it, especially if you have 64MB of RAM. I plan on researching softmodding a bit more so that I can create an option for it, if the user wishes. Maybe I could get with @Rocky5 a bit and if he is willing, he could provide me with a bit of guidance in this respect.
However, doing this install on a softmodded console in any state, either semi-permanent or as an application, still leaves the issue of having 64MB of RAM, since a softmodder is almost guaranteed to still have a stock amount. I think this is fine for very small applications, but is going to cause issues for a developer if they code something that takes up a fair amount of memory. In other words, it will run, but anything intensive that is run will probably experience issues since there needs to be room for the debug overhead. That is the reason for needing 128MB in a true Debug environment.
In the spirit of having a true debug environment, I would like to mention here for the time being that if somebody wants to utilize the SuperIO serial debugger as I have done with my development kit, versions 1.0 to 1.2 is what I would choose, since LFrame was still hooked up to the LPC and you could extract debug output through the LPC connection. Versions 1.3 and 1.4 have LFrame disconnected from the MCPX, which necessitates some modification. But I know that most people will not be using the serial debugger and so this really is turning your box into a "Debug Kit" rather than a "Development Kit" which requires some hardware modification. At least that is the distinction as I see it.
This project means a lot to me and I certainly don't want anybody to make a mistake that irreversibly damages their Xbox. I only want good things and good vibes!
However, I can only put in so many disclaimers and warnings before I start getting repetitive and annoying in the readme's and OP and I don't want to make the disc seem like a ticking time bomb. "Danger, Will Robinson! Danger! If you run this installer, your Xbox may set on fire and burn your house down... and un-neuter your cats!" Lol. It is no more dangerous than an installer disc, as this regularly wipes partitions in many ways, albeit with fair warning. Thank you for taking the time to express your concerns in a constructive and polite way. I truly appreciate it. I will take what you're saying into consideration and try to be very explicit in the OP.
-
1
-
-
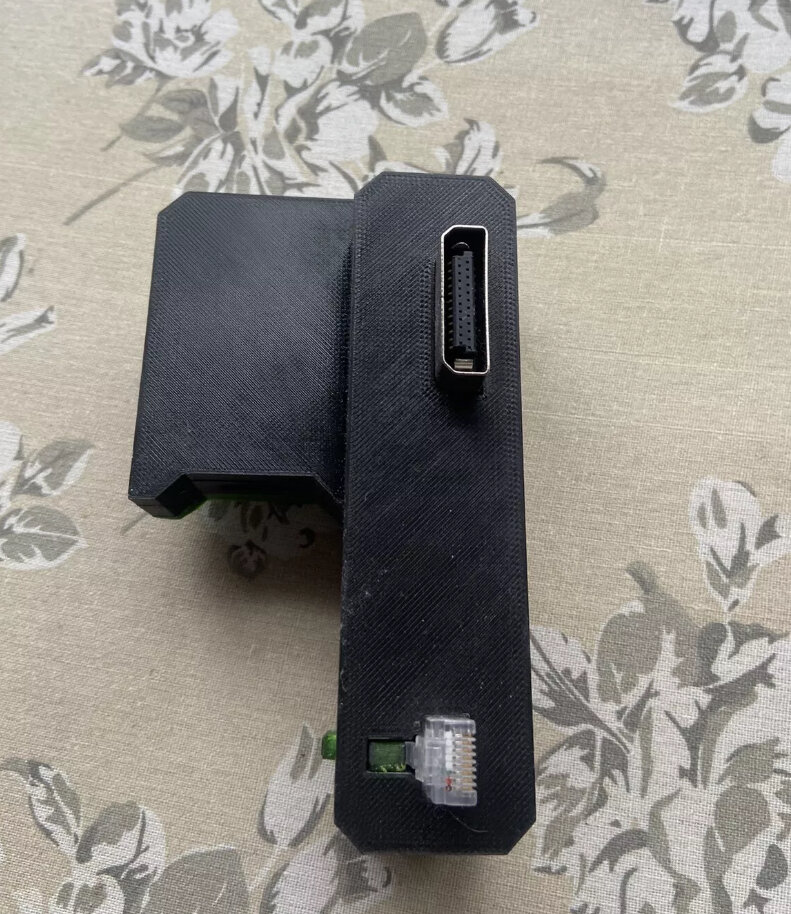
6 hours ago, steve1 said:its Thanks Matty Suds for creating and sharing this.This device is a plug and play solution to HDMI and WiFi on the Original Xbox!combined a small component + digital audio to HDMI converter from Electron Shepherd with a small Vonets vm300-L micro router/bridge repeater!Plugs into the back of the Xbox and just works! Utilises the 5v pin on the AV port to power both devices!Completely self contained unit. Only wire necessary is an HDMI cord!
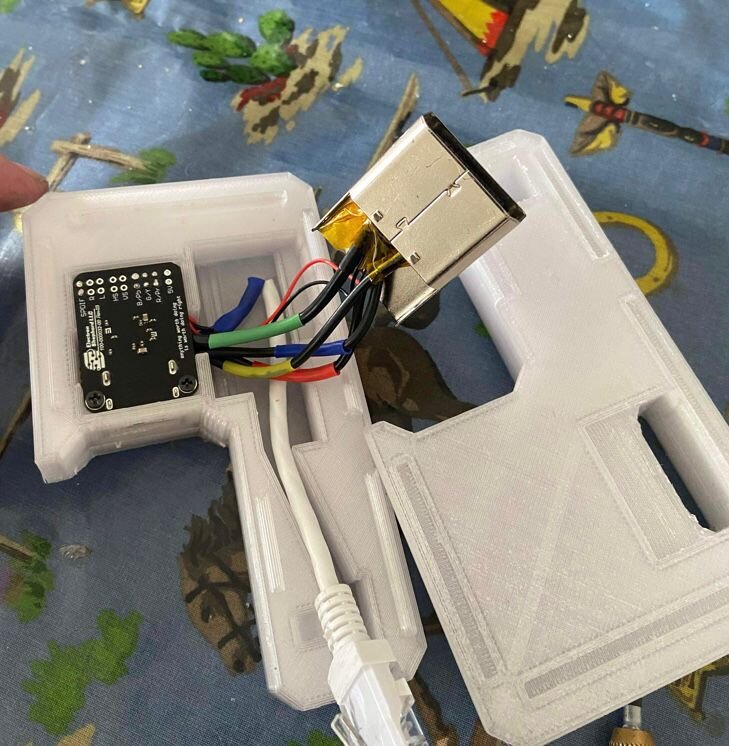
Matty Suds is THE MAN. His guidance and 3D prints helped me get my SuperIO internalized with the USB-C out in the rear. He recommended the adafruit USB-C breakout board and gave me the 3D prints to mount it. I'm surprised he doesn't have a place of higher prominence in the scene. His work is amazing.
Do you happen to know what PETG filament that is in the top photo?
-
2 hours ago, AndyB said:
That's an really small solder point. It is supposed to be soldered from the back?
I was gonna suggest the same thing that @nikeymikey did. There are two ways to get at D0. One is at the top, just below the TSOP (which is notably harder to solder to) and the other is the classic point underneath. I would go underneath, as it's easier to solder to. I don't think I've ever used the top point. Some people don't like running a wire underneath and I think some people feel that it's cleaner to just go to the right of the chip and terminate the connection there.
-
8 hours ago, steve1 said:
Matteys hdim Wi-Fi design Is a good idea I think
This is SICK. I second @PRince404. Please tell us more.
-
48 minutes ago, steve1 said:
Original Xbox 1.1 are 1.4 all have 128 mb of ram the Clock Cap has been removed I have 6 black and 1 cristal £80 posed £90 for the cristal plus any fees console only it will have a mod chip installed and the 8 gig hdd Some of the dvd drives have week laser possibly
I'm having trouble understanding. What price is the crystal?


Board Life Status
Board startup date: April 23, 2017 12:45:48
Requiring Replacement IDE Ribbon
in Repair
Posted
Well I think the power cable is bundled with it, kinda like how it is with the regular startech. Could be wrong about that though.