

junkman77
-
Posts
20 -
Joined
-
Last visited
Content Type
Profiles
Forums
Calendar
Store
Posts posted by junkman77
-
-
On 5/21/2020 at 7:01 AM, BigSplodge said:
What did you use as your "donor" AV connector for the PlayStation cable? I've had one turn up today which in truth actually doesn't look too bad. However, I'm still determined to crack the connector open and solder the official 360 cables in its place.
I'm not sure how to open this particular plug without demolishing it though - would welcome any tips from your previous efforts!
EDIT: re-read your message and saw "Console5 has the unpopulated connectors" this time haha
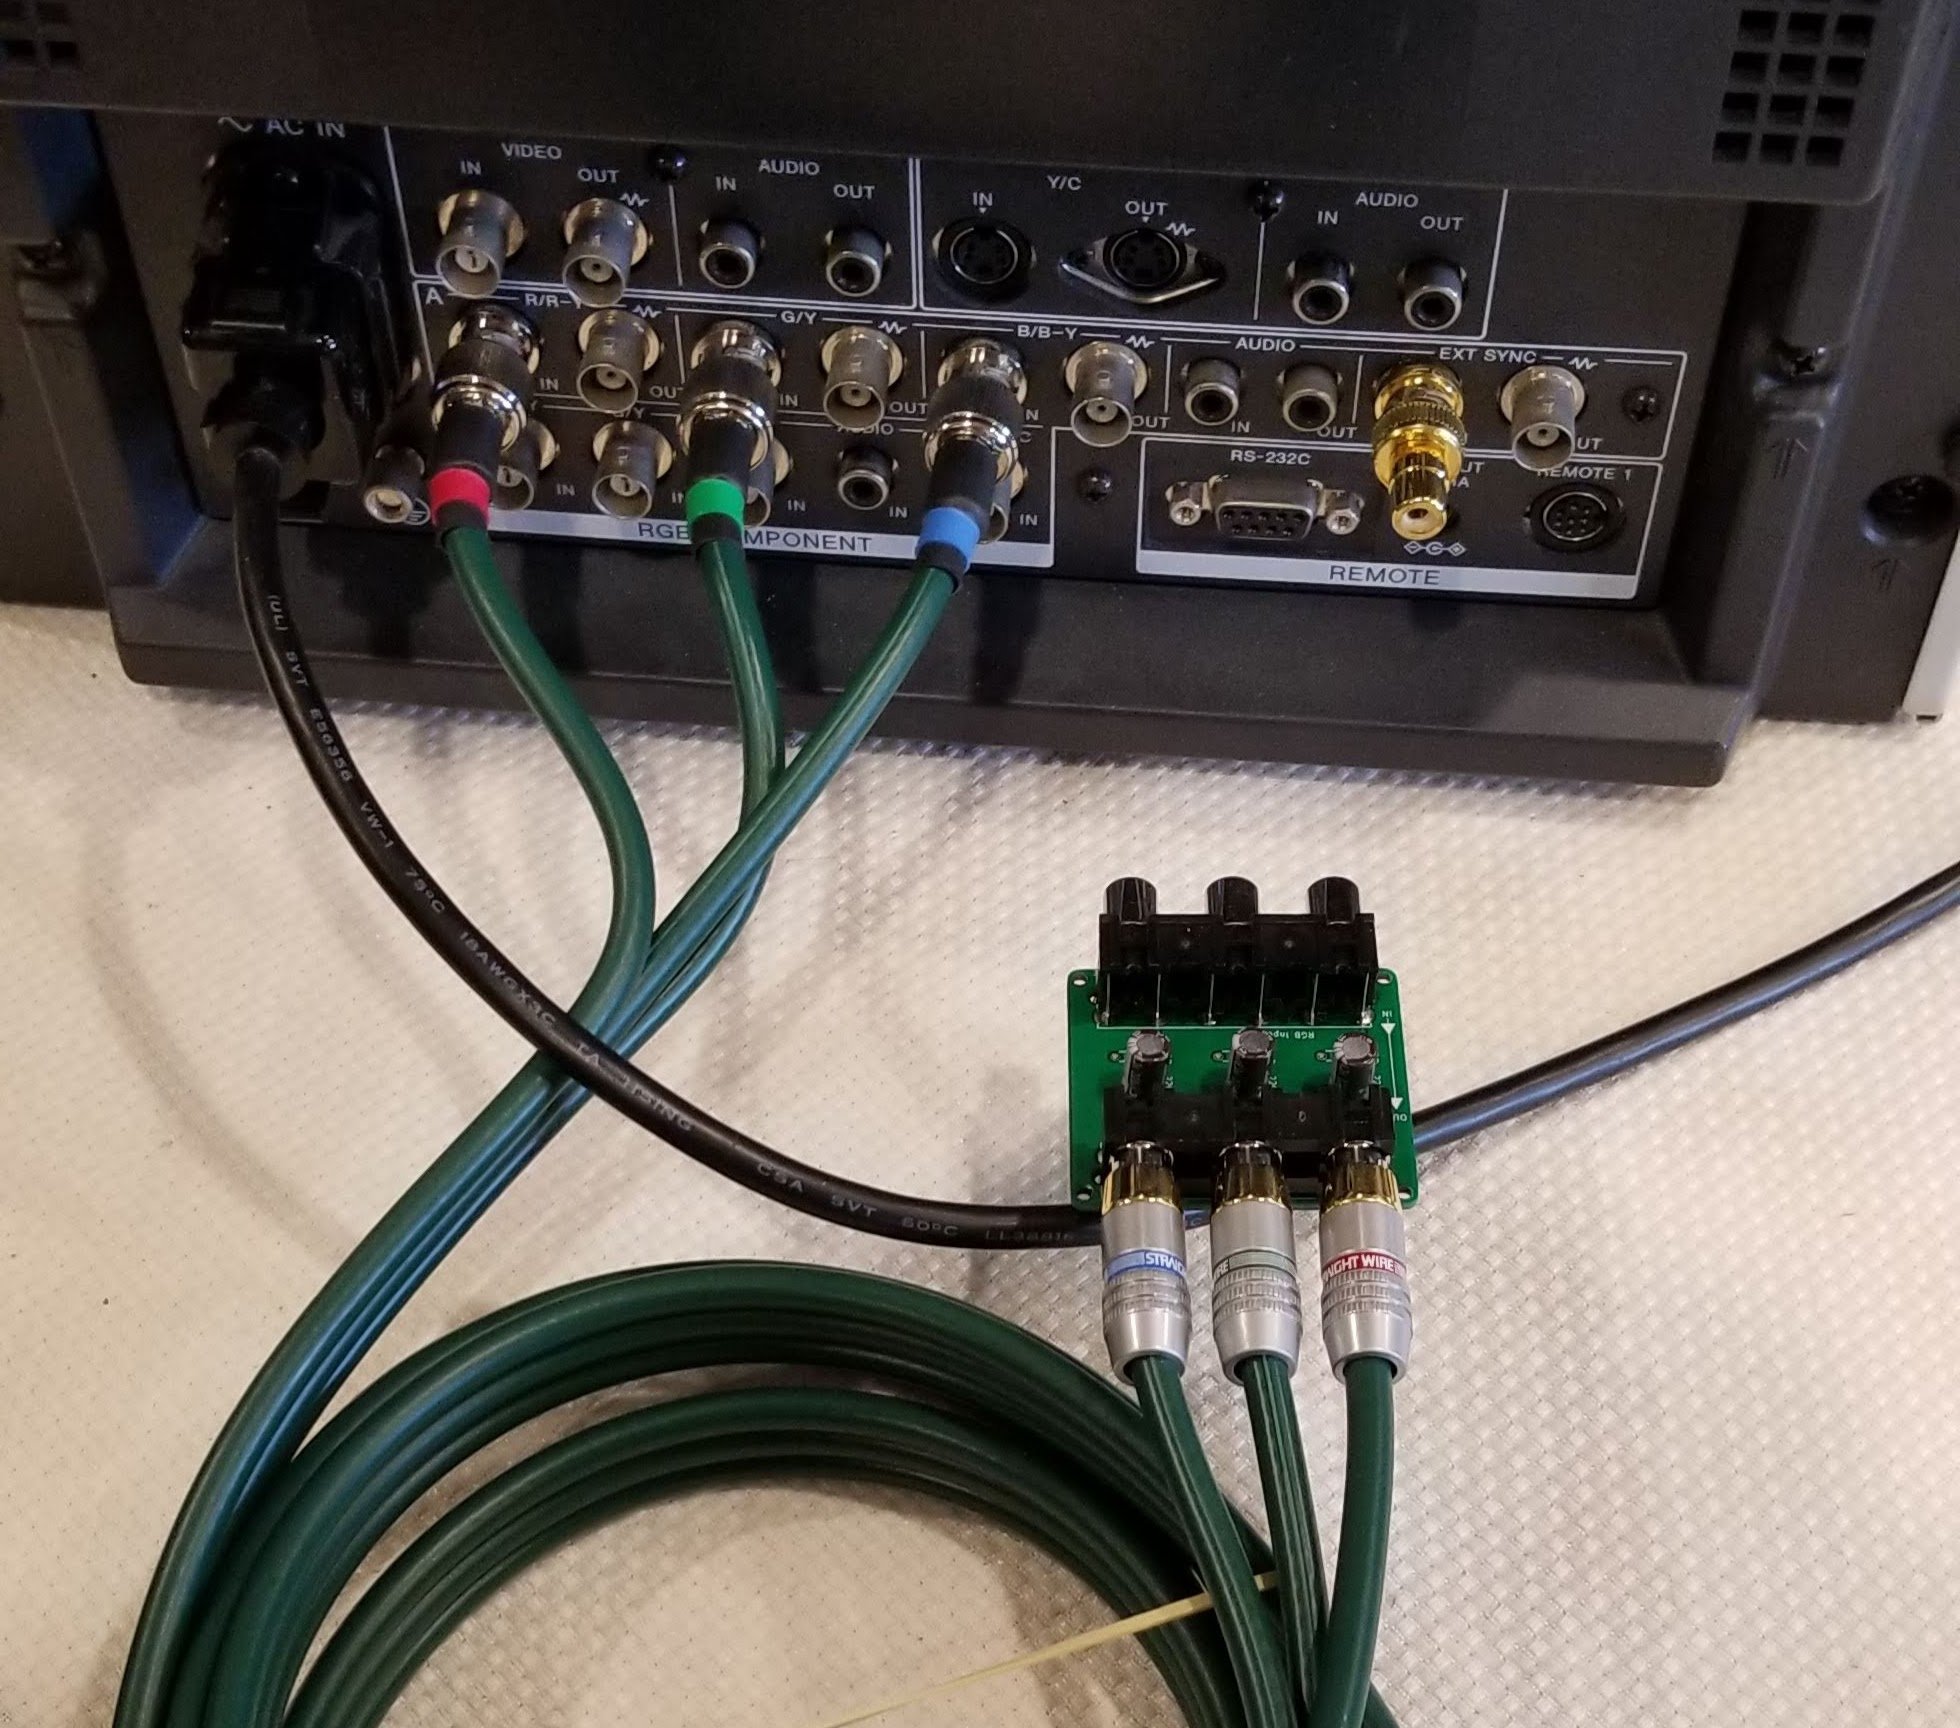
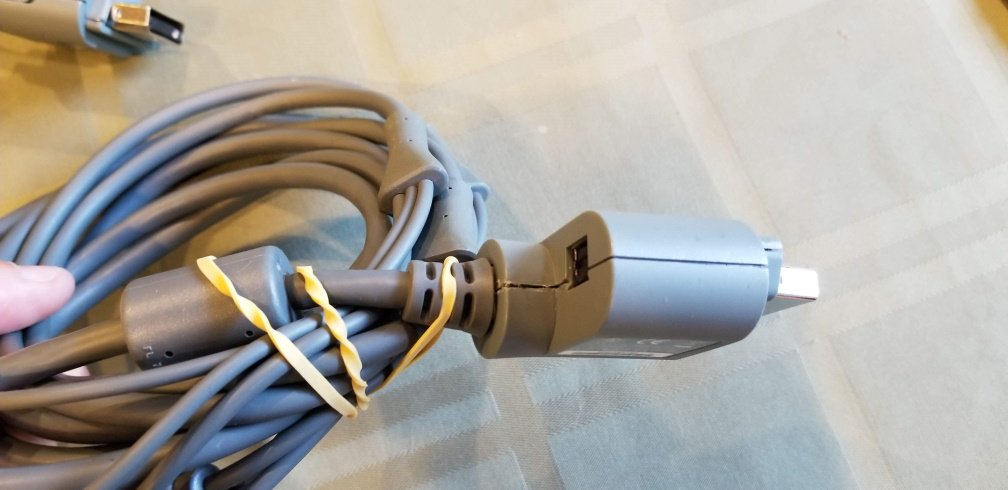
Note that for the SNES/N64 (With RGB mod) and PS1/PS2 cable you need to add the 220uF capacitors to the RGB lines. I did this externally with an adapter board I made (pre-pandemic). I found the green RCA to BNC cable at a Goodwill.

-
14 hours ago, BigSplodge said:
No worries @Cryptonix, glad it went well.
Perhaps @Cian Cunningham - you might consider adding this additional tip to your brilliant guide, just in case others who could benefit from this additional step miss out?
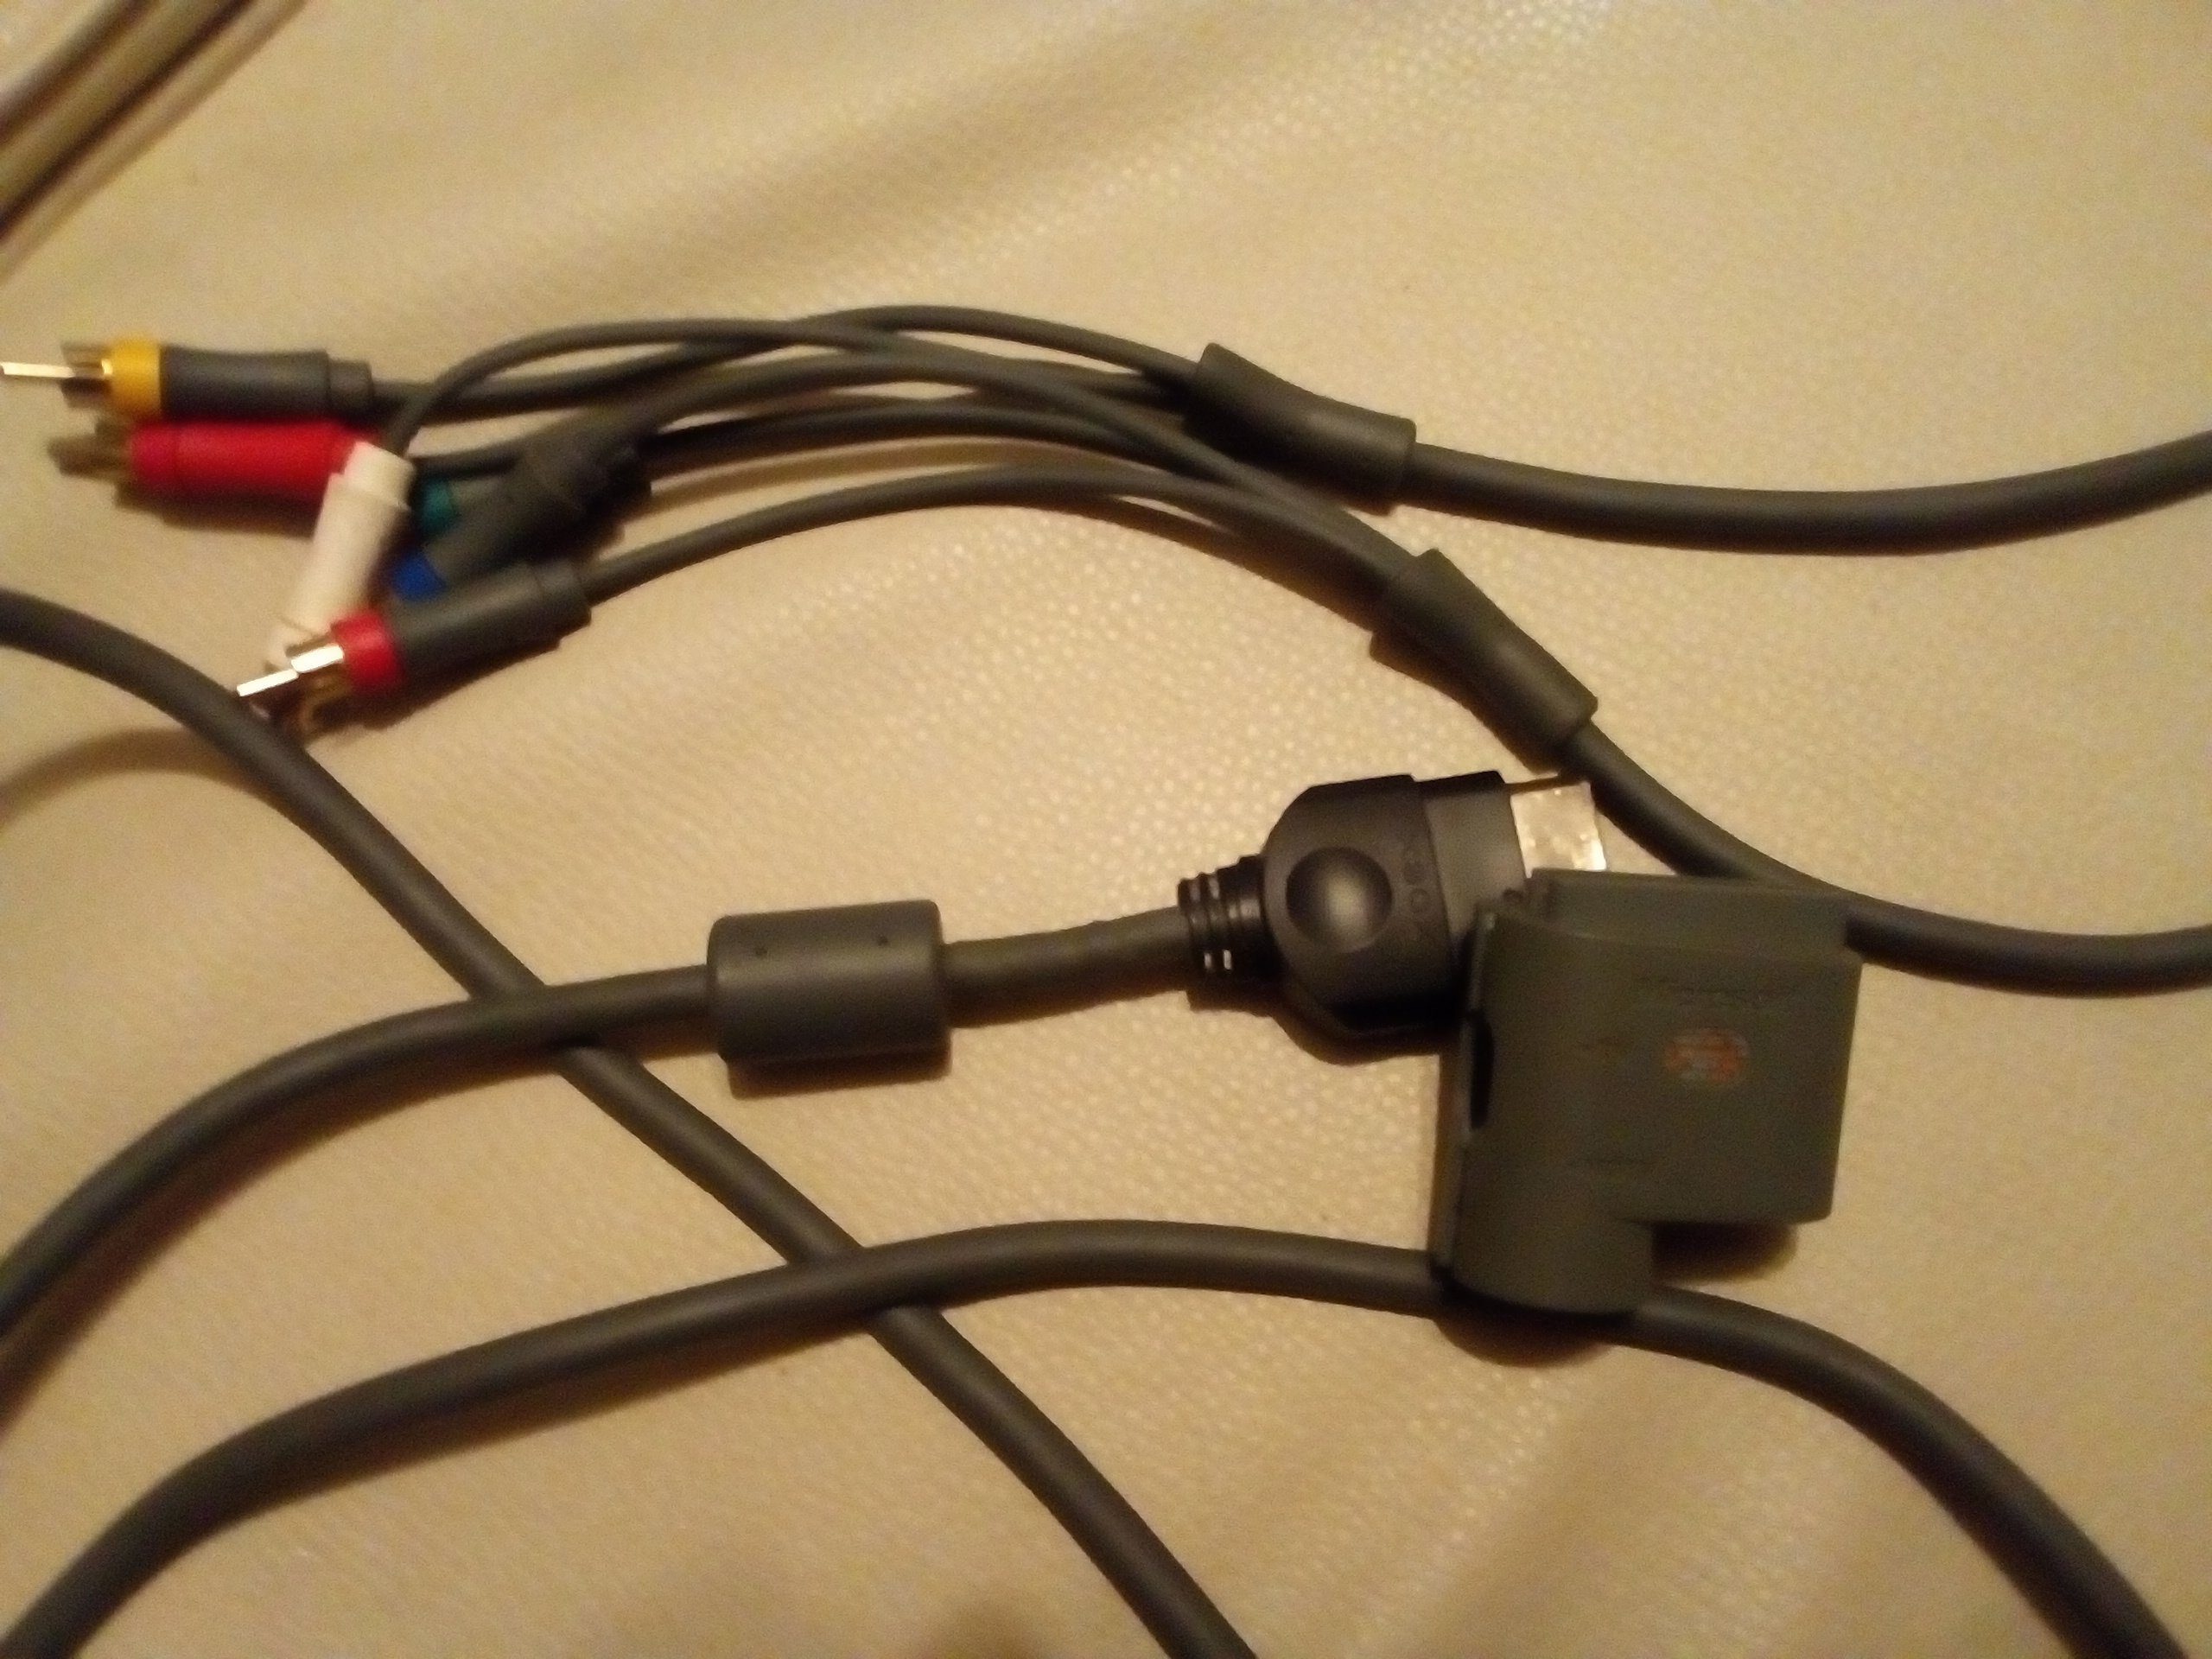
Also, it might be blasphemy mentioning this here, but as an aside, you've inspired me to make a PS2/PS3 component cable using the same technique (and sacrificial 360 cable). The only issue is that the official PlayStation AV connectors only contain the required pins, so an official PlayStation composite cable is not a worthwhile victim. I've instead ordered a crappy Chinese knock off, but at least one that looks like it has a robust AV connector that I can liberate and combine with the 360 shielded cable and RCAs! I'll keep you posted.
The xbox360 cables are straight-up-quality shielded and flexible cables. I have used them to make OGXBOX, SNES/N64(wRGB Mod) and PS1/2/3 cables. Console5 has the unpopulated connectors. The only console I personally have left to build one for is the Genesis.
-
I have a 1.6 XBOX (I call it SpideyBox) with a bulging clock capacitor...
 and looking for a decent replacement from digikey our mouser. Located in the US.
Looking at Digikey part 604-1034-ND looks like it might be viable? -
We all have to start somewhere. I would probably put this on the shelf since it "can" be fixed, but probably just a hair out of your current skill set.
The three biggest things that improved my soldering was getting magnifying glasses, practice and watching some soldering videos on youtube ~ recommend Voultar's videos; but there are others. The right wire (30awg kynar), flux (lots of flux) and a decent soldering iron (I did not say expensive) go a very long ways.
I would also recommend getting a practice board; easy enough to pick up something from a thrift store for cheap to practice soldering on.-
 1
1
-
-
Thanks for hunting that down, I figured it is actually nulled based on the txt file, config magic and that it boots fine.
It can be a bit overwhelming finding some of that information depending on the search phrase used.
Thanks!
-
I picked up a v1.6 XBOX today and did a Rocky5 1.1.5 softmod (a bit behind; but whatever).
When I went to null the HDD key it says it completed and everything looked good.
However when I check the System > Settings > System > Xbox info > the HDD still had a non-null HDD key.
I then loaded Config magic 1.6.1 application and it reported a Null HDD.
What do I trust? I could probably swap in a Nulled HDD, but this is weird. I checked a different XBOX and in the Xbox Info screen it is all zeros.
Any idea why the Xbox Info is reporting a value for the key while Config Magic is reporting zeros? which do I trust?
Thanks!
-
What happened to R7D2 ?
Rev 1.2 to 1.4 have different points to solder, but the process is nearly identical.
This forum is an awesome resource!
-
 1
1
-
-
Is it possible to use two unmodified standard XBOX AV cables and use standard RCA barrel connectors to match red-red, white-white and yellow-yellow as a No cut mod?
-
5 hours ago, Hector Hidalgo said:
I did it! It took me all day! It was quite the odissey! (I couldn't do your version junkman, too hard for this cable version)
Now summarizing the story:
No ONE in my country was selling the component cable for the 360, only cheap knock offs. So what I did was buying through Yapo, which is a type buy and sell site, were you mostly buy locally.
And there I found ONE guy, just one, in the whole country, who had an original component cable for the 360. And just as my OG XBOX, I bought it blindly, with faith, believing he was not going to scam me, no warranties.
You do this, when things are to niche and you simply cannot buy them on Ebay, etc.
Here:
It wasn't easy, because this was the version of the cable with the filter at the beginning of the cable. It makes it super hard to work, I had to even trim the OG Xbox "neck" plastic a little, so it could give me enough room to work.
Also I don't know if it's the version of the componente cable, but the OG Xbox plastic case hardly slide through, this compnent cable is very thick.
A lot of work, the good thing is that this component cable has the filter, I don't know but is supposed to be better in terms of protecting from noise, etc.
If anyone has this component cable and wants to get some tips, let me know in a PM. It was a pain in the ass.
Cheers to all
") And thank you Cian! and also thanks to Junkman!
And thank you Cian! and also thanks to Junkman!
Great! Making a cable like this is difficult; but so rewarding in the end and now you are the expert in your Country!
-
1
-
-
35 minutes ago, Hector Hidalgo said:
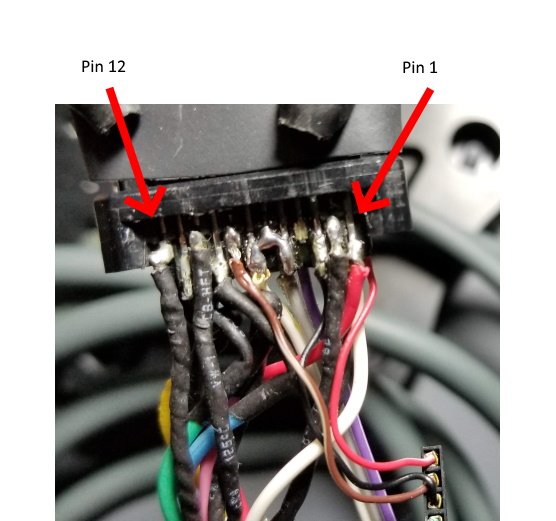
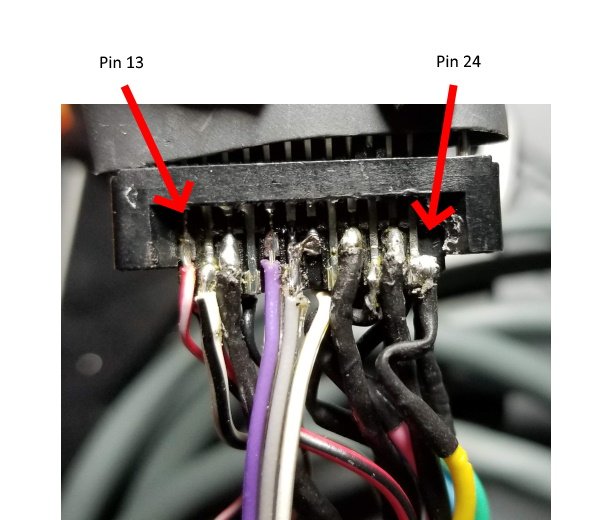
Junkman, today I receive my 360 original component cable! It was the only one in existence in my country. May I ask you if you have a picture of your connector with everything soldered already? So I can have an idea where every wire goes? (or where do I start counting from 1 to 24).
Or maybe it's in one of the pictures and I didn't see it. Thank so much Junkmann, you are the best
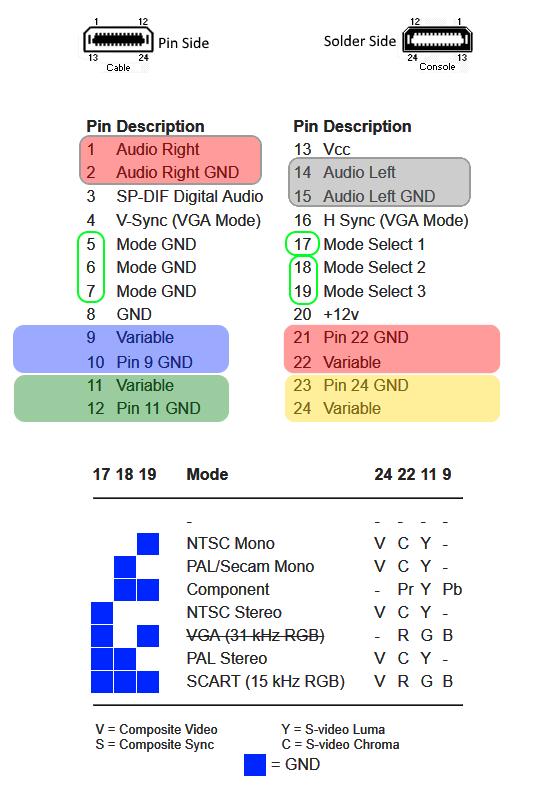
Sure, Refer to post #13 in this thread for the Pin references.

-
I think the analog audio and video will be exactly the same.
Personally I like to unsolder the 360 wires instead of cutting them so I don't have to mess with the shield braid.
You may have to add some "Fresh" solder to get them to flow better.
With my method the cable will still be compatible with TVs without Component inputs because the switch is there and works.
If you want details about that, I can provide more information.
And I always wanted the optical audio.
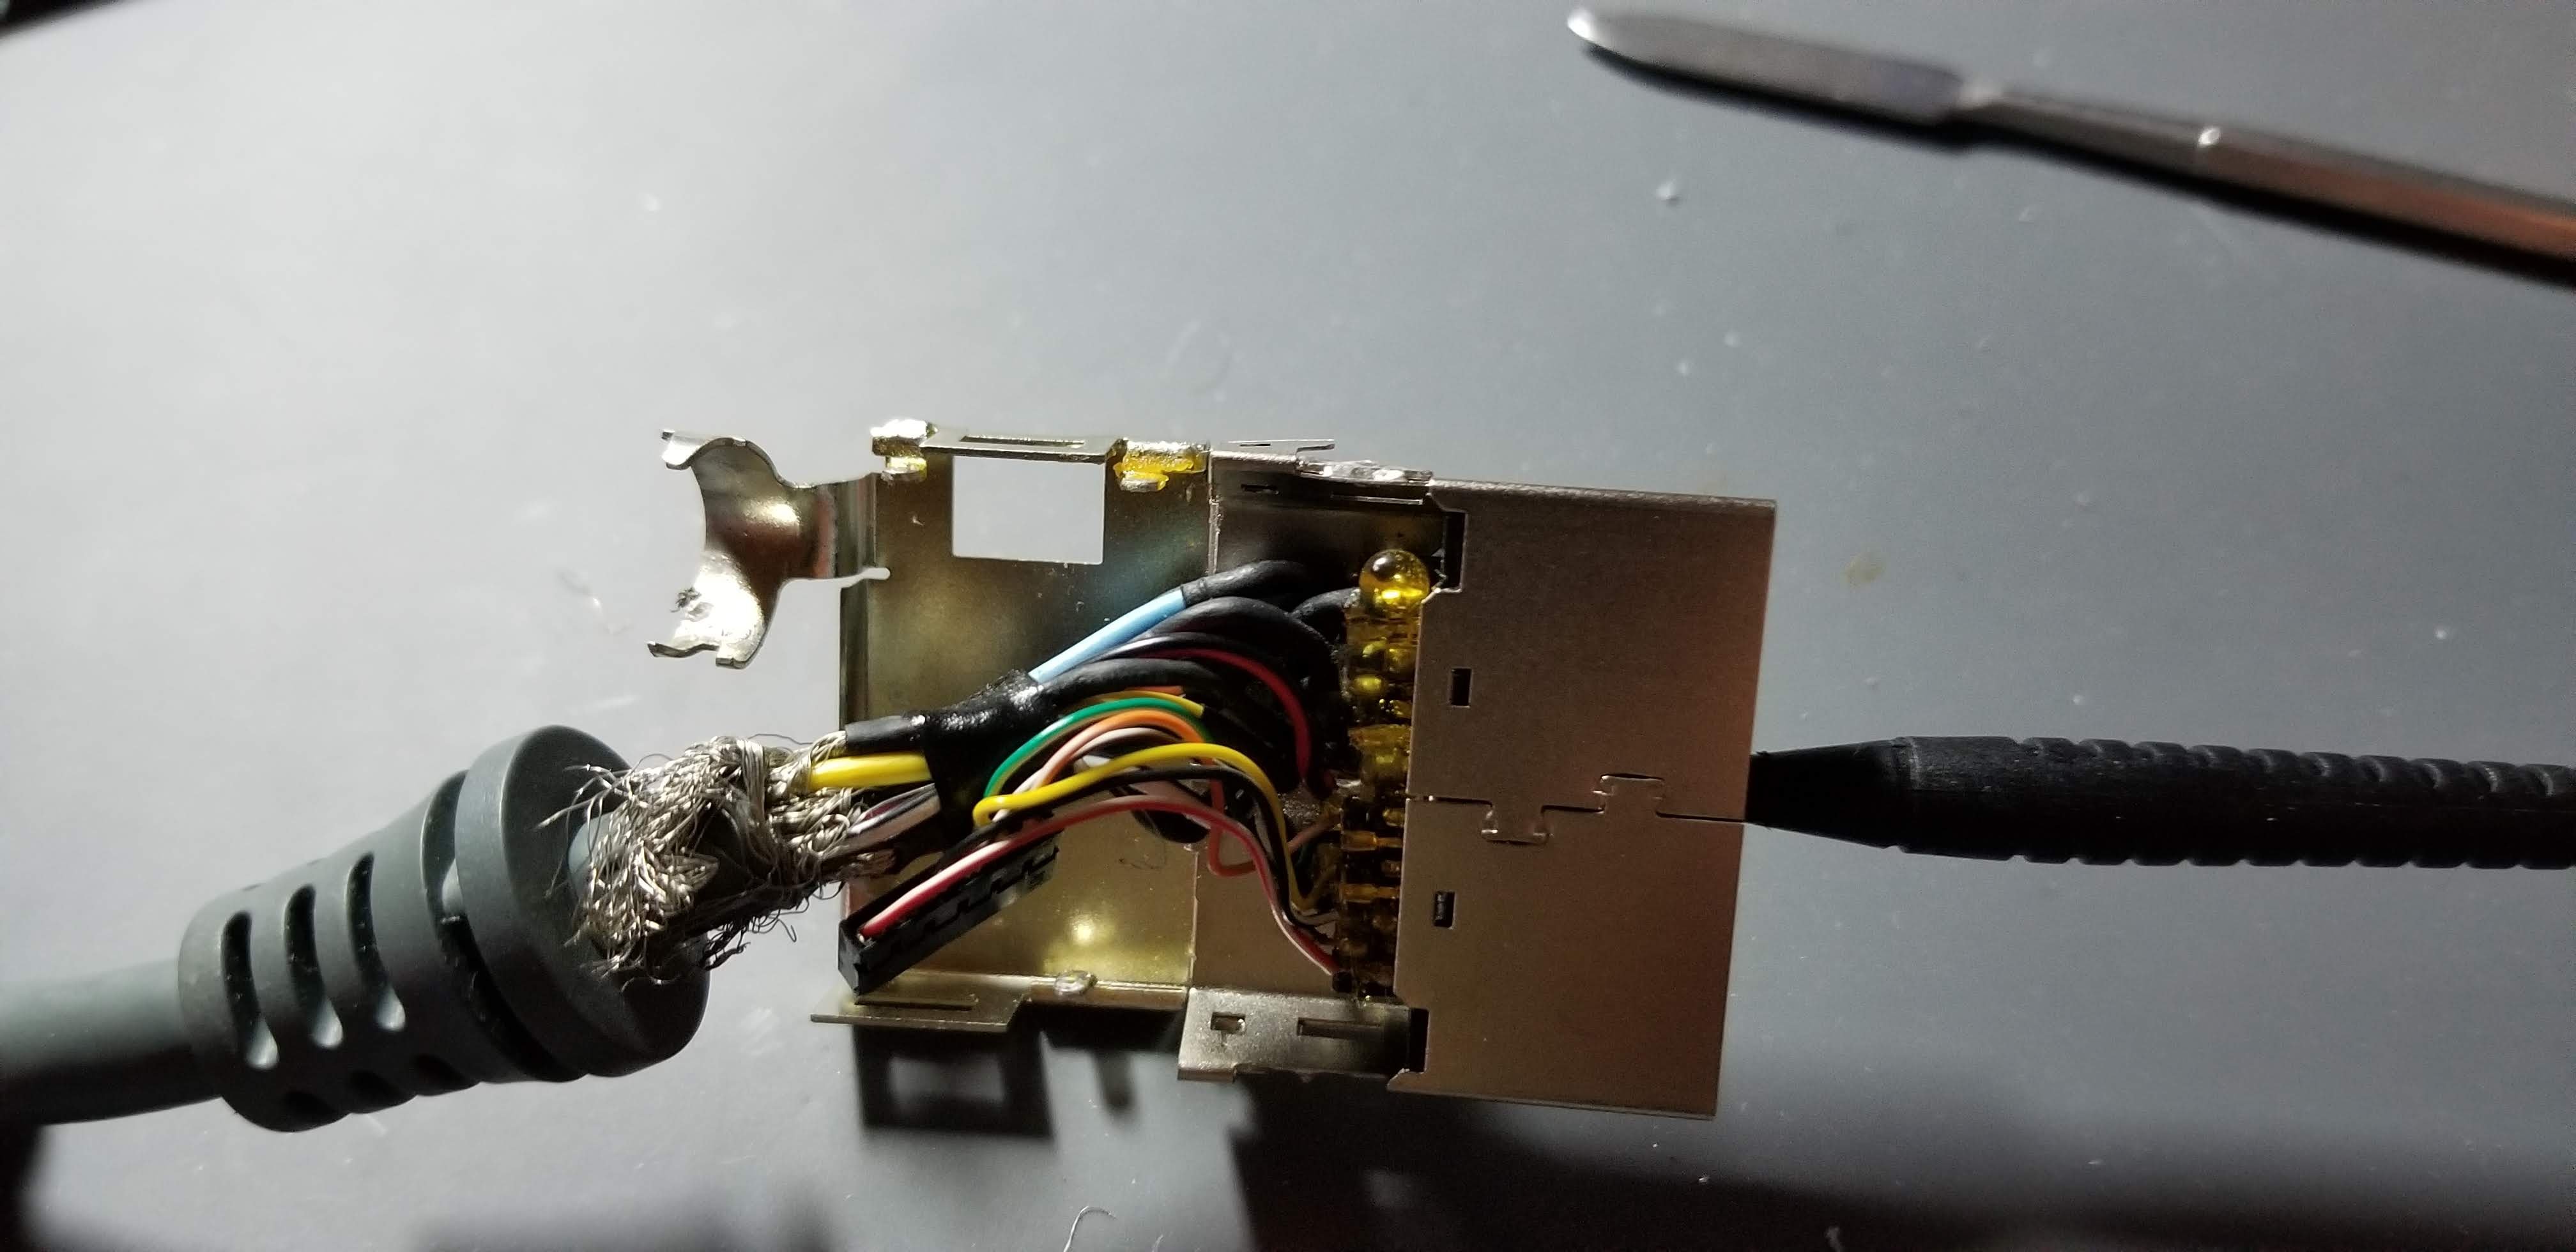
I have found some variations in the 360 cables where the wires for the optical audio is either Black/Brown/Red or Blue/Yellow/Green
Red/Blue go to VCC
Black/Green go to Digital Audio
Yellow/Black go to groundThe Black/Brown/Red combination seemed to be more common in my neighborhood.
Final tip: Take Pictures of EVERYTHING before you cut, remove plugs or unsolder the wires.
-
5 hours ago, SS_Dave said:
If your not worried about digital audio out you could use one of these.
https://www.chimericsystems.com/product/xbox-video-connector
You could then make what looks and works like a original lead excpt for the color.
If at a later stage adding a digital out put is easy to do you can add a coax digital out on the rear of the Xbox
You can also get OGXBOX connectors (just like in the link) from console5
-
Personally, while in there and soldering everything up I prefer to just do it once and have all the bells and whistles. The optical transmitter in the 360 cable is compatible with the OGXBOX and the little board has a capacitor on it already. You never know if you are going to upgrade your audio system (or get wireless headphones with Optical Inputs) so it is nice to have it there already.
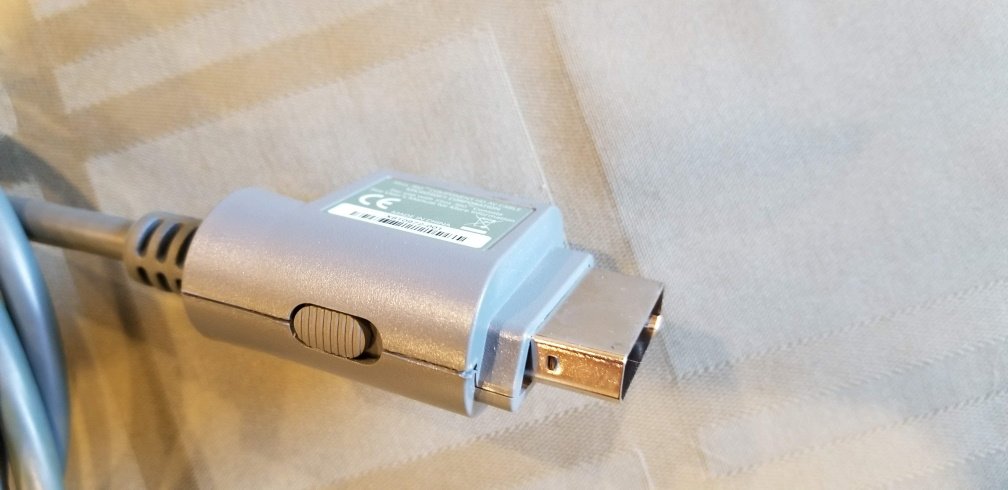
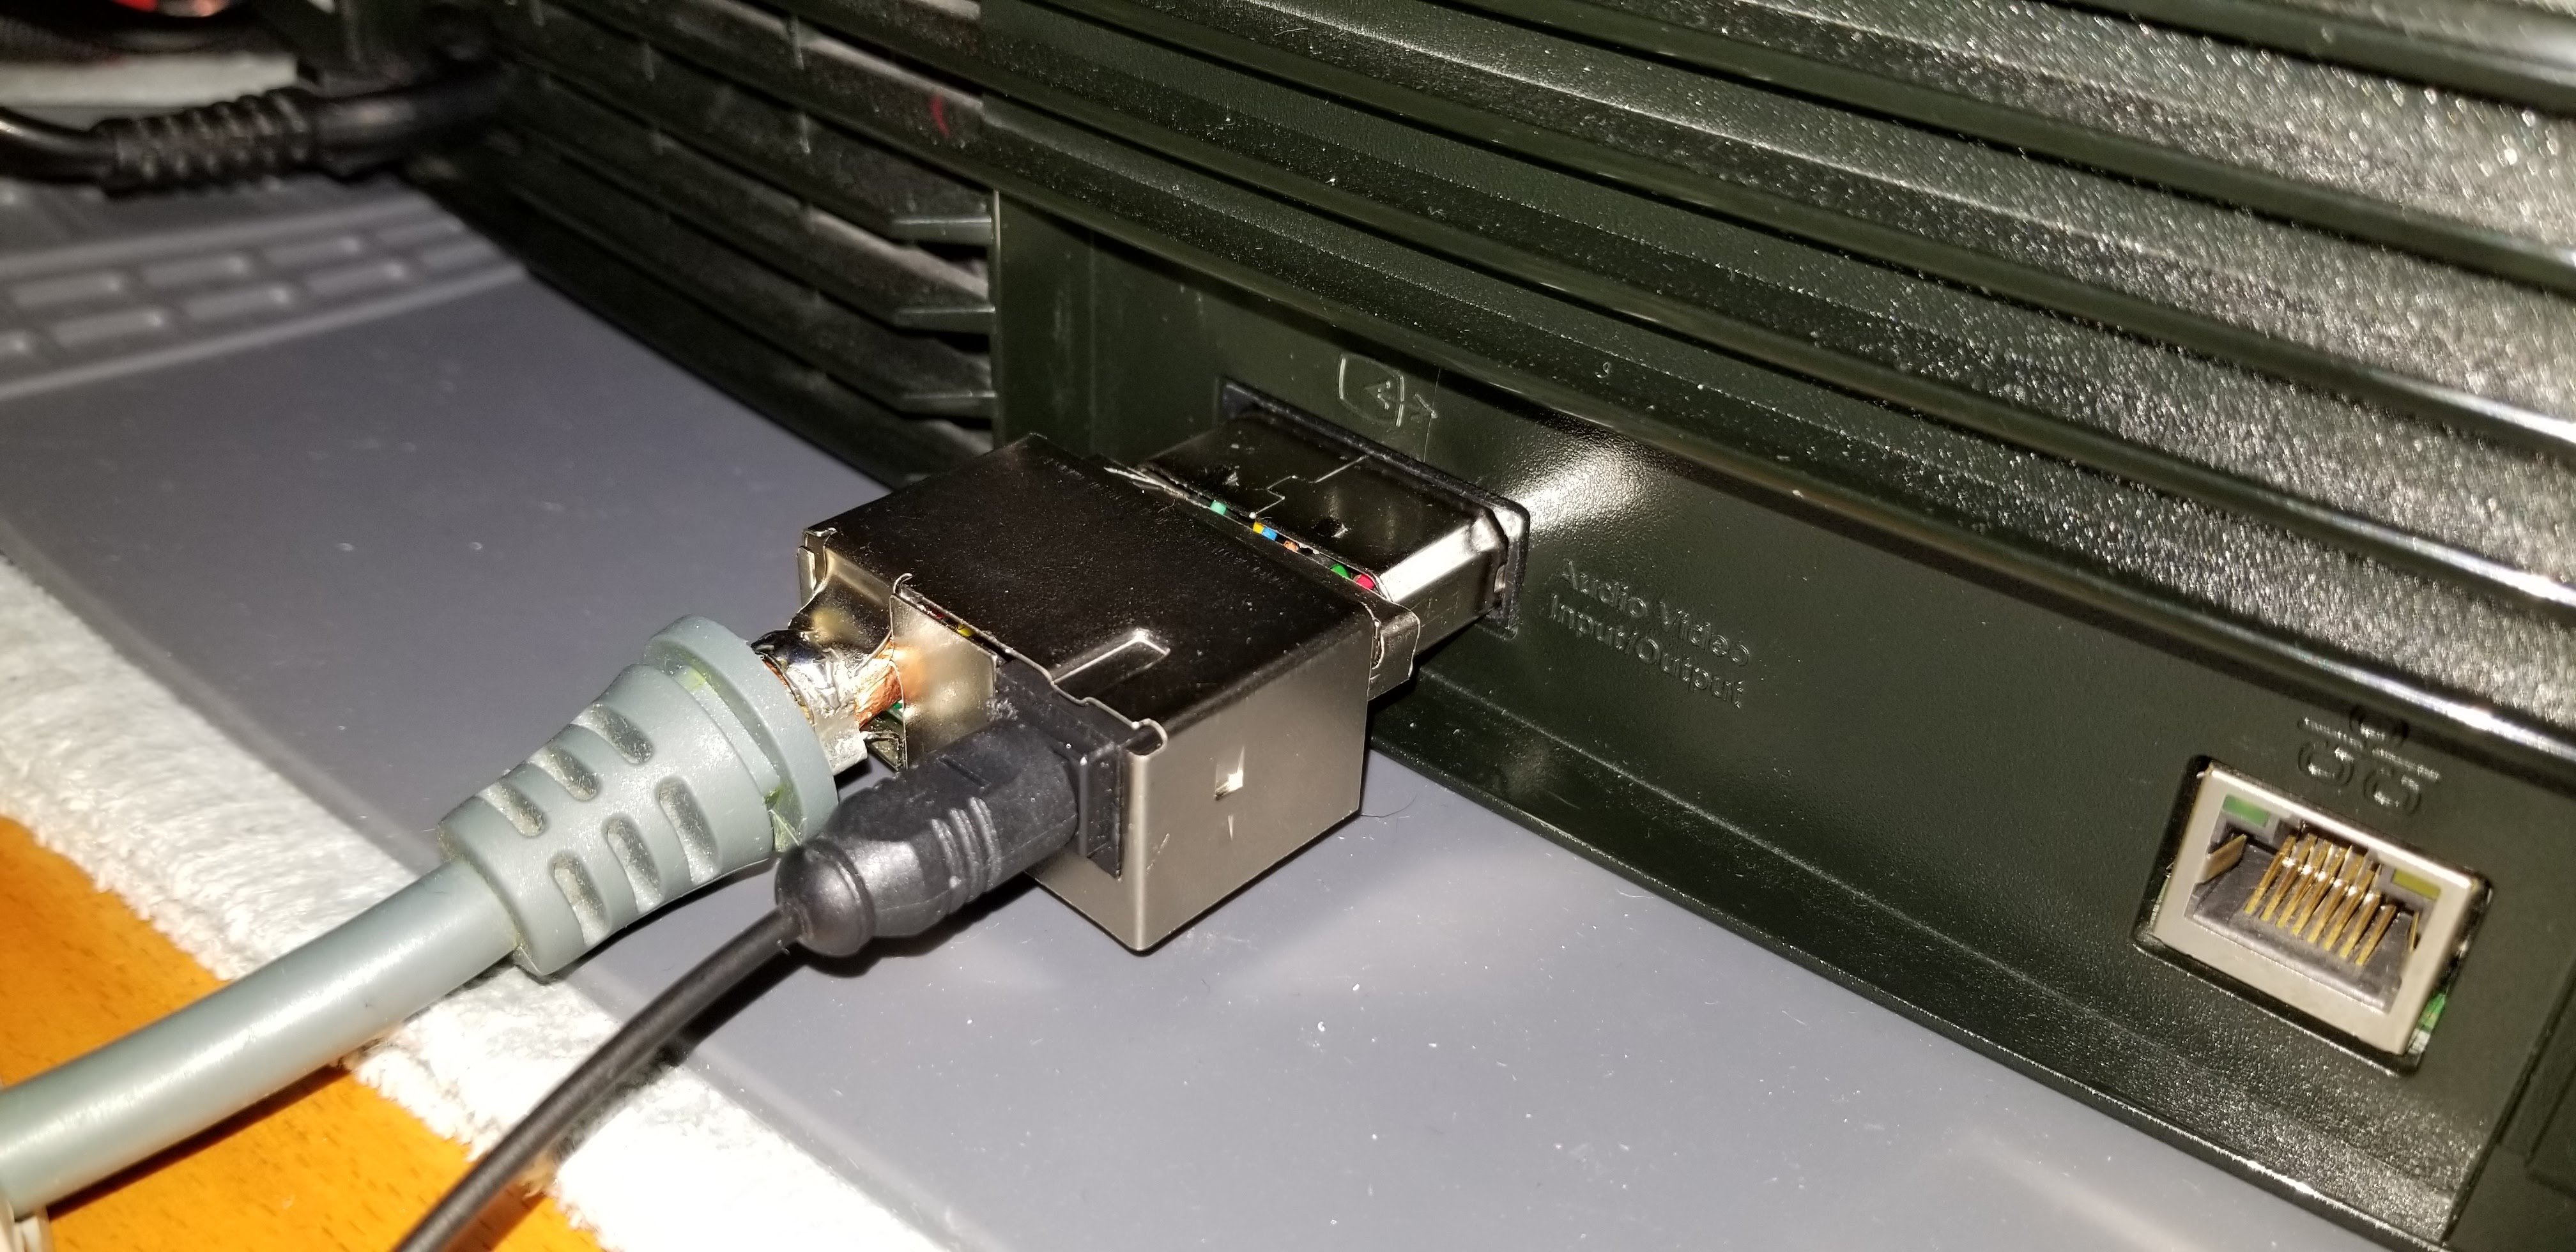
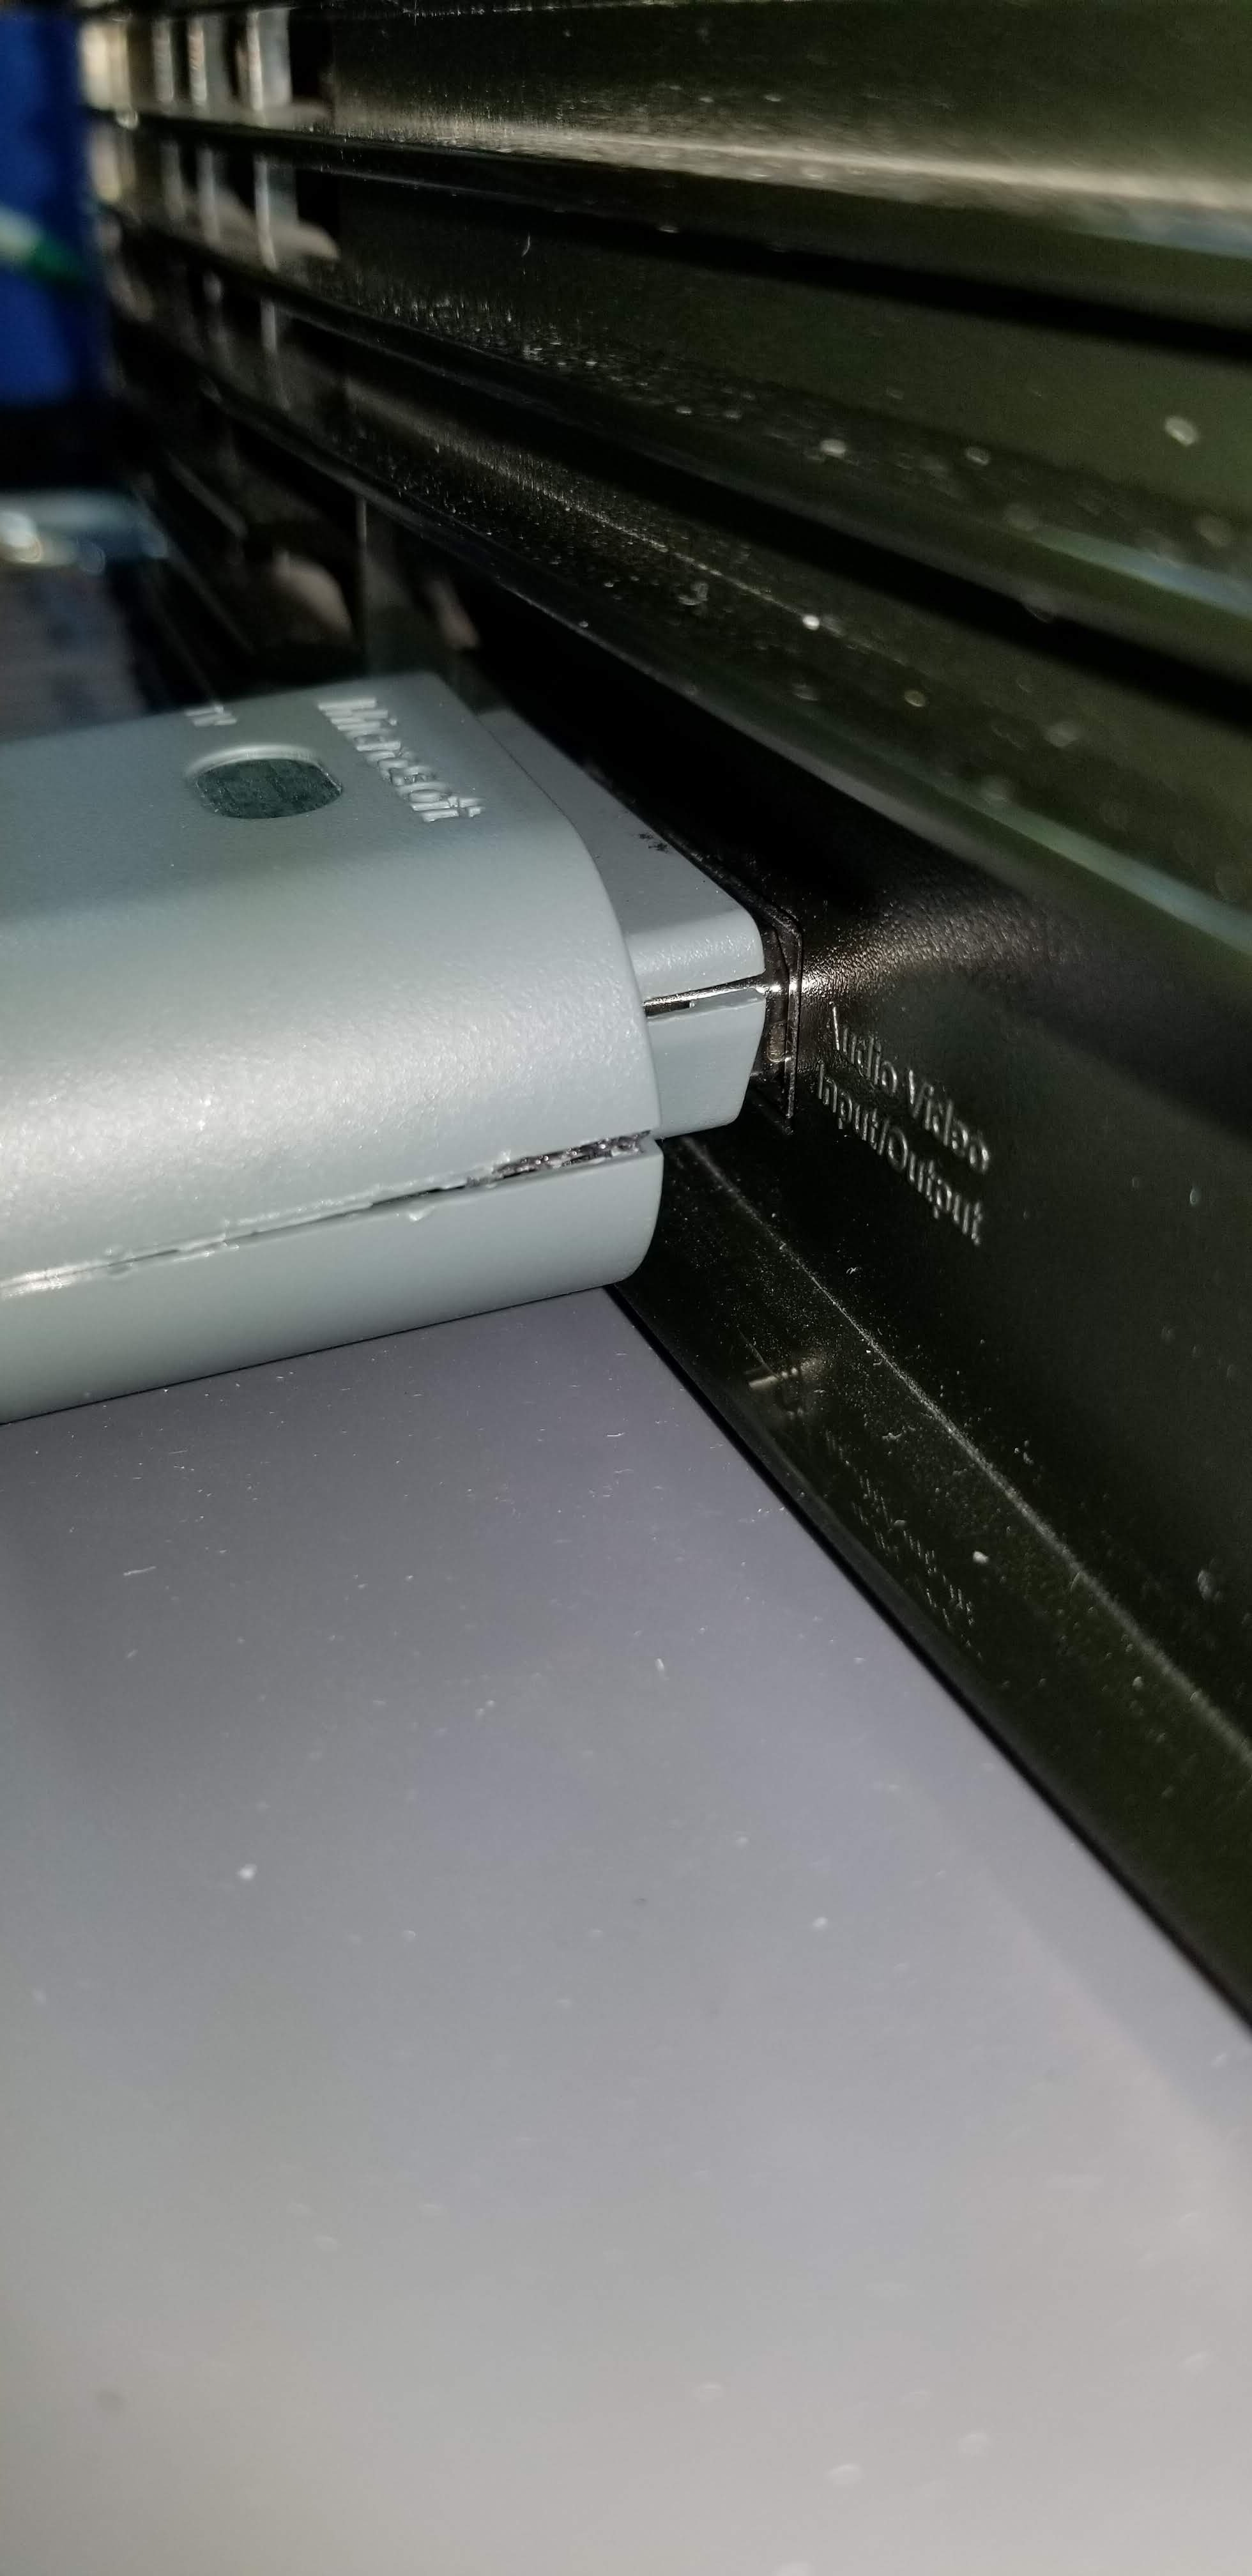
The metal housing for the OGXBOX connector is thicker than the 360 so it take a lot of fiddling to get "just right" without removing too much material. Wish I had a 3d printer. Ultimatly you probably will not be looking at the minor (the pictures make it look huge) gaps; but enjoying the OGXBOX in 480p or 720p and much more clarity than the composite cables for much cheaper (these cost me about $7 in parts...total... each)I did a bunch of these and found a lot of variations in them; not only with the internals, but with how much glue holds the casing together and if the metal shielding was soldered heavily, lightly or not at all. But they all work the same. How well yours turns out will depend on how much time you spend on it.
I would guess that about half the time on these is spent on the plastic housing getting them "pretty good". They will never look "perfect" because they can sometimes take a beating getting them open.
-
6 hours ago, Blobby85 said:
What actually is a sd to HD Switch? Kind of an upscaler? If yes, what are you using and how to Connect it to the Xbox? Been looking for a upscaler that works on the Xbox for a long time now...
It changes which outputs are used: HD = Component (YPbPr Aka the Red, Green and Blue connectors - Pin 18 and 19 to Ground) and SD = Composite (Yellow - Pin 17 to Ground).
They way I wire it up with the original XBOX, it changes which "Mode" pins are connected to Ground. -
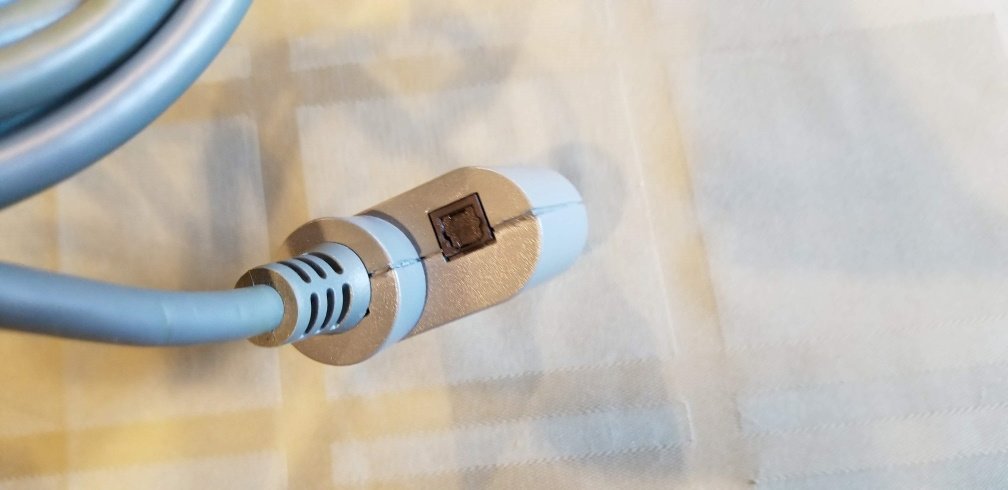
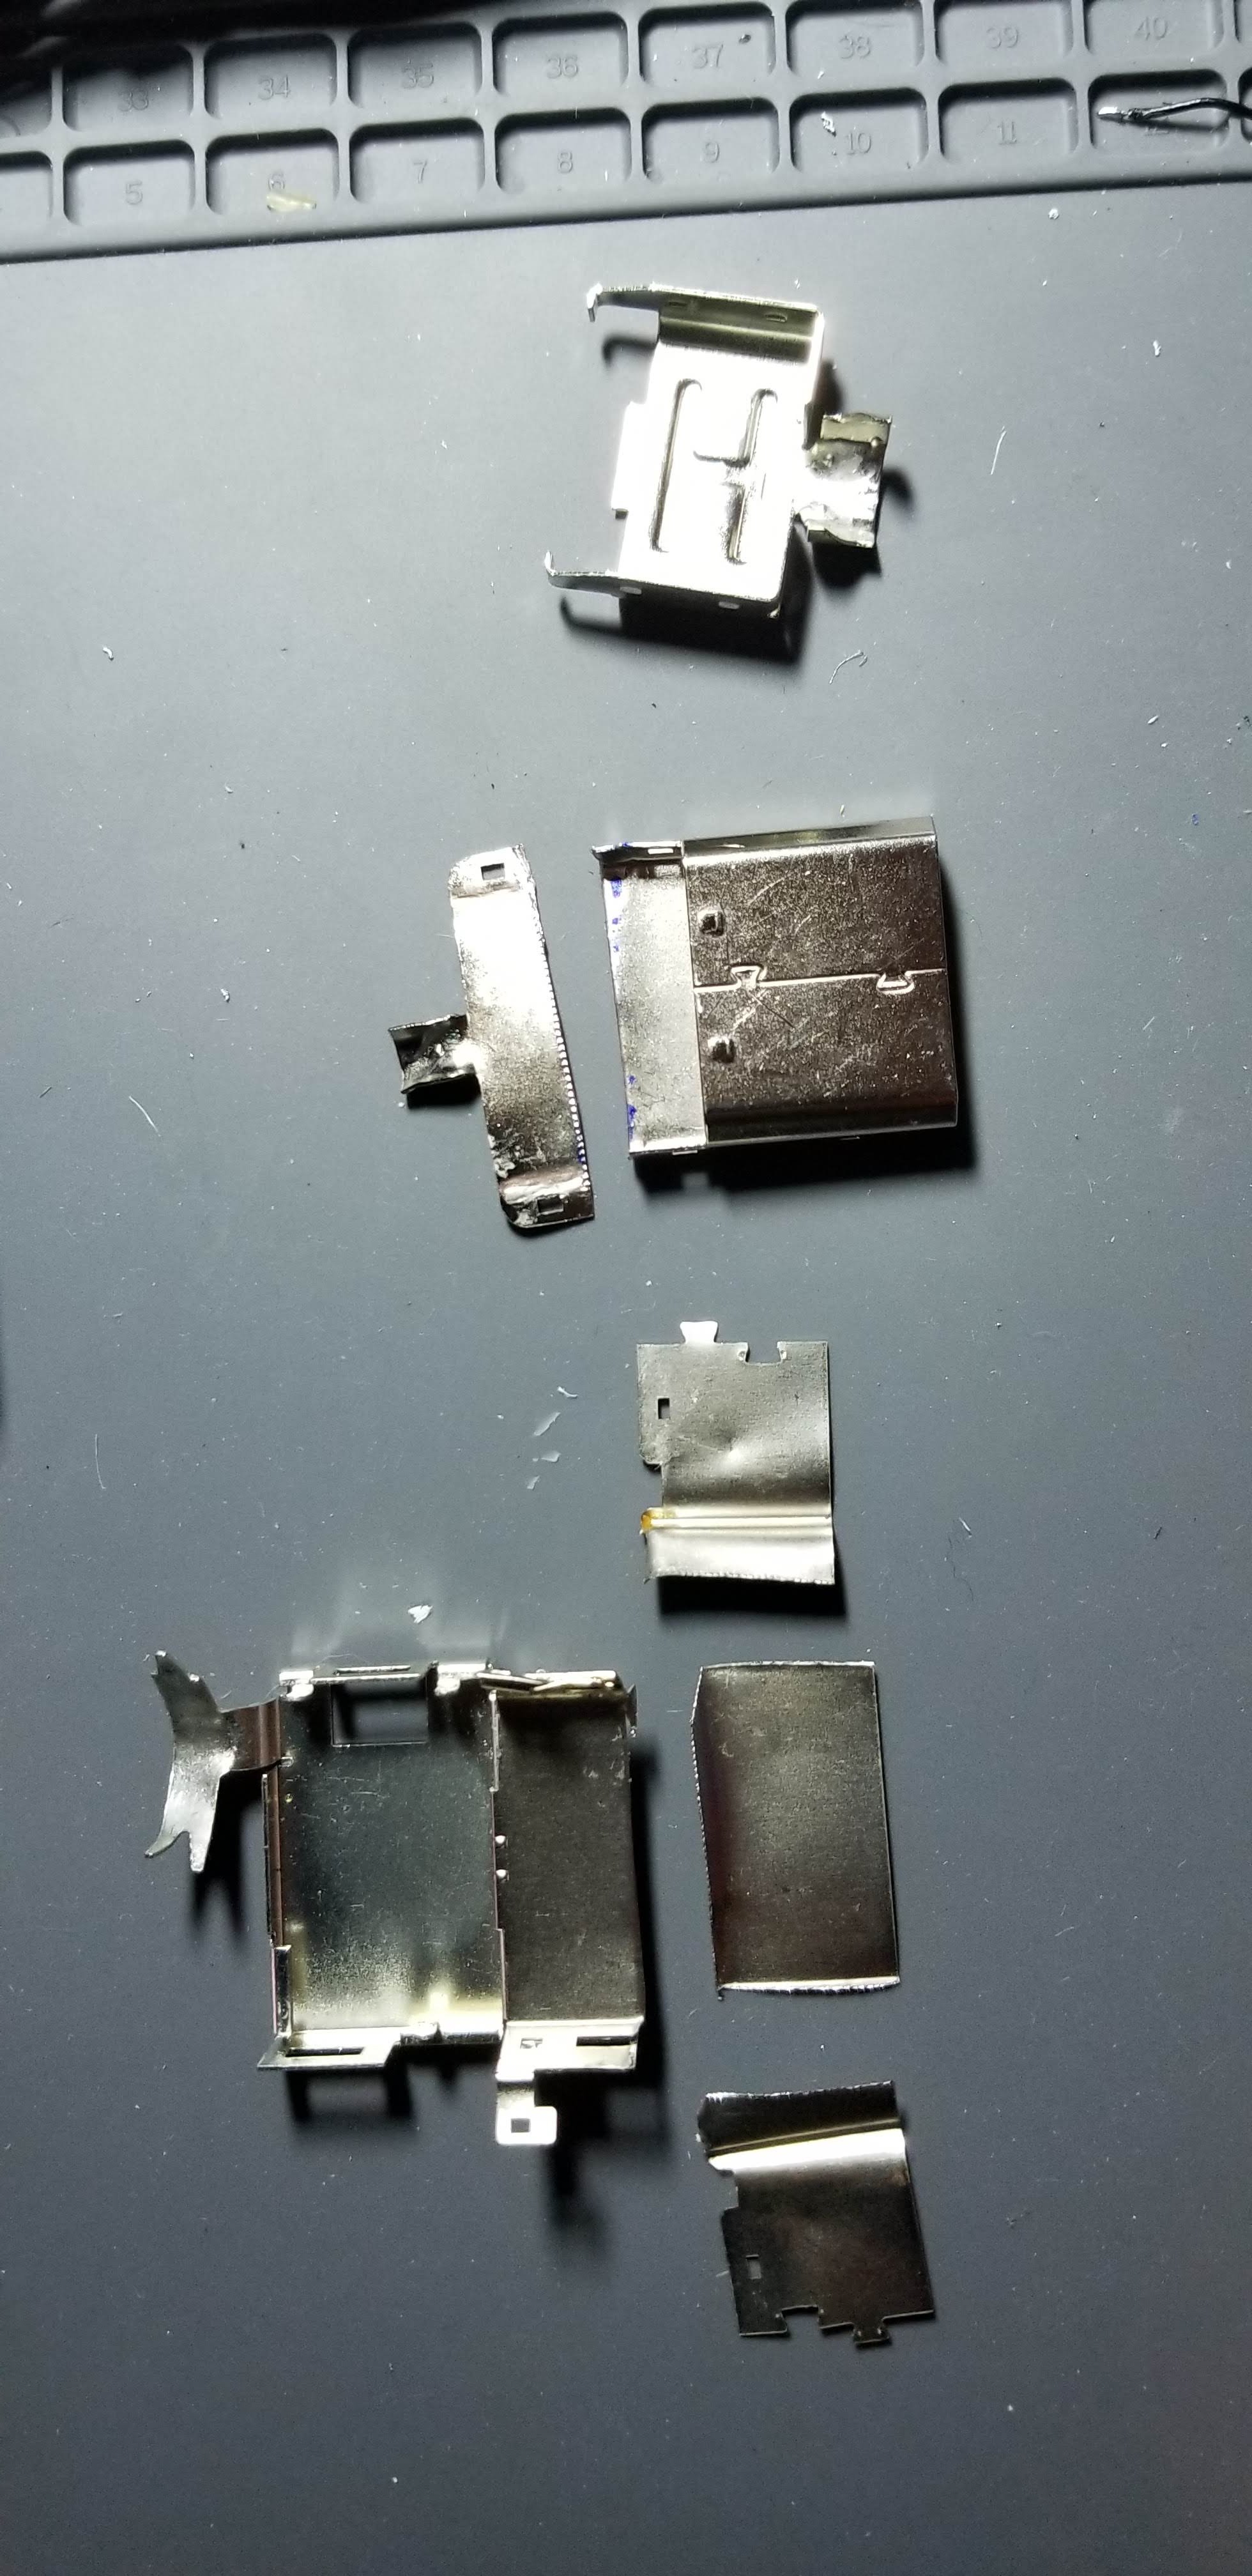
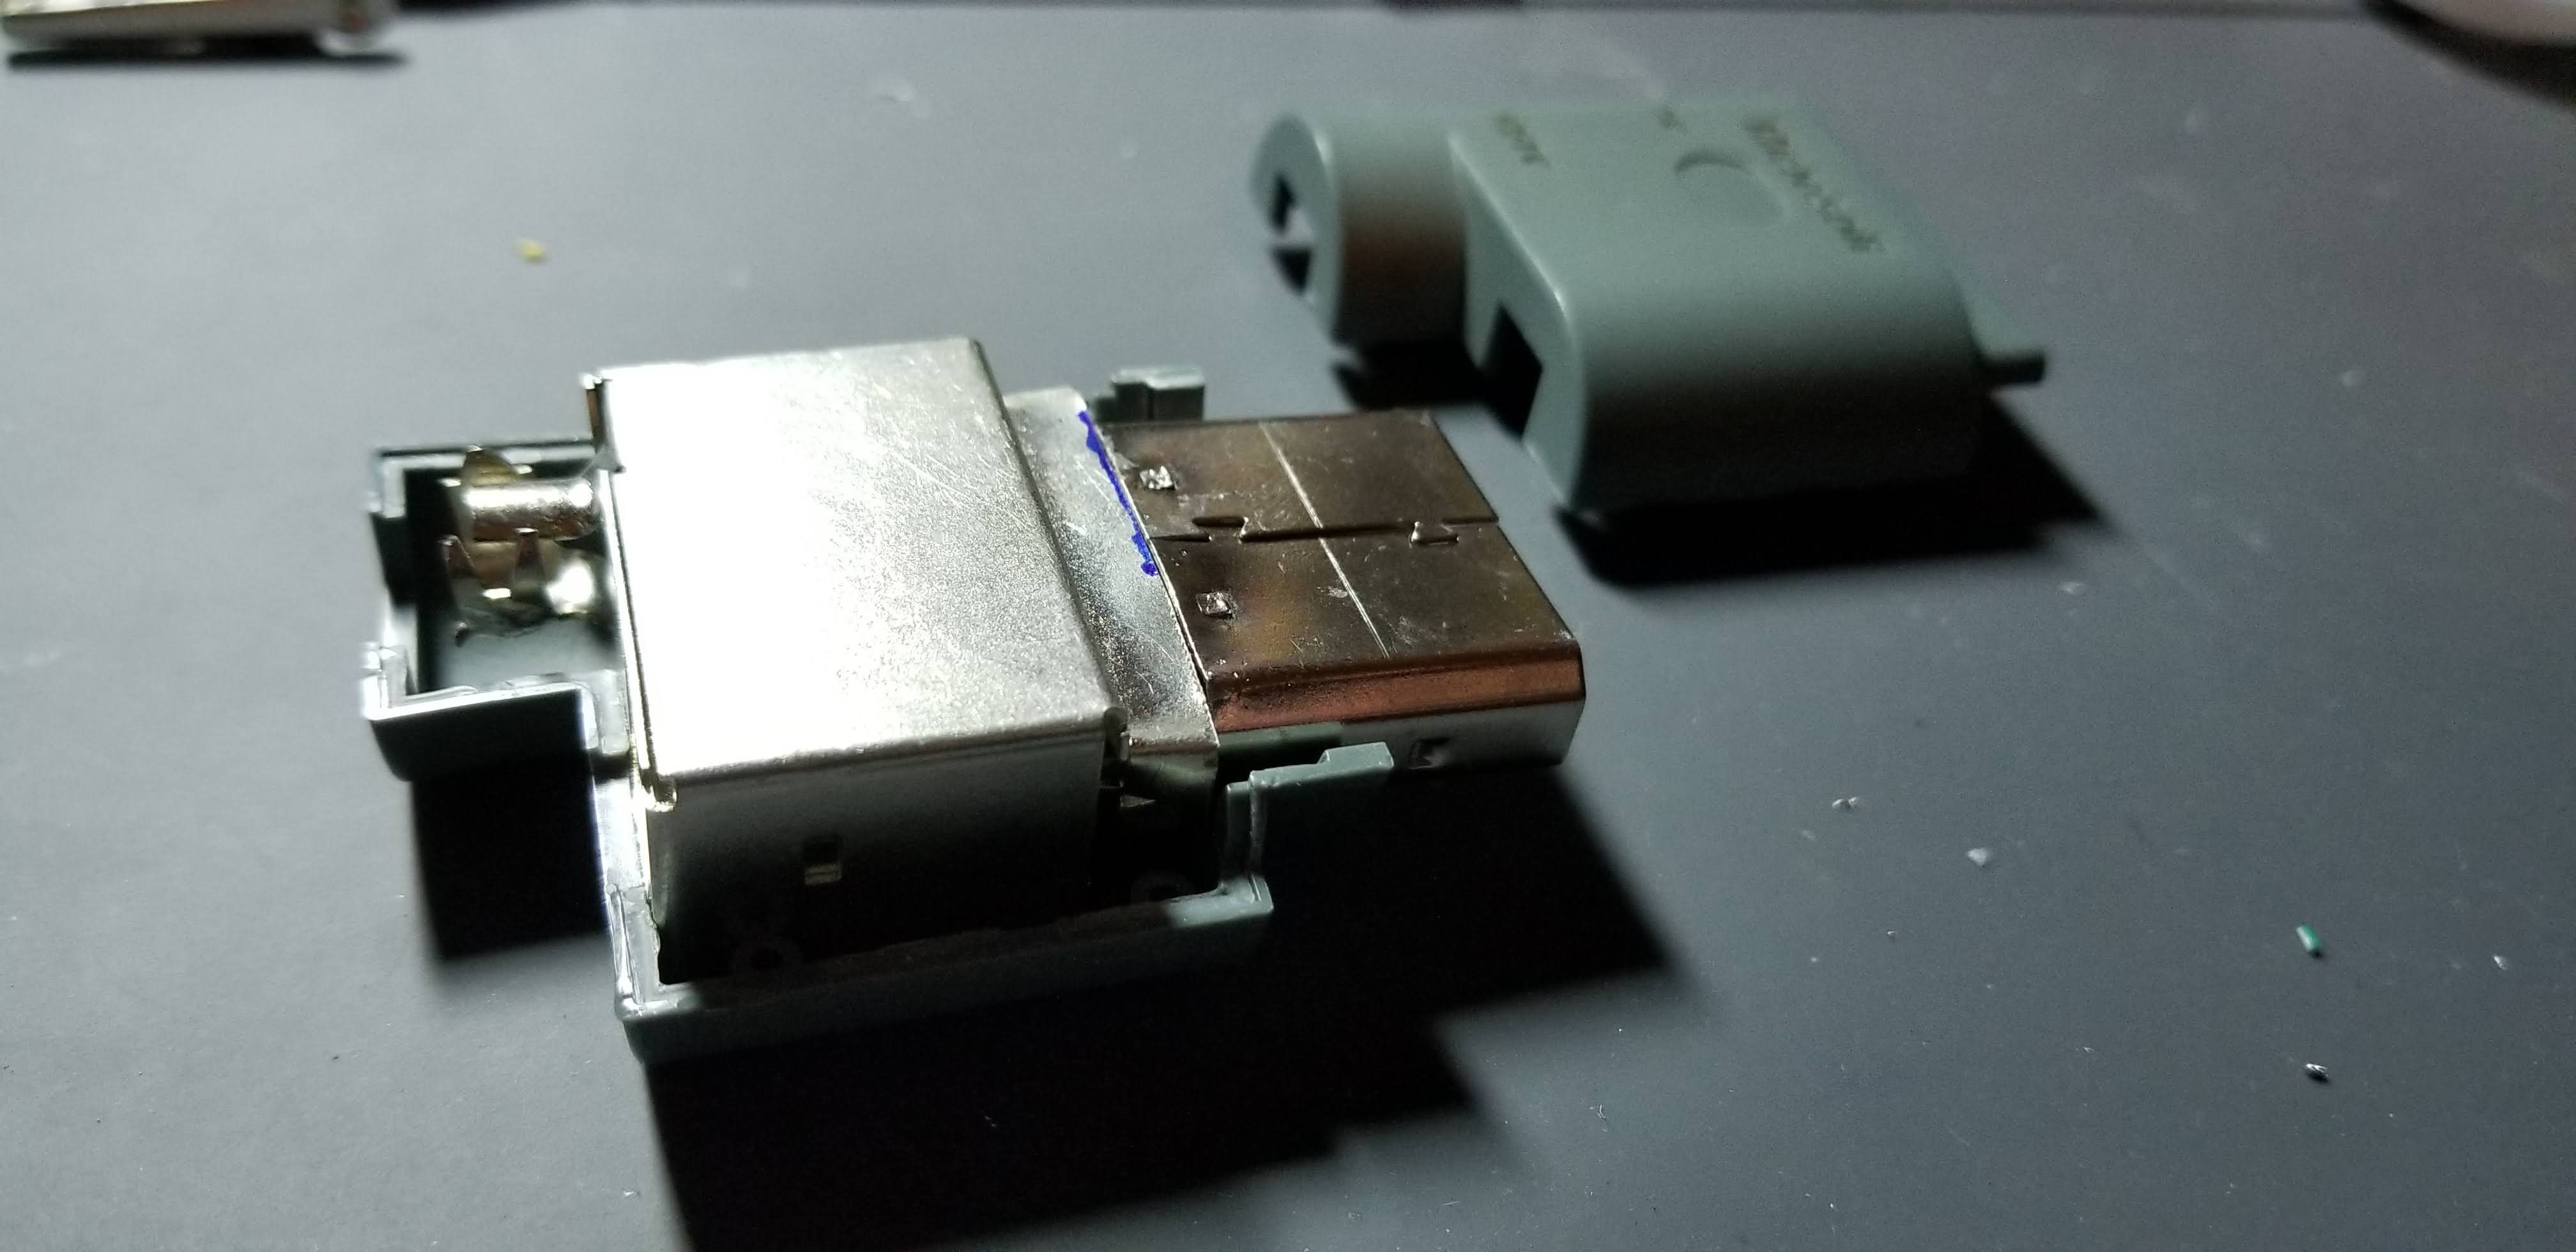
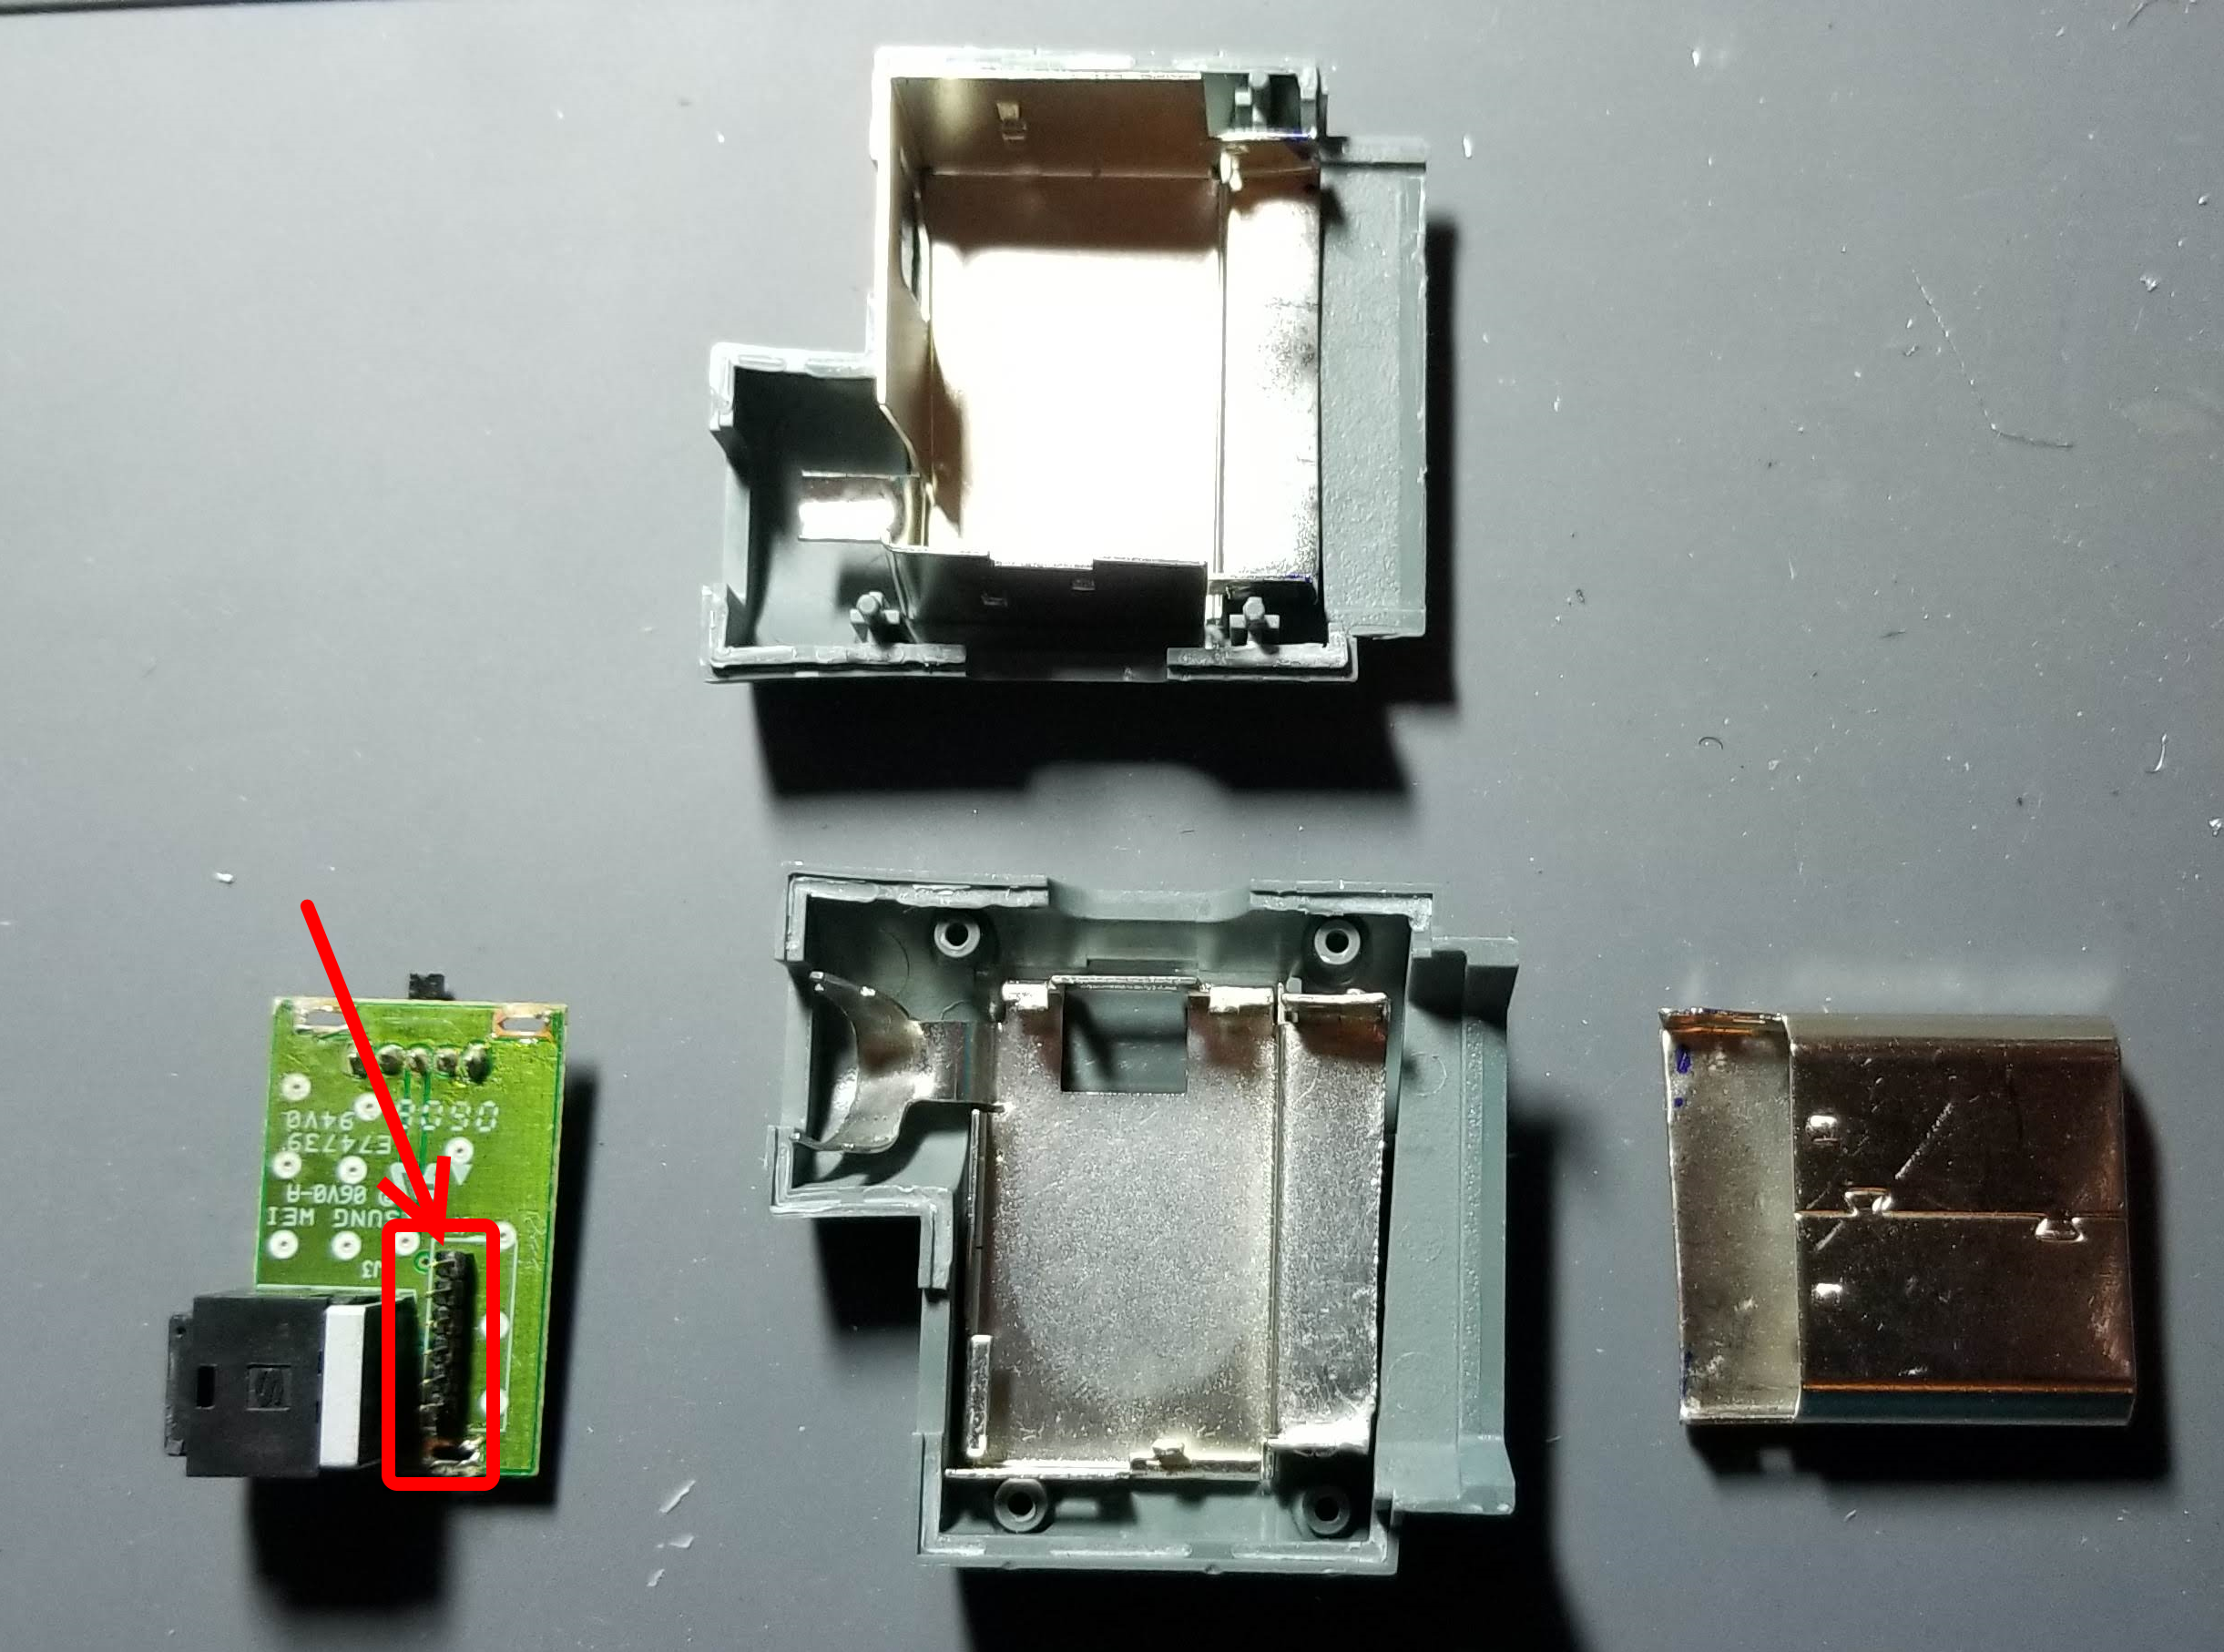
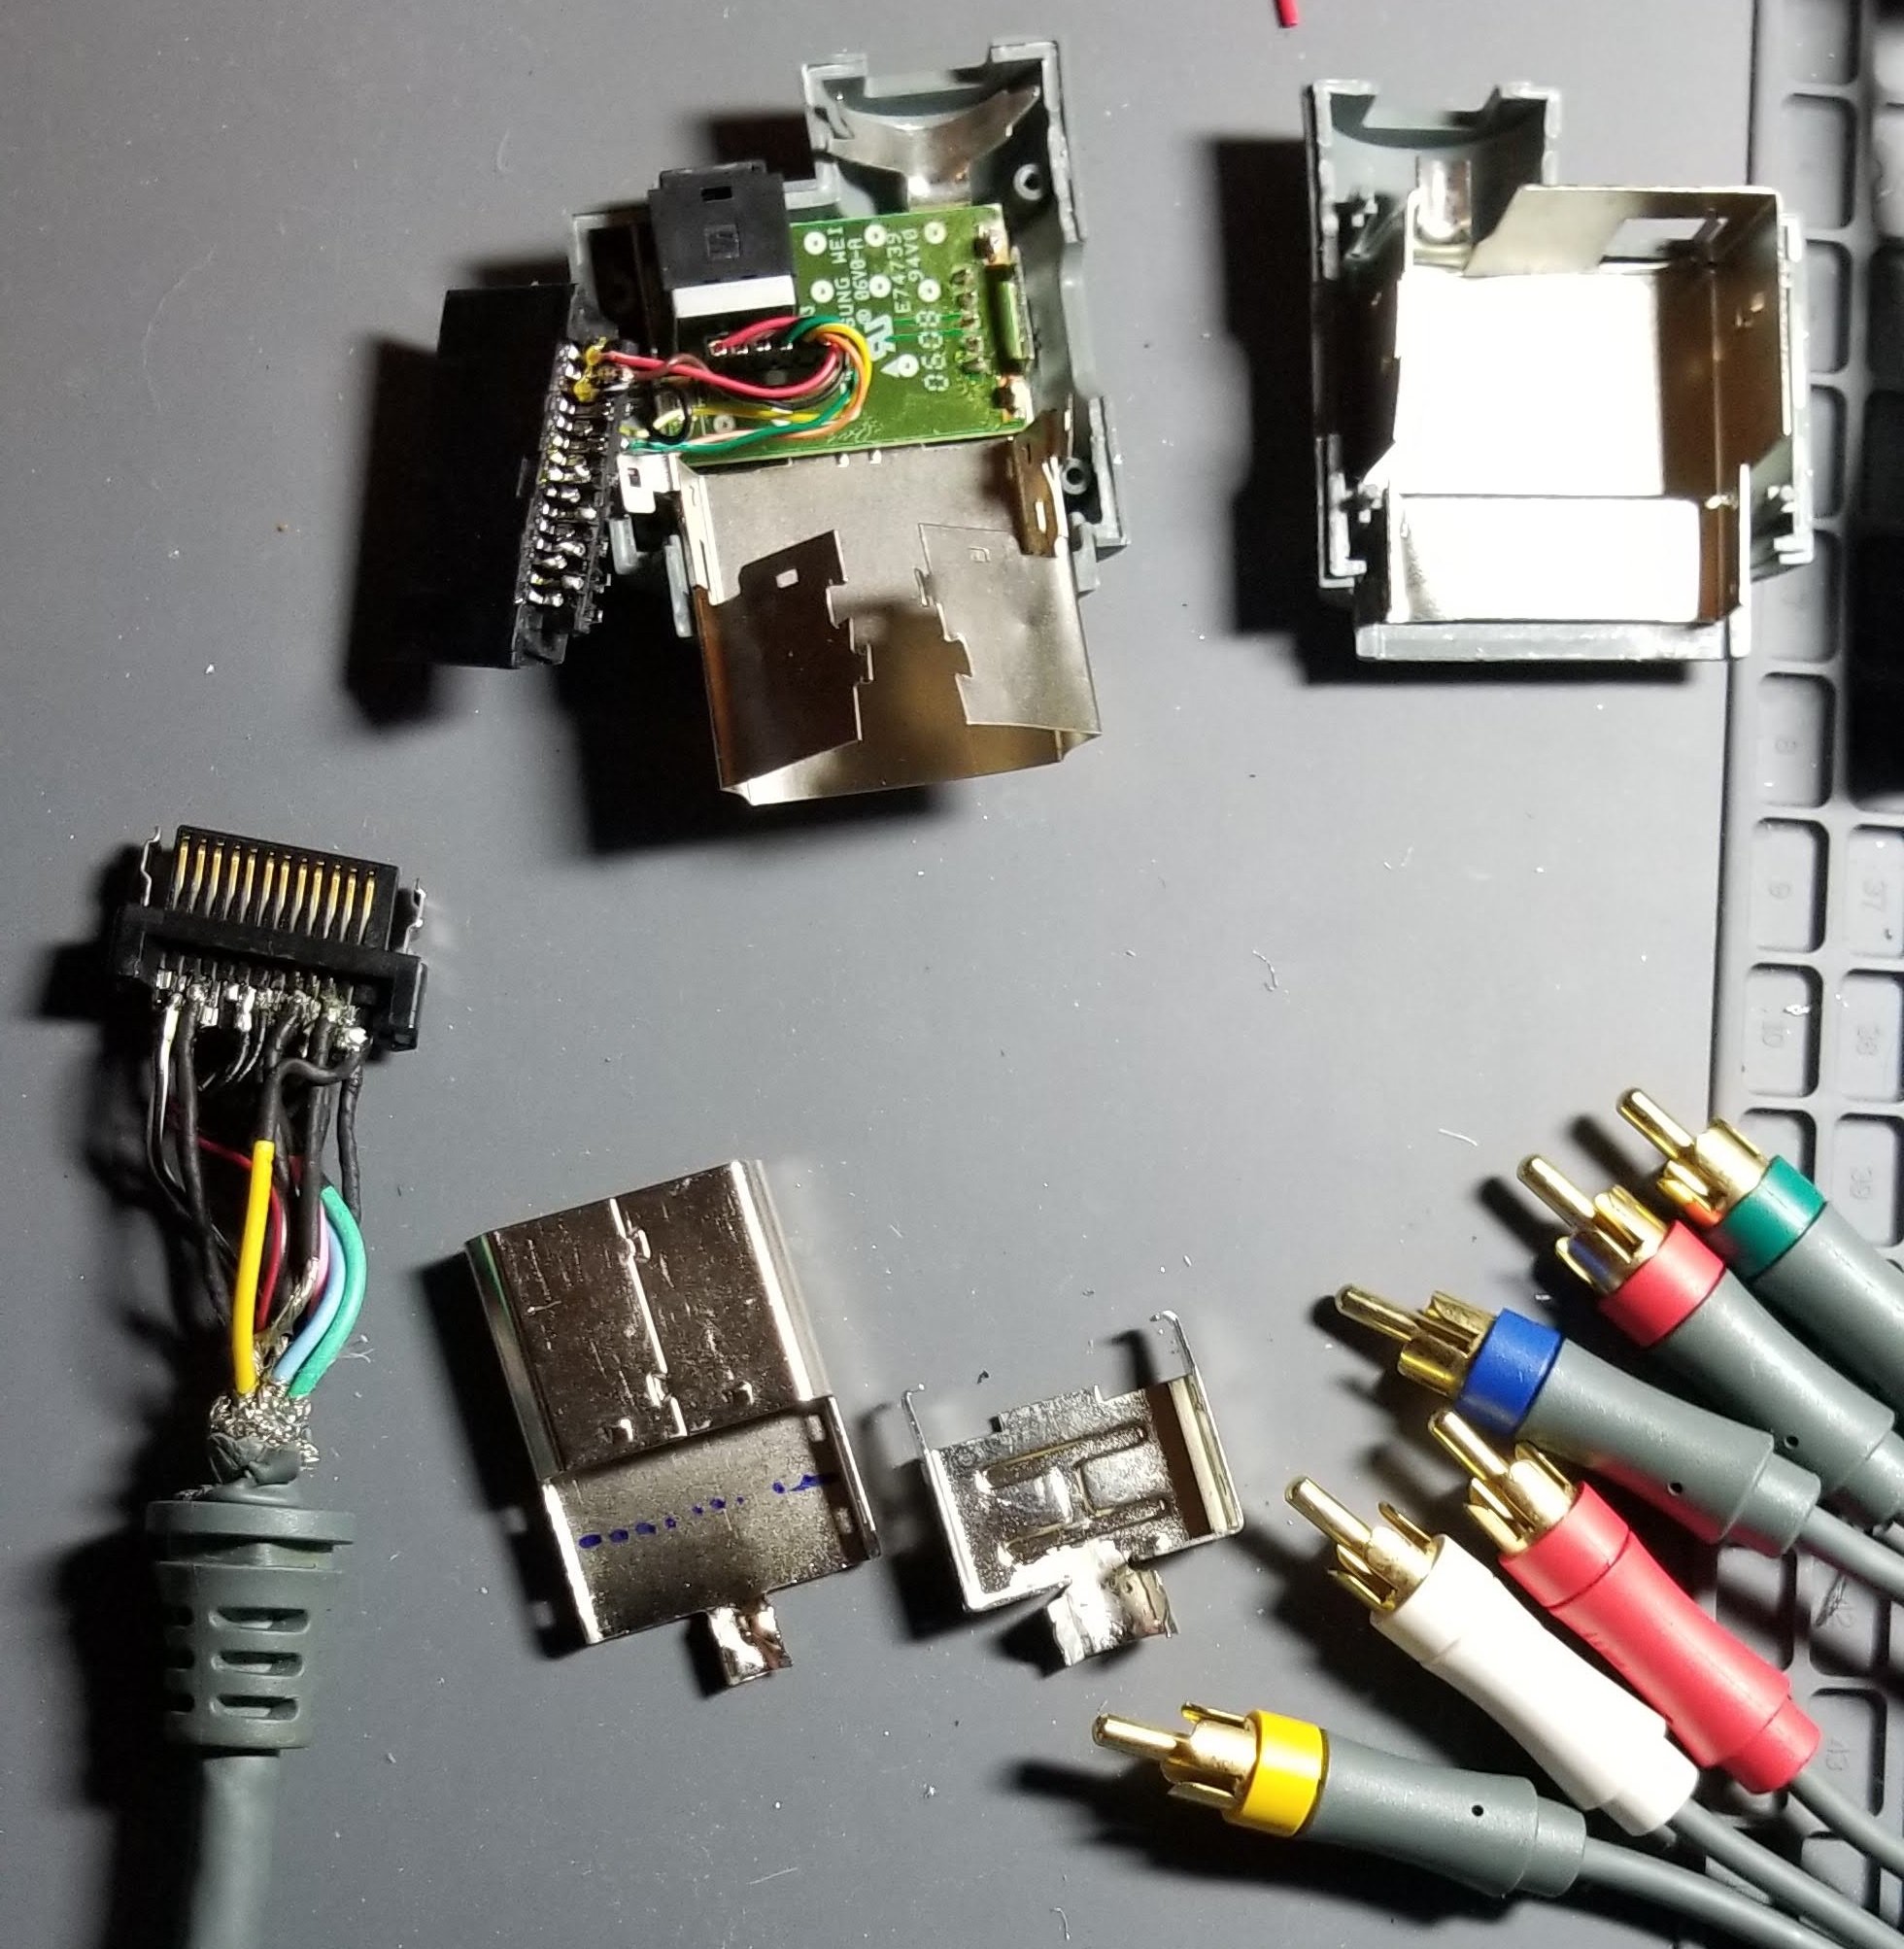
It takes a lot of work, but it can be done with patience. You have to cut the OGXbox metal housing down (I used a dremel cutoff tool) to be a length that can be soldered to the base piece. Difficult to explain, but it can be done as you can see from the pictures the parts need to be cut up to and re-joined. Before you disassemble the OGXbox component cable, I would recommend scribing (marking) the exact length. Take a screwdriver or sharp edge and mark where the plastic is on the metal so you know how much metal you need to cut. You might be able to see the mark on 20190603_210457.jpc picture.
-
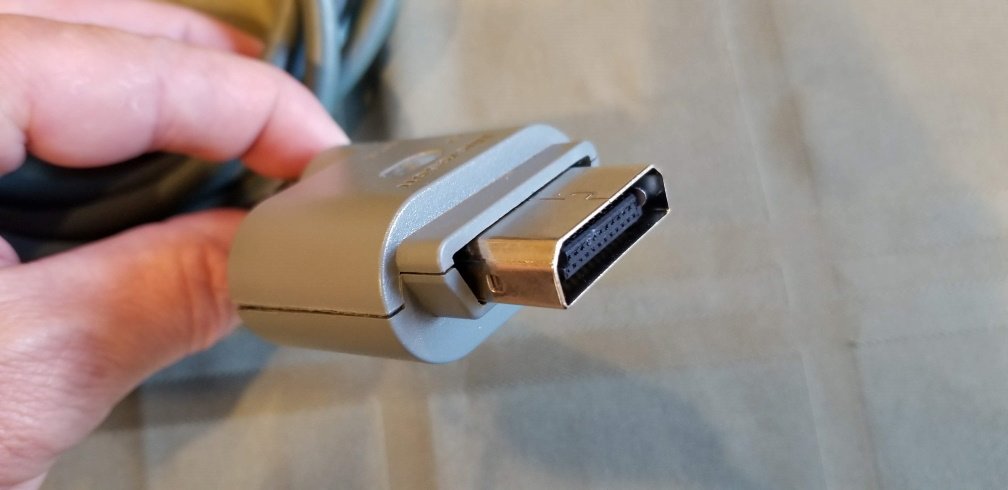
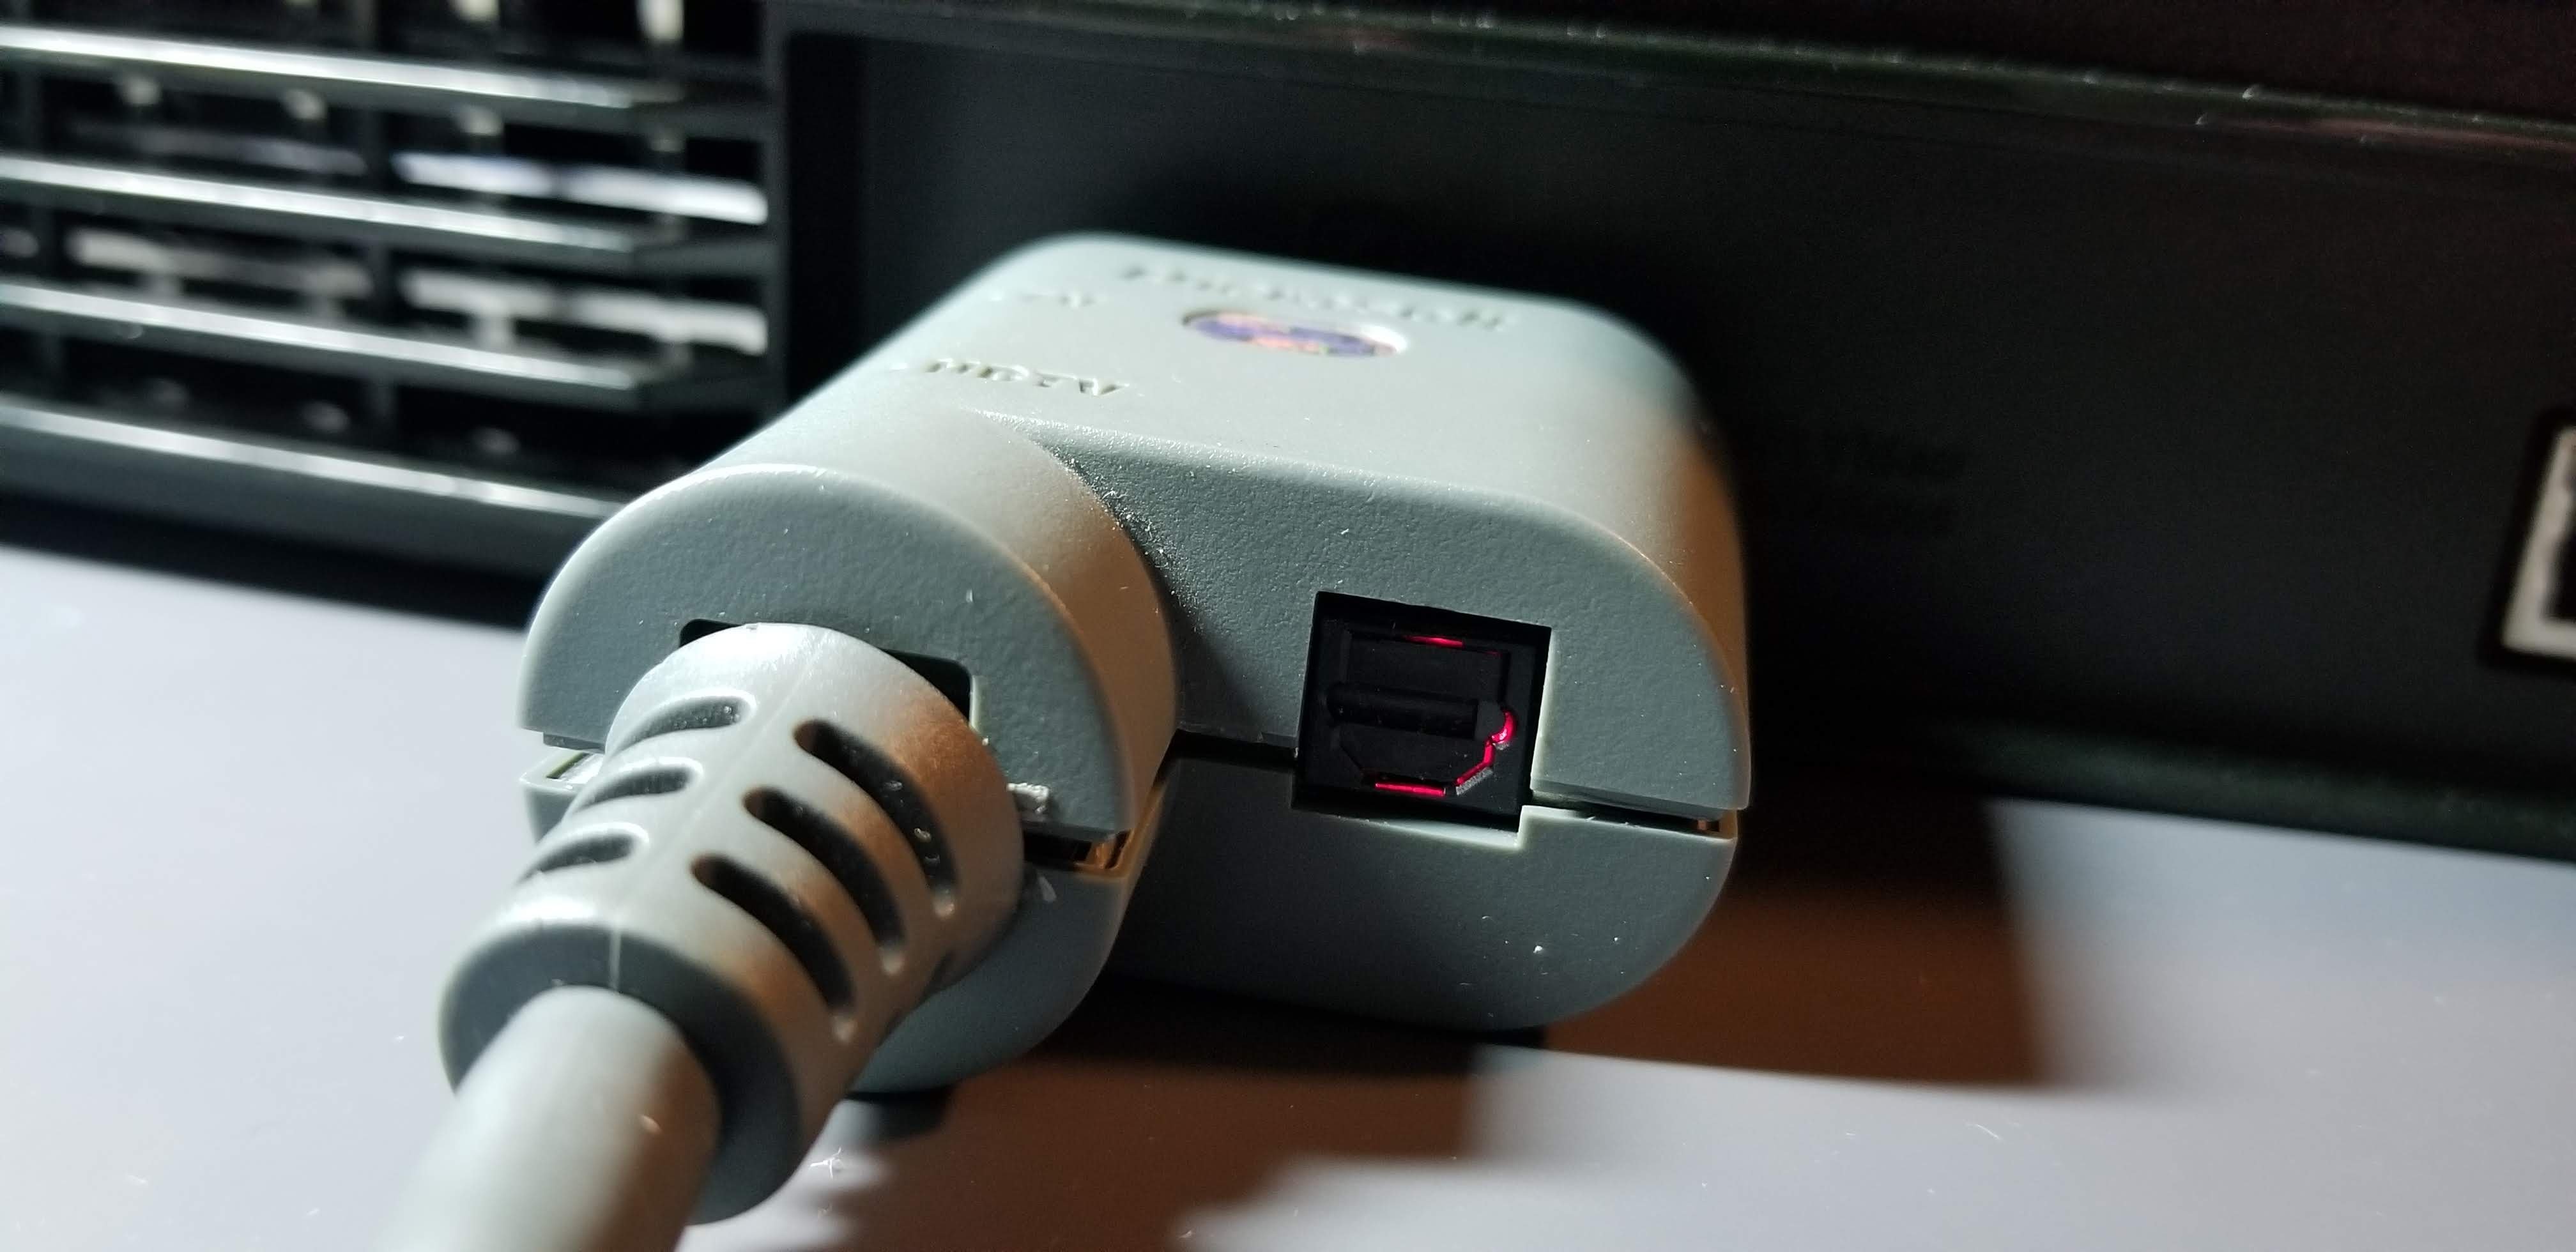
Good luck on your project. Take your time and would recommend de-constructing things non-destructively as possible (unsolder instead of cut ~ at least the 360 cable which you want to re-use). Done properly you can re-use the optical out and housing (with some filing).
Once you get the 360 housing open you can push the connector out; remove the hot-glue like stuff and unsolder the wires. I used two different tip sizes, one for the ground wires and a smaller one for everything else.
-
Converting an XBOX 360 Component Cable to work with an Original XBOX is a pretty good project depending on your soldering skills.
If you go that route I have some tips since I have done about a dozen of these with working optical ports and SD<-->HD Switch.Unlike some of the videos; I recommend unsoldering the wires from the 360 connector instead of cutting them to keep the length long enough so you can reuse the 360 housing (with a bit of filing).
-
1
-
-
Are they Actual Microsoft Component cables or the cheap ones?
The cheap ones (typically under $10 on amazon/fleabay) will product horrible images because they are not properly build or shielded.


Board Life Status
Board startup date: April 23, 2017 12:45:48
How To Make XBox Image Look Sharper?
in General Xbox Discussion
Posted
You have to cut a trace on the little PCB, then wire the middle post of the switch to pins 5,6 and 7 (GND).
With the switch in the "SD" position wire to pin 17
With the switch in the "HD" position wire to pin 18 and 19
Use a blunt plastic object to push the original 360 plug into the housing where it can be removed; however that part of the shield is discarded.
I used a Dremel to cut the metal shield down to size and a file to debur the edges.