

cch2001.tw
-
Posts
36 -
Joined
-
Last visited
Content Type
Profiles
Forums
Calendar
Store
Posts posted by cch2001.tw
-
-
1 hour ago, Marty said:
Nobody knows that answer because we don't know the cause of your XBOX's current reason for malfunction.
Yes....so I will try it.
There was no problem at first, just the capacitor was a little bulge, but it still played normally. I first used configmagic to change the HDD key to 32 1s, and everything was normal and there was no problem. Later, I went to buy a supercapacitor.
Maybe because of my poor soldering and handling , dropped one of the capacitors, causing the power to fail. Fortunately, I found the reason later and repair.
After the repair, console can power on but encountered the error 07 problem. I also did a cross test, took out the stock HDD and the password had not been changed. After replacing it, error 06 appeared. After changing it several times, the result was the same.
I’m a little confused. softmod HDD show error 07 (changed HDD key to 32 1s), but change stock HDD (no change HDD key) is show error 06, different error code.
I feel that is caused by a hardware problem on the motherboard, not sure.
-
2 hours ago, lopenator said:
welp. time for an upgrade
so.....after install modchip will be repair? I think...
-
5 hours ago, Bowlsnapper said:
That should help him out. After all it is a forum, where people come to hear whether they are the cause of the issue, rather than to come to find the solution to it.
@cch2001.tw I am actually new to electronics, even though I've been working on them for quite a while now. I've only really begun to try to actually understand what I am doing. The fact that multiple points are showing absolute zero DOES make me question the readings of the multimeter. However this is two cases of this now simultaneously, which is not usual... If all you did was replace the clock cap, I highly doubt you did something ""accidentally" to completely fucking decimate the board. You probably would have something in your memory that would be a clue as to whether you were the cause of the problem. If the console started acting up right when you worked on it, then common sense would lead me to believe that something happened while it was open. But that may have been something that you weren't able to avoid and you shouldn't really blame yourself for. It could a happened if the guy next to you had been the one to take it apart.
Don't let anyone try to make you feel like an idiot because you tried to replace a clock cap. That's necessary preventative surgery if you're trying to prevent trace rot from happening and your console from being destroyed anyway. Everybody knows that. Don't beat yourself up, man, whatever you do.
I would definitely ask somebody like Kaos who is very much a hardware wizard, but it looks like even he may not know what is happening @KaosEngineer
Which motherboard revision is this?
Thanks all. I checked more times and found root cause, one component had tilt and poor joint, post resoldering console can power on, but encountered another one problem, show error 07 by softmodded HDD....

-
I know, becasuse I saw many experts in forum, so maybe some problem can be solved.By the way, OG Xbox is not a popular game console in our country, there are not many technical documents to refer to.
For detail step I replace clock cap.
1. Try to resoldering to remove
2. Change 1.0F/2.5v super capacitor to 1.0F/2.7v (I don't know that if any risk, not same spec). But I change back bulge one still no power.
3. resoldering time may long.
4. I only know my console is 1.6, not know mainboard revision.
-
5 minutes ago, Bowlsnapper said:
That should help him out. After all it is a forum, where people come to hear whether they are the cause of the issue, rather than to come to find the solution to it.
@cch2001.tw I am actually new to electronics, even though I've been working on them for quite a while now. I've only really begun to try to actually understand what I am doing. The fact that multiple points are showing absolute zero DOES make me question the readings of the multimeter. However this is two cases of this now simultaneously, which is not usual... If all you did was replace the clock cap, I highly doubt you did something ""accidentally" to completely fucking decimate the board. You probably would have something in your memory that would be a clue as to whether you were the cause of the problem. If the console started acting up right when you worked on it, then common sense would lead me to believe that something happened while it was open. But that may have been something that you weren't able to avoid and you shouldn't really blame yourself for. It could a happened if the guy next to you had been the one to take it apart.
Don't let anyone try to make you feel like an idiot because you tried to replace a clock cap. That's necessary preventative surgery if you're trying to prevent trace rot from happening and your console from being destroyed anyway. Everybody knows that. Don't beat yourself up, man, whatever you do.
I would definitely ask somebody like Kaos who is very much a hardware wizard, but it looks like even he may not know what is happening @KaosEngineer
Which motherboard revision is this?
-
53 minutes ago, Marty said:
Everything was working fine, then you opened it up and "worked on it"....
I suspect something regarding your work or the way you handled the motherboard points towards it's apparent death.
Scratched or broken trace, component knocked off the board, static shock, bridged points....it's hard to say.
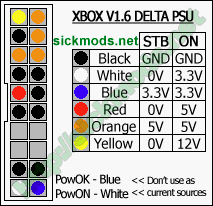
By the way, I follow instructions from this topic to check voltage, mine console only DC4V, normal should be 5V. Any instructions for next step to check? thanks
-
49 minutes ago, Marty said:
Everything was working fine, then you opened it up and "worked on it"....
I suspect something regarding your work or the way you handled the motherboard points towards it's apparent death.
Scratched or broken trace, component knocked off the board, static shock, bridged points....it's hard to say.
I know your point.....maybe I damage something when soldering and replaced clock cap.
-
9 hours ago, Bowlsnapper said:
After reading this whole thread, I was going to say that the probability of your meter never giving a positive reading to anything is becoming more and more improbable... and suspicious. Lol. You sure the multimeter is working?
Hello Bowlsnapper, my console looks same problem as Cytra's. But I only change clock cap, no any changed for PSU and before replace clock cap is good. Any advice? thanks
-
On 7/15/2022 at 2:27 AM, KaosEngineer said:
Make sure that the power supply unit's 5Vdc standby voltage is present at the motherboard's power connector.
Use a multimeter set to measure DC Voltages. Set the multimeter to the 20V dc maximum range. Connect the multimeter's red (+) probe to one of the orange wires and its black probe (ground) to one of the black wire metal contacts in the connector body or the metal RF shield.

Is 5Vdc present?
Hello, Kaos, I encounter same problem. Mine is 1.6 softmod and everything is great before today. Because I saw clock cap had bulge, so I bought one and try to replacement. Initial clock cap is 1.0F/2.5v, I changed 1.0F/2.7v. After replacement, the tragedy begins.... My xbox can not turn on power and I only do this work, no take off PSU
Finally, I change back bulge clock cap, result is same, can not power on. Also check other caps, they are normal. (no bulge)
So....I tried to search more solution to fixed and I found this thread, follow previous power check, mine is only 4Vdc. Could you help me how to do next step? thanks a lot!!!!
-
2 hours ago, Bowlsnapper said:
Yes, it is a component converter in a box. You are correct. Analog to digital. That's supposed the be the appeal of MakeMHZ's HD+: An all digital path.
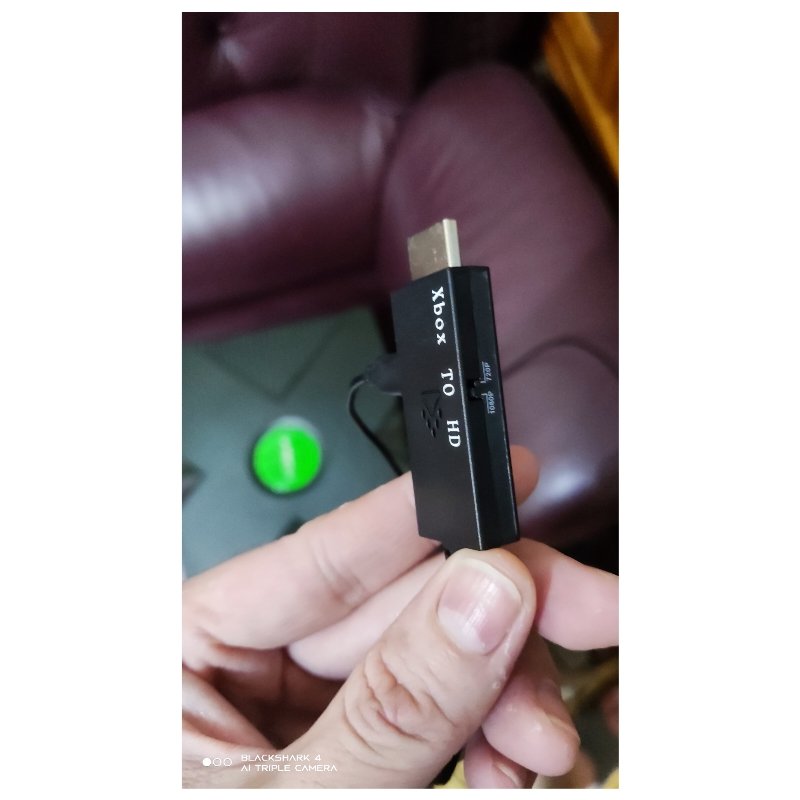
Thanks bro., I think bought fake one....maybe this adapter just transfer RGB resolution to HDMI output, actually, resolution is no change
-
10 hours ago, Bowlsnapper said:
Error 12 seems to be a DVD ROM circuitry failure.
Like the PCB is bad. Or it's not setup correctly, like jumper settings are wrong.
But the place to start when editing video settings is with the eeprom, i.e., the MS Dash.
Already confirmed all connector are correct, I copy backup file to run (MS dash), still show errors, now is error 21
-
2 hours ago, HDShadow said:
I suspect the cause of you not being allowed to change resolution options with the UnleashX dash is simply because you're using an SD (Standard Definition) type AV cable ie. AV Composite or SCART/SCART RGB or S-Video which only support 480i/576i (NTSC & PAL60/PAL50).
You need to be using a Component cable to get any of the ED/HD screen display options ie. 480p, 720p and 1080i.
I use that, HDMI adapter. Seller said that had support HDMI, but still can not switch to other settings for high resolution ...

-
5 hours ago, Bowlsnapper said:
Error 12 seems to be a DVD ROM circuitry failure.
Like the PCB is bad. Or it's not setup correctly, like jumper settings are wrong.
But the place to start when editing video settings is with the eeprom, i.e., the MS Dash.
By the way, I already change new HDD, not sure if use MS dash will affect and show erreor12 or not, thanks.
There's no impact by use UnleashedX for my console (new HDD)
-
3 hours ago, Bowlsnapper said:
Error 12 seems to be a DVD ROM circuitry failure.
Like the PCB is bad. Or it's not setup correctly, like jumper settings are wrong.
But the place to start when editing video settings is with the eeprom, i.e., the MS Dash.
Thanks, but if console run unleashedX, that is normal and no show error12, only run MS dash had this issue. I will try to reassemble and test, thank you
-
Hello guys, I finished OG XBOX softmod few days ago, thanks for some buddy in forum.
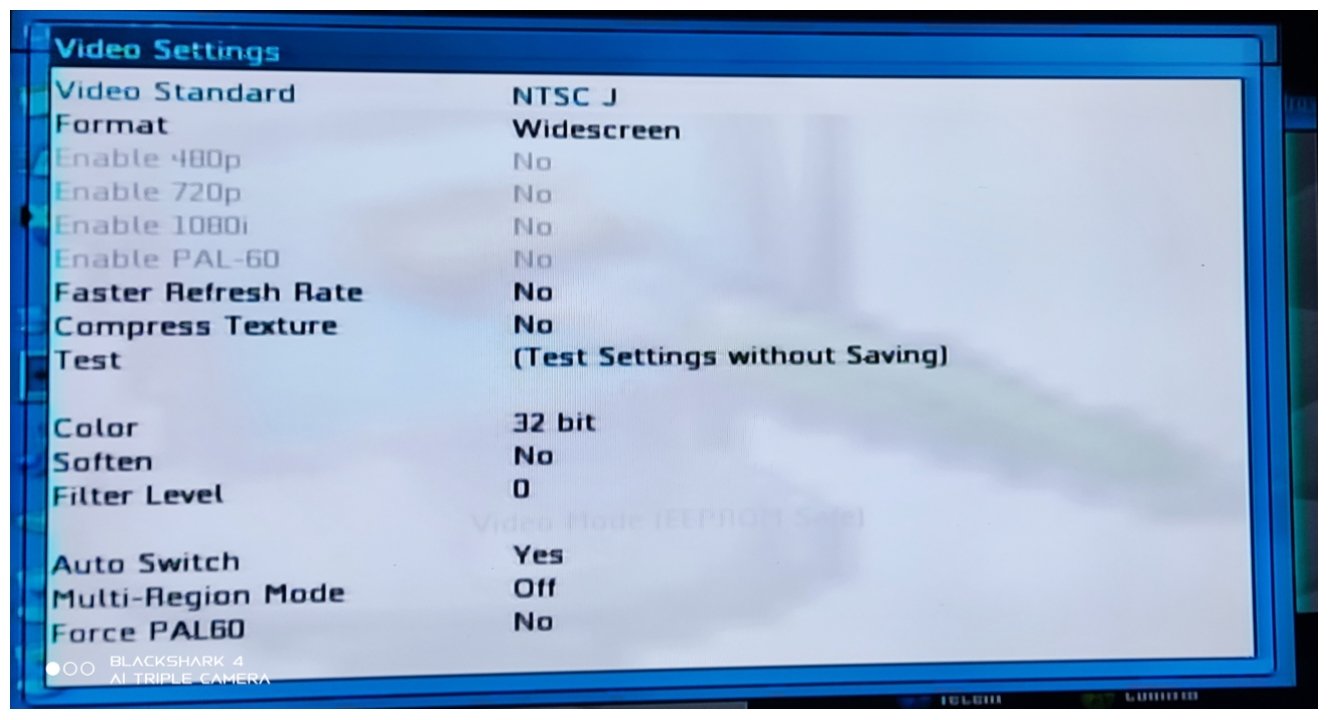
Currently, I had another one question, in unleashedX GUI can not change resolution. I tried to search the solution, that should be go back MS dashboard to change, but my question is my unleashedX menu had no MS dashboard this item.
I also check C drive, but no MS dashboard files can execute.So, I copy my C drive backup files (before softmod) and execute MS dashboard in unleashedX file explorer, result is show errorcode12, can not enter MS dashboard. Could you help me to how to change high resolution? thank you.
-
3 hours ago, HDShadow said:
I sort of agree, not that the Startech is any better, but that ones like those you have can have issues ie. they seem not to have had the same quality control. When they're good they are just as reliable but there seem to be a higher percentage of bad ones out there and that's more likely the cause when you get problems like this and are doing everything else correctly.
Thanks for everyone. I did it, key point is plug timing. My method is different from others. Firstly, IDE to SATA adapter not plug on HDD, and only plug power wires on adapter.
When run Chimp and take out IDE bus from DVD, first step is plug IDE bus to adapter, than plug adapter to SATA HDD. (I think key point is adapter need to plug IDE and power wires together)Share this method to all.
-
 1
1
-
-
48 minutes ago, HDShadow said:
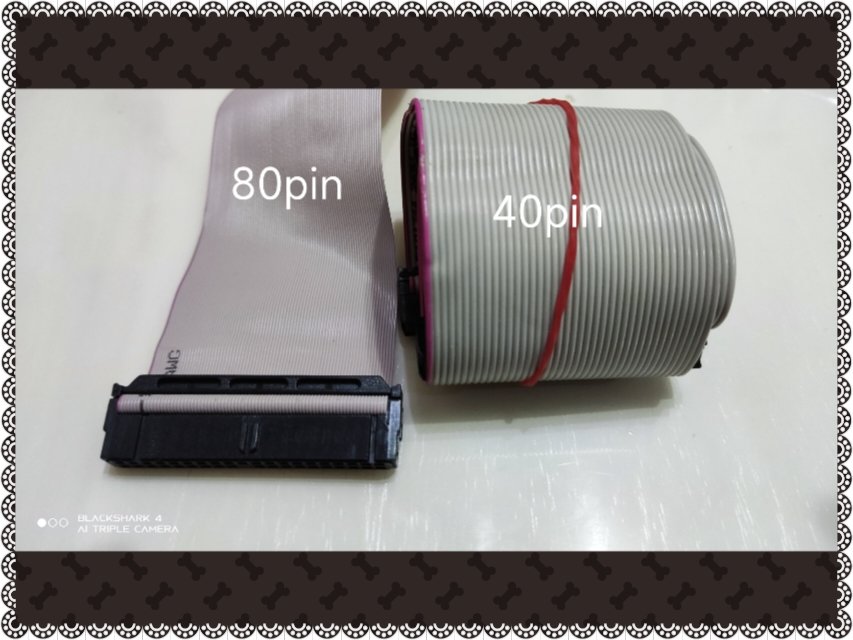
Assuming you're doing or have done all the things suggested, in particular using an 80 wire IDE cable, you have not said what make/model the HDD is.
Also check IDE cable, that should be correct, both 40 wire and 80 wire cable are fail, I tried...
-
33 minutes ago, HDShadow said:
Assuming you're doing or have done all the things suggested, in particular using an 80 wire IDE cable, you have not said what make/model the HDD is.
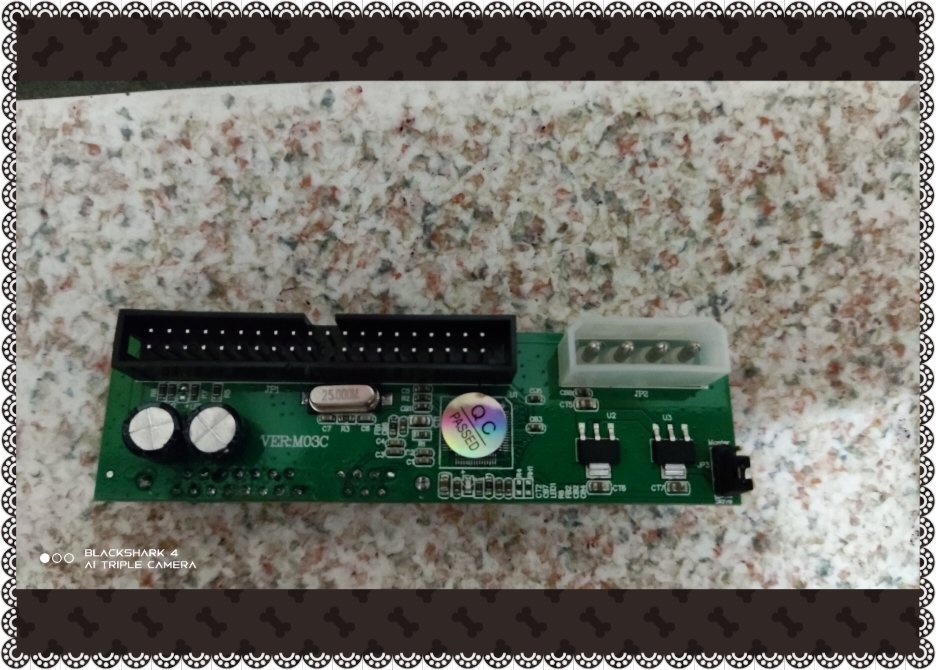
Attach SATA to IDE adapter for reference, right-bottom side is jumper, already set slave
-
23 minutes ago, HDShadow said:
Assuming you're doing or have done all the things suggested, in particular using an 80 wire IDE cable, you have not said what make/model the HDD is.
Sorry, attach HDD information for reference
Hitachi Deskstar / SATA
Model: HDT725025VLA380
Capacity: 250gb
-
7 hours ago, KaosEngineer said:
Which adapter is it?
Does it have a MASTER/SLAVE jumper block?
If so, make sure it is set to SLAVE.
If not, it will not work with Chimp to clone the old to a new hard drive. You need to obtain an IDE-to-SATA adapter that does have a MASTER/SLAVE jumper block to select which device it is on the IDE bus.
Yes, I confirmed SATA adapter is use Slave jumper and tried many time, Chimp still show same message.....
Could I use copy method to new hard drive? any risk for that? thanks
-
Yes, I use SATA to IDE adapter, maybe there had compatible risk.
I had one idea, can I use FATXploer to copy all folders and files to new hard drive and change that to XBOX original hard drive?
I mean backup original hard drive to new one and change that? Is that method available? thanks
-
Hello guys,
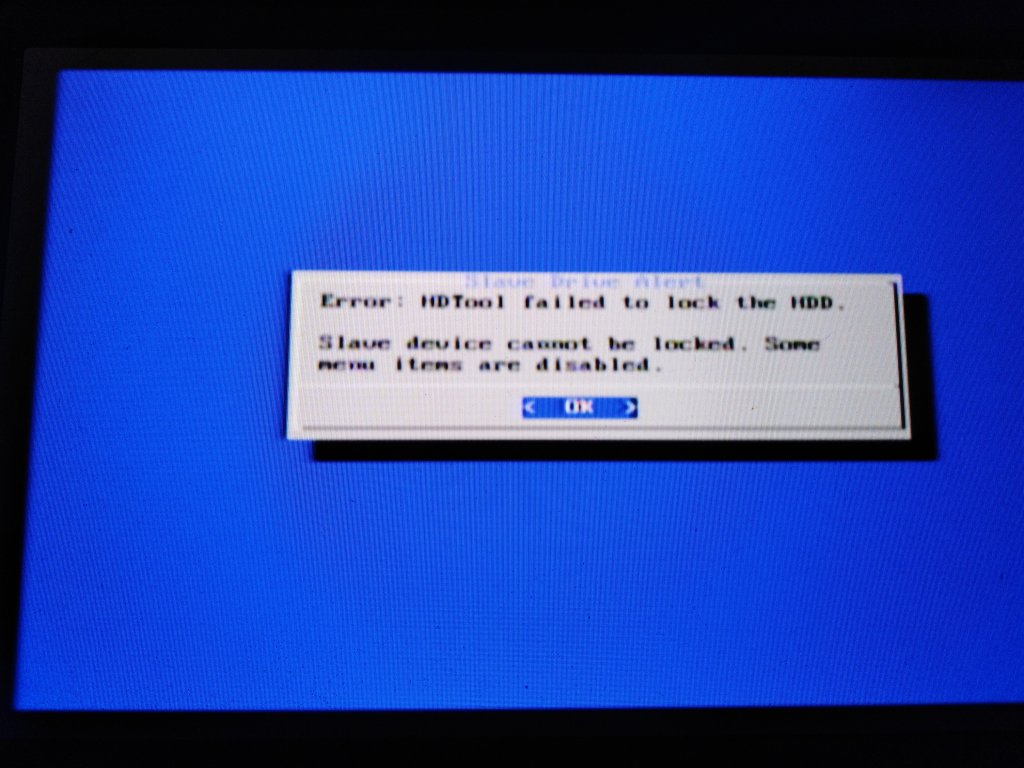
I tried to change large hard drive by use Chimp application, but show this error message. Could you help me? I am not sure what step is wrong.
My process step as below:
1. Console turn-off, plug new hard drive power. (no connect IDE bus)
2.Console turn-on, my console already softmod by hotswapping
3.Run Chimp application
4.Take out DVD IDE bus and plug to new hard drive
5.I saw console show some message, should be OK
6.Go to dialog box, but show this message, "slave device can not be locked"And I check program function, slave device function is disable.
By the way, before plug new hard drive, I format by FATXplorer. Any mistake of the procedure?
Need you help! thanks so much! -
On 5/22/2023 at 7:20 AM, KaosEngineer said:
Yes; however, for step 6, forget about using the old buggy Xplorer360 app instead use FATXplorer 3.0 beta.
You could use xboxhdm23usb beta3 to install a no-original-game-disc-required bootable softmod installer.
To obtain the latest bootable softmod installer, download XBHDM Build.zip from the pre-built Xbox Softmodding Tool repository's Installer Variants subfolder:
https://drive.google.com/drive/folders/1Gs_yYVotDxAxtHZeHUVr_ts7KeMgqEmQ
Extract its content and replace the files in the XboxHDM23USB Beta 3's HDD_files/C folder.
Or, use FATXplorer 3.0 beta to mount the unlocked hard drive's C partition and write the bootable softmod installer files extracted from the XBHDM Build.zip file to it.
Hello Kaos,
Could you please share tutorial that you mentioned? start from step 6, softmod by FATXplorer 3.0 beta with XBHDM Build.zip
Thank you!
-
On 5/22/2023 at 7:20 AM, KaosEngineer said:
Yes; however, for step 6, forget about using the old buggy Xplorer360 app instead use FATXplorer 3.0 beta.
You could use xboxhdm23usb beta3 to install a no-original-game-disc-required bootable softmod installer.
To obtain the latest bootable softmod installer, download XBHDM Build.zip from the pre-built Xbox Softmodding Tool repository's Installer Variants subfolder:
https://drive.google.com/drive/folders/1Gs_yYVotDxAxtHZeHUVr_ts7KeMgqEmQ
Extract its content and replace the files in the XboxHDM23USB Beta 3's HDD_files/C folder.
Or, use FATXplorer 3.0 beta to mount the unlocked hard drive's C partition and write the bootable softmod installer files extracted from the XBHDM Build.zip file to it.
Appreciate! I will try that, thanks
Board Life Status
Board startup date: April 23, 2017 12:45:48
Xbox rev 1.6 still won’t power on after multiple fixes
in Repair
Posted
Two HDD are IDE. My concern also EEPROM had problems, because I can't unlock stock HDD (already backup EEPROM with HDD key), FATXplorer show can't unlock or wrong HDD key, but I checked is correct. That's seem when I change stock HDD, HDD key is modified. (I am not sure?)