

Fringle
-
Posts
129 -
Joined
-
Last visited
-
Days Won
1
Content Type
Profiles
Forums
Calendar
Store
Posts posted by Fringle
-
-
The command you'd use to combine or merge two 512mb bios would be "copy /b 512BIOS1.bin + 512BIOS2.bin NEW1024BIOS.bin" but remove the quotes. File names used are just an example but the output file would be a 1mb bios consisting of two 512mb bios files.
-
1 hour ago, Petrolhead said:
Perfect

I have a microscope, heat soldering station and a normal soldering iron.
Please hock me up with those two openxenium

I'll pm you about the payment.
Thx for the link, did order the tsop now.
Only problem with ordering a TSOP chip like that is that it is likely to come blank unless it's been removed from an old xbox and if don't you have a programmer you'll have no way to flash it to see if it works. You'll also need a copy of an original MS bios or a modded bios of your choice to flash on to it. Since they are from a 1.0, any 1.0 or 1.1 1mb TSOP should work. I have a spare 1mb sharp at home on a 1.1 board but won't be there until the middle of next month to remove it. If you're still in need when I get there I'll remove it and send it to you.
-
 2
2
-
-
It looks like the resistors came from R7D4 and R7D5. Don't want to assume because the picture doesn't show it but if I had to guess, the capacitor is probably from C7D2 giving it's location to the LPC.
-
1
-
-
1 hour ago, KaosEngineer said:
Looks like C7D4 is missing. That piggyback rider probably goes there.
And those two small resistors need to be put back where they go.
Any other loose SMD components on the motherboard?
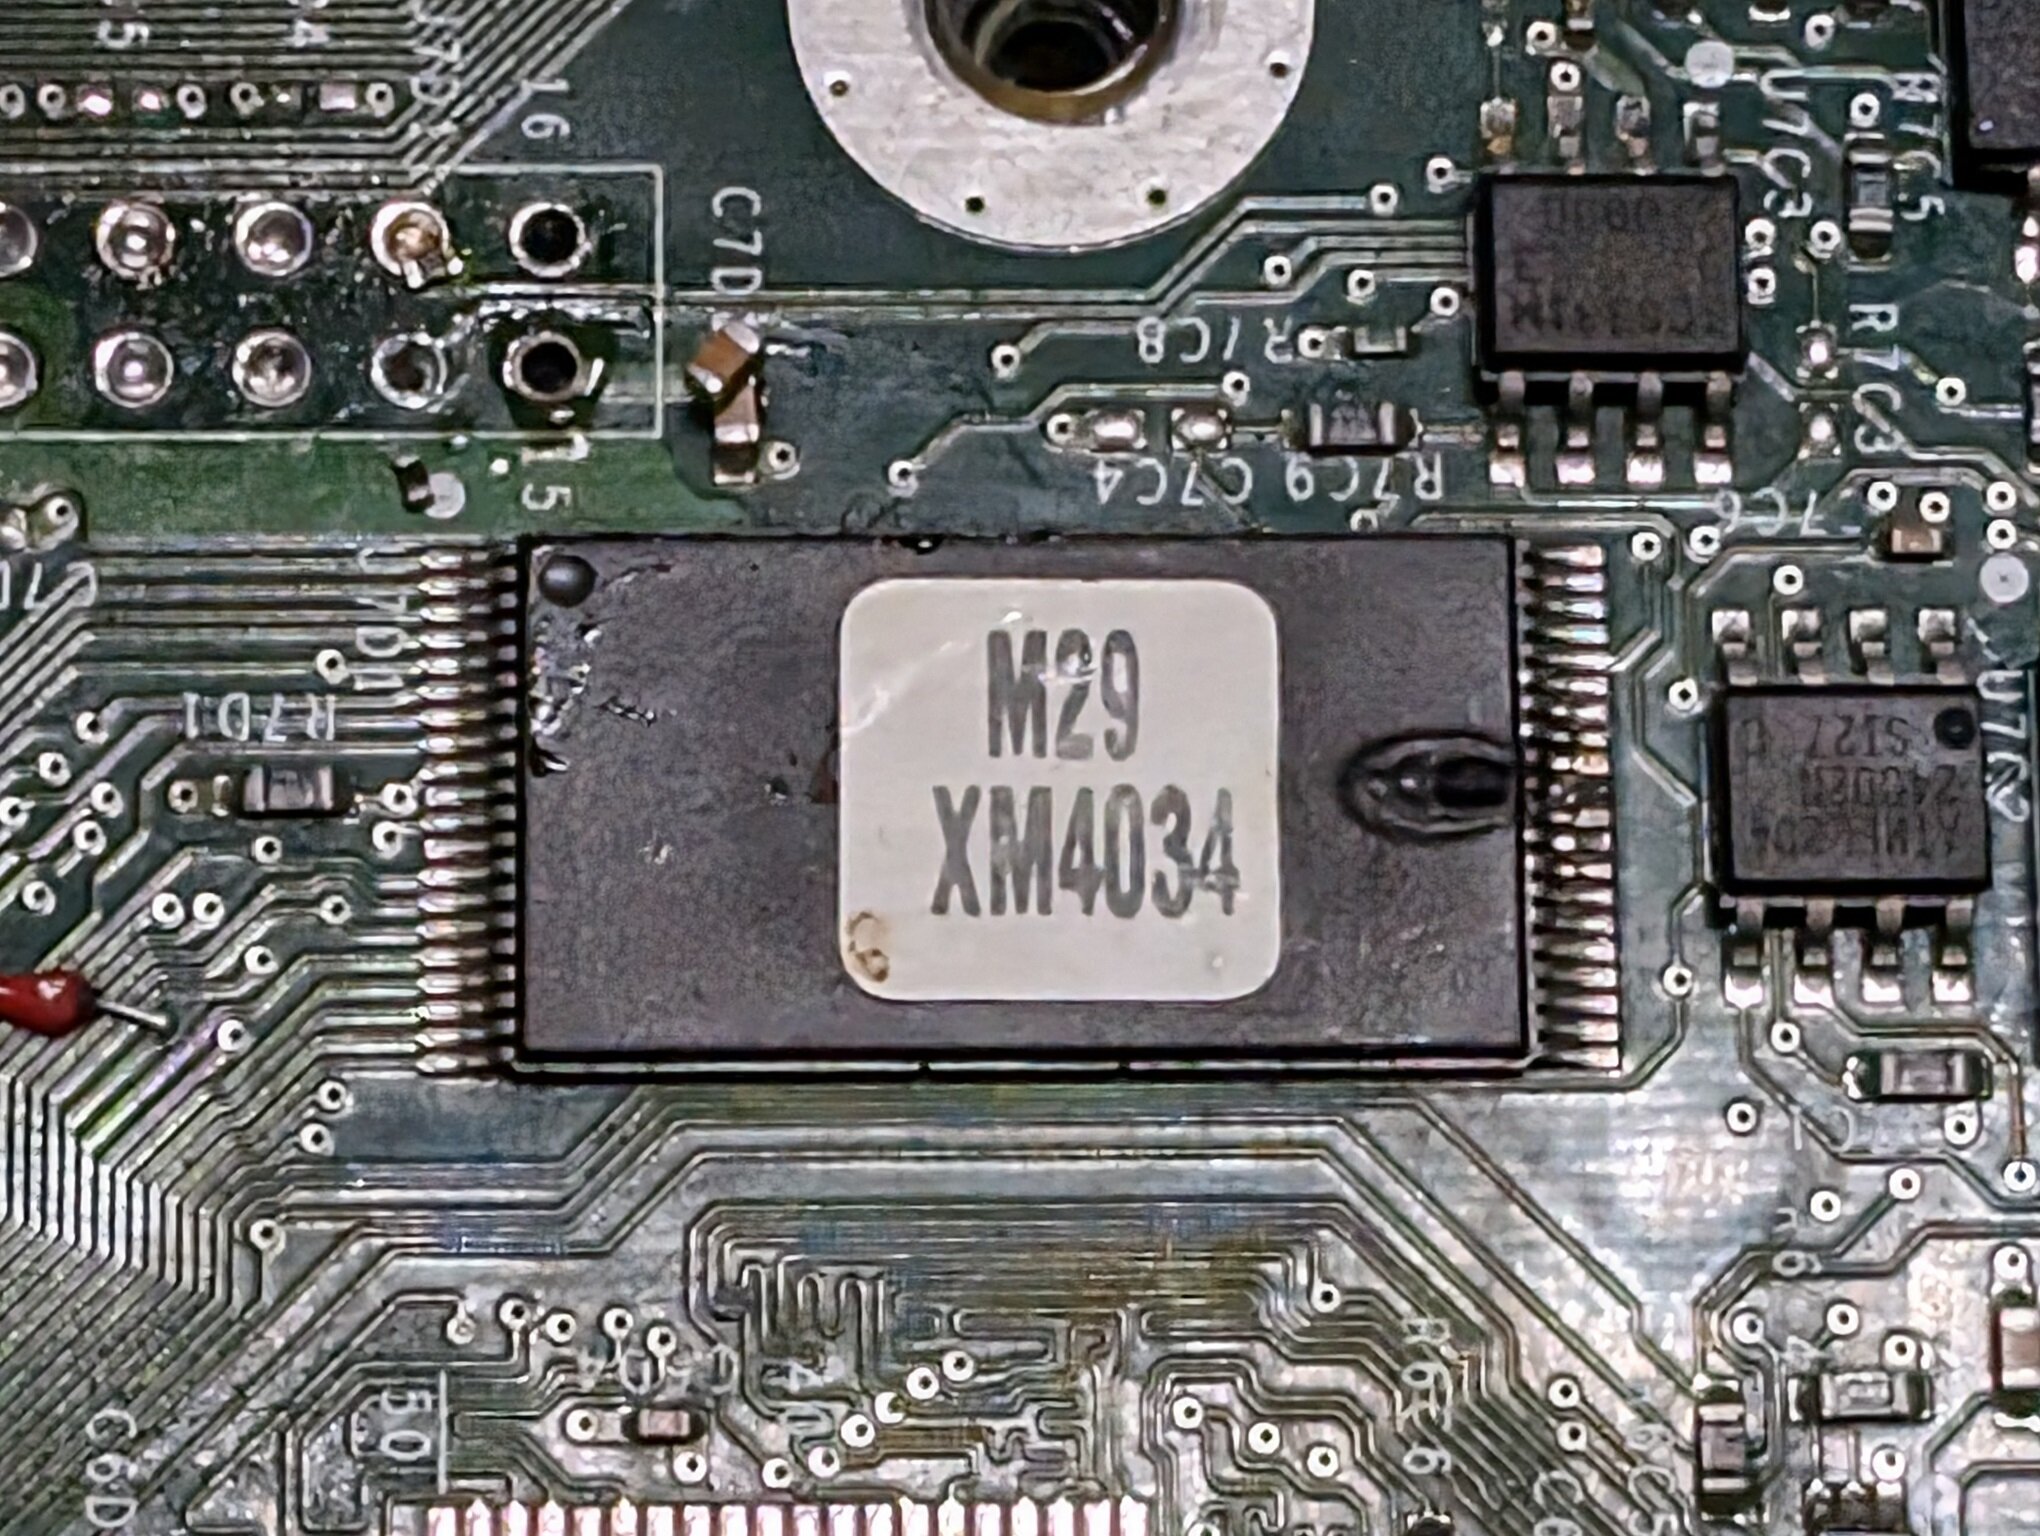
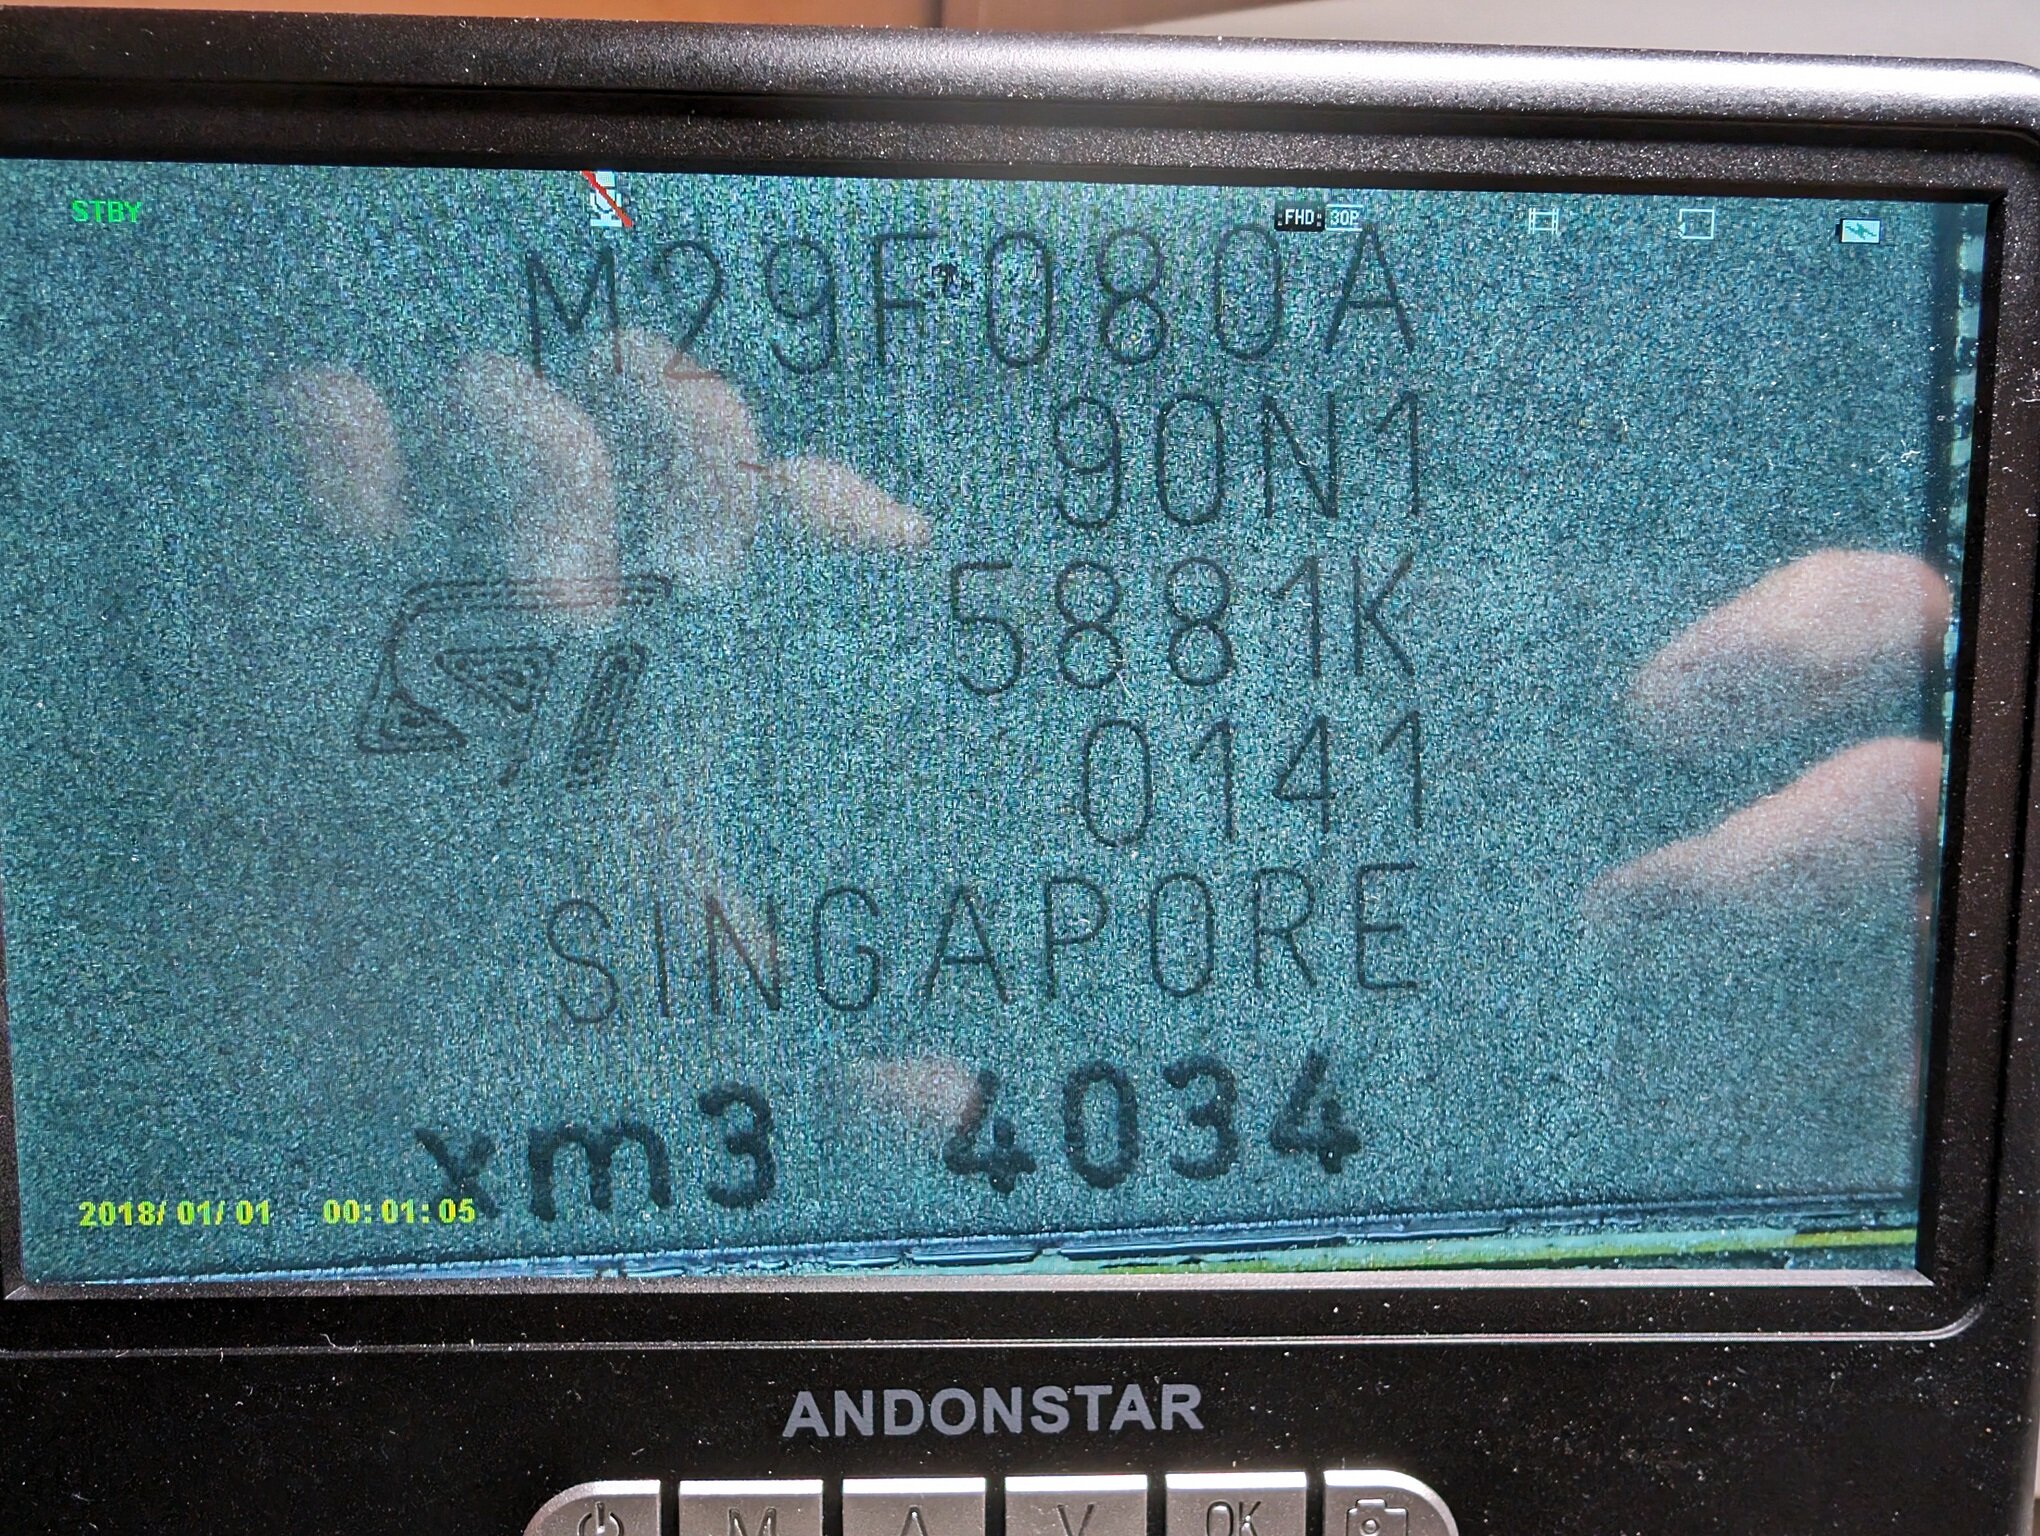
ST M29F080T-90 Flash memory chip.
The sticker on top covered all the manufacturer's labeling.
ST M29F080A-90, Hyundai or Hynix HY29F080T-90 flash memory chips will work to replace the TSOP.
I was going to suggest that was it's location but since I'm at work and don't have a board here to verify it actually went there I didn't want to misleading. The second board he posted also don't have a cap in that spot so I'm not convinced that's where it came from unless both boards have the same missing components.
-
1
-
-
31 minutes ago, Petrolhead said:
I think the modchip did that short (tried that ship on two old devices)
Can I just remove that chip and use a working mod chip like OpenXenium?
You think this is fixable?
Thanks for the help/reply.
Best regards

Since you have a modchip, the tsop being damaged is probably not the issue. I'd be more concerned about the smd capacitor that is sitting on top of the other one in the first picture. You'll have to figure out where that came from and solder it back in.
-
1
-
 1
1
-
-
1 hour ago, ProudNFLDer said:
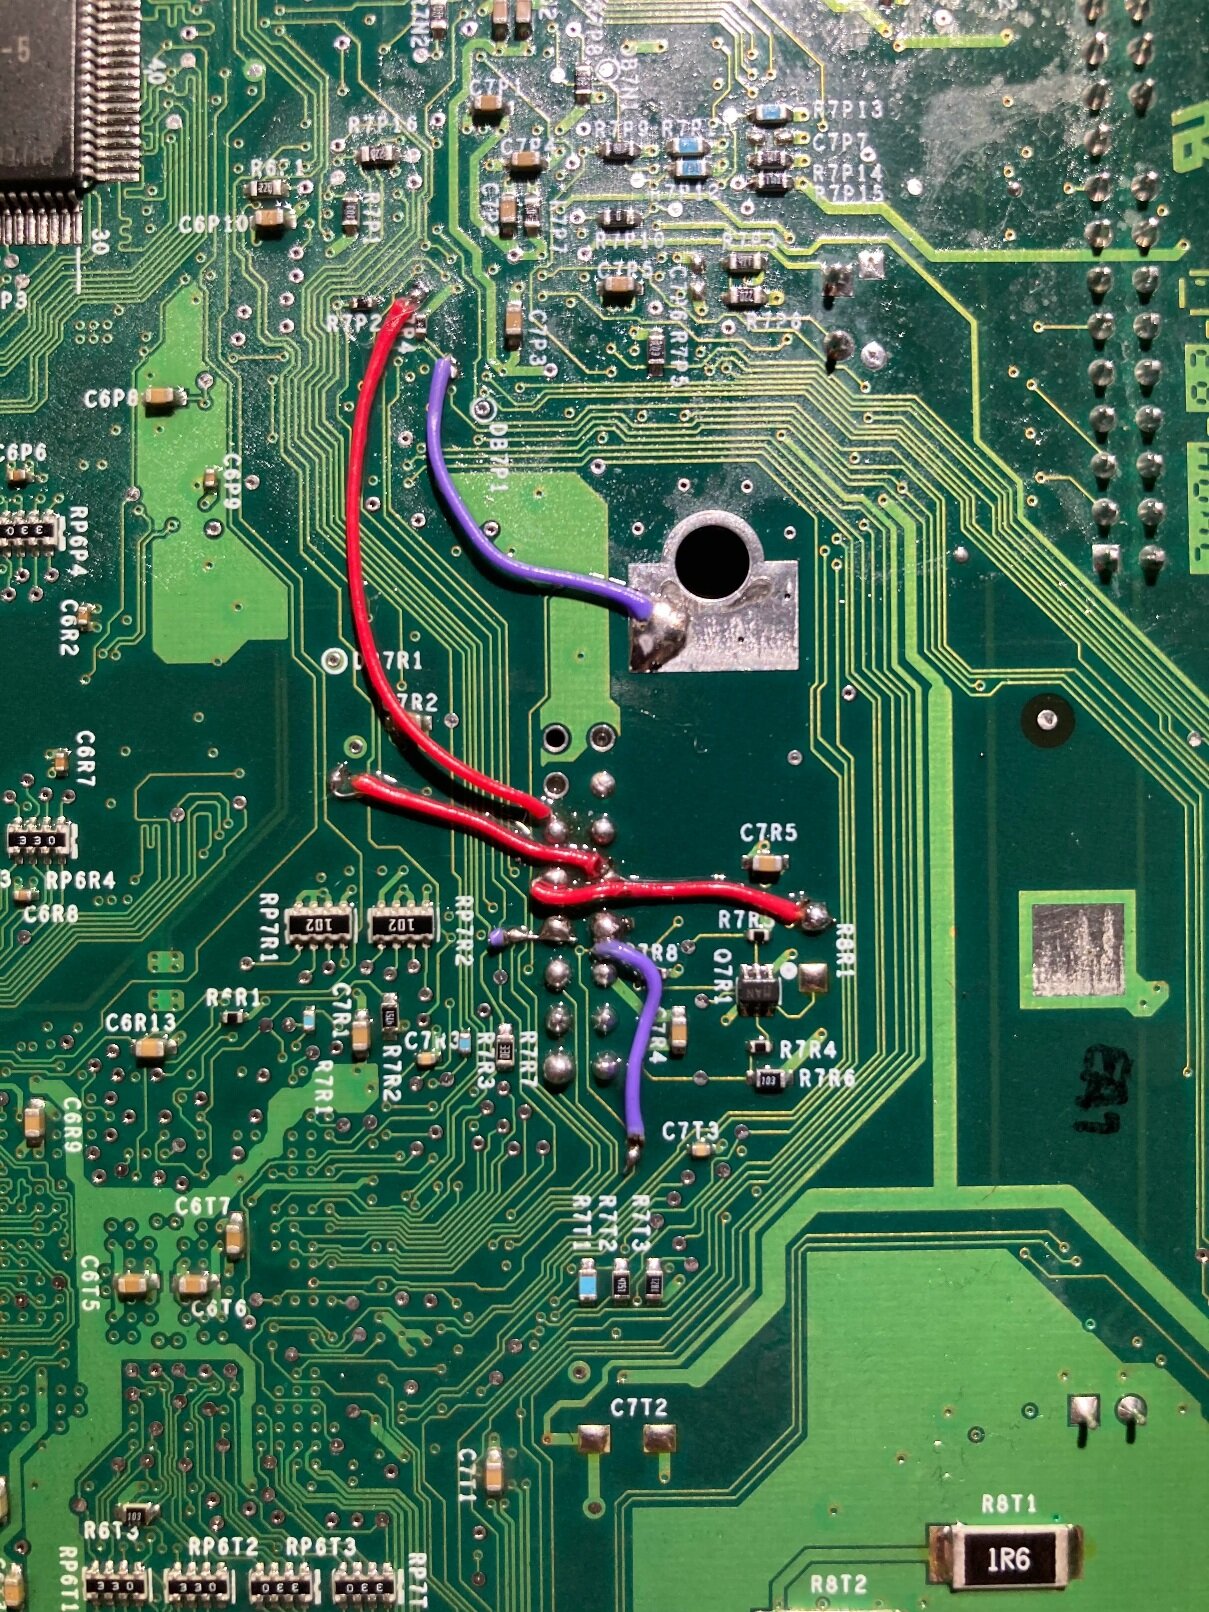
Thank you too all for your replies. Reflowed everything today and booted right up, no issues. I did move what I believe to be a ground connection from the top side to the bottom. Followed the LPC rebuild connections as below that I found on another post here.
Awesome, glad it's all working perfectly now.
-
All 360's use SATA for the DVD and hdd. It's not just limited to slims, with the Phat console it's just a custom eSATA connector for the hdd. Take a good quality picture of the HDD connector and pin header solder. Could be a bridge or missing component from the board.
-
5 hours ago, amxcs said:
I flashed the bios. First chip (bank 1) - successful.
The next one, which is bank 4 - failed.
Does the order of chip banks matter? Were they supposed to be in the order 1,2,3,4 bank?After you get a failure, just go over your soldering again. Remove any excess with wick and possibly reapply fresh solder with plenty of flux. My first try I did without Xblast so it was all a guessing game as to which chip or chips weren't working. When I was about to give up and remove them all I took solder wick and went around all the chips and decided one last time before removing them to power it up and it worked. Could just be a short between two pins that you can't quite see.
-
Sounds like your wiring isn't all that good. The console should glitch with the dvd drive connected. Only reason it wouldn't is due to it drawing extra power or something along those lines which leads back to your wiring. Shorten your wires and try different resistor values. As for the HDD not working, it sounds like you borked the port. Try blowing it out with compressed air or looking for any shorts on the pins. Could possibly be also related to it not booting with the dvd drive attached since they both connect to the SATA bus. Go over the entire board with a fine tooth comb and make sure there are no solder bridges/shorts. Post high res pictures so someone else can take a look and possibly pick up something you don't see.
-
3 hours ago, ProudNFLDer said:
St. John's, Newfoundland to be more precise and I really appreciate the offer of assistance. However I'm quite comfortable with a solder iron. I put that mod chip in many years ago, so many that I can't remember anything about Xbox mods haha. Can't remember what chip it is or any of the steps involved with modding, I did a bunch at the time. All my sources were on mIRC so that wasn't yesterday. Any chance these mods chips all use the same install technique? There's a couple jumper wires on the bottom side of the board but before I reflow them I want to make sure I know where they go. Two are in a cluster of vias and want to make sure I have they correct ones.
It's all good. I'm actually a bit of a distance from St. John's. Live in Cape Breton but work as an Engineer on the Ferries. The chip appears to be a variant of the Akira modchip. You can view the different chips on this site: https://consolemods.org/wiki/Xbox:Modchip_Identification
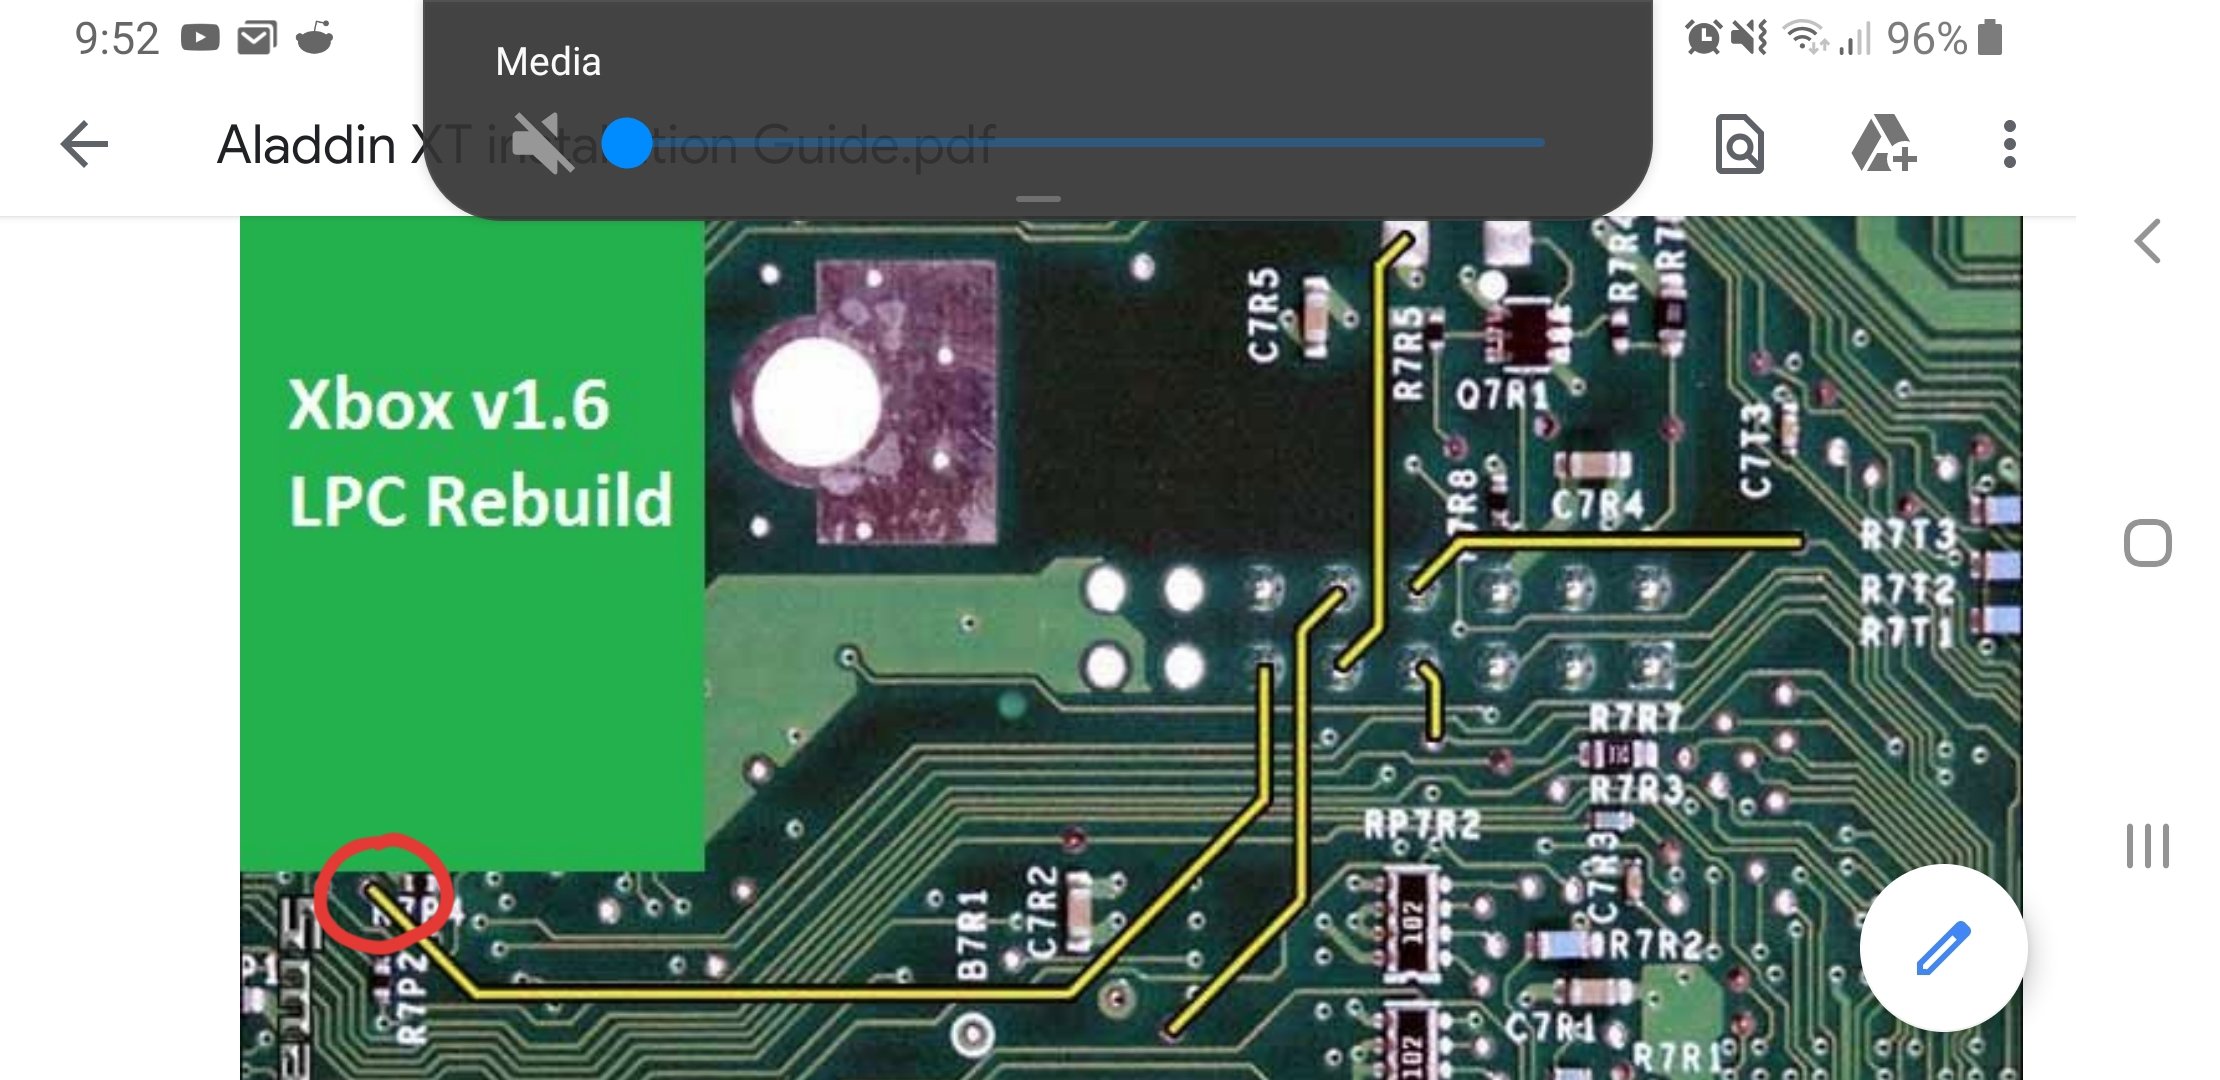
The wires you are seeing on the bottom are probably part of the LPC rebuild since it's a version 1.6 and D0 is possibly also connected on the bottom side as well. The directions for rebuilding the LPC should be all the same for a 1.6 as well as the underside D0 point so any instructions you can find should be accurate. I found this diagram in another thread here.
This is the underside D0 and I'm pretty sure it just needs to be wired to GND.
-
1
-
-
2 hours ago, ProudNFLDer said:
Totally green here so be gentle. I've spent a couple nights reading your posts and I'm just more lost haha. I've pulled out my OG Xbox v1.6 after about 16 years storage. It has a mod chip and a 160Gb drive. However I've got the red green flash on the eject button. If I smack it hard enough while powering on I can get to the dashboard, sometimes. Maybe a loose connection, maybe a failing mod chip, I'd love to hear opinions. Also wondering if I should even try fixing it or is there something else I should head straight for, maybe a different mod chip, bios, etc. Reading through the posts it's clear I don't even know where to start, what do I have, what I should do next. Any suggestions or help pointing me in the right direction would be much appreciated. I have a 9 year old little boy who is dieing to play dad's old Xbox
 Cheers
I can't help but notice your username and wonder if you're from Newfoundland. As the others suggested it sounds like a cold solder joint/loose connection on either the pin header or the D0 point. If you're from the Island, I may not be that far away and could possibly help you out if you're not comfortable with a soldering iron.
-
2
-
-
You can also convert Ryzee119's ArduinoProm to a uf2 file that can be flash it to a pico and dump it that way as well.
Nice to see more options though for those that don't want to install Arduino IDE and convert the file.
-
1
-
-
2 minutes ago, bacus said:
@Fringle Sorry - A bit late replying - busy weekend.
Tried options 0,1 & 2 in the cerbios.ini file but all the same results. Also tried changing dash paths back to the old format, but no joy there either. Not convenient atm to disassemble and remove the DVD drive as a test. If that did work for me, it wouldn't solve the problem though as I want to be able to use the DVD drive in an emergency. I saw your post over on gbatemp last august about the same issue and it wasn't resolved there, so maybe this is a bug we both have?
I can always use the X2's other bank for a different bios in an emergency, so I'm not totally stuck.
Thanks for your help.
I ended up resolving my issue by purchasing a startech adapter and got a replacement for a defective IDE cable. Was initially using a cheap sata adapter with no master/slave jumper. I then got the startech but it still didn't work for me. Turns out the 80 wire IDE cable I purchased was also causing problems and eventually the middle connector broke off while I was attempting to troubleshoot it. I got a replacement cable and it all started working. The first one was a yellow cable and apparently there are know issues when using the yellow cables for some reason. Possibly of lower quality.
-
1
-
-
7 hours ago, bacus said:
OK, I just did that. Unfortunately, it still doesn't work, same as before.
That's pretty strange. Have you tried setting the no dvd drive option in the ini file and disconnecting the dvd drive just to see if it might be causing the hangup? Seems like an odd glitch.
-
6 hours ago, bacus said:
Great thought. So, I've just reinstalled c:\evoxdash.xbe and c:\evox.ini to test. Unfortunately, it doesn't help and the console still freezes in the same way when booting by eject. Then for completeness, tested the evoxdash separately under normal UDMA6 boot and it works fine.
What's your dash path 2 in the cerbios.ini file? This is where mine is set to load \Device\Harddisk0\Partition2\evoxdash.xbec:\evoxdash.xbe which is c:\evoxdash.xbe. Maybe something is not setup correctly there? I'll hook mine up later this afternoon and do some messing around with it to see if I can reproduce what's happening to you.
-
I think safe mode loads c:\evoxdash.xbe. I don't have mine hooked up at the moment to confirm but the only two dashboards I have are c:\evoxdash.xbe and e:\xbmc4gamers\default.xbe and it loads the first one with safemode using eject and the second one with using the power button.
-
I had one that would do this as well a long time ago. Bought it used in this condition and hoped I could fix it. I think in the end I determined it to probably be the mcpx since just the mcpx would get scalding hot when playing any game and after about 5-10 mins of playing it would freeze. CPU and GPU temp were fine. Tried putting a heatsink on the mcpx which made it last a few min longer but since it was beyond my abilities to repair at the time it went in the trash.
-
The first couple of replies in this older thread may give you some clues as to what you need to do when cloning drives for the OGxbox.
From my experience FatXplorer can only create and format an entire drive and can't create a single partition on already existing drive with a file system. So, creating a G drive on an already existing xbox files system will possibly need to be done on the xbox with Xbpartioner.
-
3 minutes ago, Bowlsnapper said:
I am a bit worried now about trying to RGH my 360...

There's nothing to worry about. It's actually pretty easy and cheap to do. Worst case is you have to troubleshoot some wire lengths or solder points and different value resistors to get consistent boot times. Don't be discouraged if it doesn't boot, just try the of the alternate points. Mine wouldn't boot xell or even power on at first but once I switched my wire to the topside pll point it booted Xell right away.
-
1
-
-
1 hour ago, DARK A said:
Problem Event Name: CLR20r3
P1: JRunner.exe
P2: 3.3.0.1
P3: 65404d87
P4: mscorlib
P5: 4.8.4150.0
P6: 5e176d21
P7: 15f6
P8: 0
P9: System.FormatException
P10:Can't remember if this is needed or not but give this a try and install/enable .net 3.5.
https://learn.microsoft.com/en-us/dotnet/framework/install/dotnet-35-windows
-
19 minutes ago, DARK A said:
maybe i should've been more specific
i cant launch j runner
Check the application log in windows event viewer through computer management to see if it's writing an error to the log. Might give you a clue as to what's missing or what's causing it to crash when you open it.
-
1 hour ago, DARK A said:
thanks i try it and didnt work
What device are you using as a nand flasher?
-
16 minutes ago, DARK A said:
i
everything is up to date same problem
Pretty sure on Windows 10 it requires you to disable driver signature enforcement. This is done through the advanced troubleshooting menu during startup.
This video will walk you through how to do that.
-
1
-
-
It's possible that it is suppose to be like that, I'm not sure as I don't have that revision of board here to look at and all of mine are screwed down in cases at the moment. With the FRAG you're describing it's really hard to narrow down as it could be a corrupted eeprom, hardware fault, corrupted Tsop, etc.. It doesn't take much to corrupt a tsop and since it's only a 256k on a 1.4 a working modchip installation would be your only fix. I'm not sure if there is a fix for a corrupted eeprom without a known good backup.


Board Life Status
Board startup date: April 23, 2017 12:45:48
Console FRAG after left alone for a few hours
in Repair
Posted
If I had to guess I would say it needs a recap. So replacement of the capacitors. You can lookup and buy kits for this or order them individually on their own. Sounds like by power it on and off multiple times before getting it to boot is charging the capacitors enough to give it some life but once you turn it off they start to drain and once drained the problem returns. I could however be wrong and the issue might be something else. I did have an old TV like this though that I found on the side of the road. If I plugged it in after being unplugged it would not turn on right away. After some time of being plugged in the set would turn itself on and work until power was removed. Then the problem would then repeat. I eventually replaced a bad capacitor and the problem was solved.