Search the Community
Showing results for tags 'adapter'.
-
Results Below! I compare load times while controlling all variables of the startech ide2sat2 adapter vs the cheap adapter that most people recommend. There are significant differences in both price and performance. cheapo ux bootup 2:28 - 3:09 = 41 seconds halo 2 load 4:11 - 4:56 = 45 seconds coinops dd3 5:42 - 6:25 = 43 seconds startech ux bootup 8:00 - 8:20 = 20 seconds halo2 load 10:05 - 10:25 = 20 seconds coinops dd3 10:57 - 10:40 = 43 seconds CoinOps was 43 seconds for both tests. This implies that the wait isn't due to throughput of the storage device but rather the zip extraction of the cpu.
-
With the eventual goal of creating a very slimmed down xbox I took one of the cheap SD to IDE adapters and modified it into this. Desoldered the existing male header; soldered a female header onto the back for a direct motherboard connection. Soldered the power connection to the DVD header to keep wires from running across the board. Unfortunately this meant the openxenium install was to tall; so that got a direct solder to the motherboard.
-
 I put together a package with all the software needed. I also included the SVF file generated by ISE's impact. This is now the easiest method for programming OpenXenium's CPLD chip. After setup, it's just one click. Merry Christmas and enjoy! https://sites.google.com/view/xc9500xl-with-openocd-ft232r/home
 -
This might interest those that want to turn their retail/debug Xbox into a fully-functioning development kit without having to spend $500+ on one. It works on any version 1.0 through 1.2 motherboard and can be great for troubleshooting crashes of all kinds without requiring the use of XDK software. I'm selling pre-made units for $30 plus shipping and would also like to get a feel for how many might want one in Europe so I can bulk-ship to a distributor to help save some on shipping costs as it's usually around $15 USD to ship from the US otherwise. Everything is fully open-source if you'd like to build/sell them yourself as well. Any questions, feel free to ask. https://github.com/XboxDev/serial-usb-adapter
-
Alright guys. The time has come. Here I'm gonna be adding an internal WiFi adapter to my OG Xbox because, lets face it, Wires are ugly, they get chewed by your dogs and people trip over them. and come on WiFi in an OG Xbox!! Heres a list of Tools and Materials you'll need Torx T20 Torx T10 Soldering Iron Solder Drill with assorted bits Wire Cutters Heatshrink or Electrical Tape Multi-Meter Dremel with cutting disc or small hand saw. Assorted files or sand paper Wireless bridge gaming adapter RP-SMA Female to Male Pigtail Rj45(Ethernet) Female to Male adapter some Motherboard standoffs with matching screws I got the idea from the youtube user "Thewheelman282" Link to video https://www.youtube.com/watch?v=3zG8DQ3Omfk To start you'll need to pull apart your console. I'm not gonna explain how to because there are Many sources for this elsewhere. Next you need to figure out where you want to mount the adapter. again I'm doing what he did in the video and mounting it to the bottom of the DVD drive. If doing the same you'll need to pull apart your DVD drive too. Every drive is different, mine is a Samsung with 4 screws on the bottom. Once you have the bottom half of your drive, You'll want to Pull apart your adapter and mark out your mounting holes. Now use your drill to drill them out. Start small, you can always make the hole bigger if you need to. Time to add the MoBo standoffs, I used 6 of them and cut the screw part off the ones that go inside the drive. Now you can mount your adapter and put your drive back together. Now its time to start cutting wires. Get your multi-meter and determine what wires you need to splice into. Since my adapter uses 5v I used Pin 01(Ground) and Pin 08(5V) Heres the Pinout for the Drive side of the DVD plug Next your gonna need to figure out where you want your adapters Ethernet port to be. I used the same location as in the video for simplicity. Now your gonna want to get your RJ45(Ethernet) Male to Female converter/Extension and see if it will fit. (Mine did not so i had to trim it down) In the process of trimming it, I nicked a few wires so I had to pull it completely apart to trace each pin with a multi-meter and solder each wire back into place. (Dont make the same mistake I did and take your time!!) I was impatient and rushing. now you can Take your dremel and start cutting the hole for your RJ45 port, Once cut it should look something like this.(Again I was rushing, So its not as clean as Id like it to be) you'll want to test fit the plug, then clean up the cuts with a file or sand paper. Then mount your new port to the top of the existing one. I used a few drops of Super glue to accomplish this. \ Now you'll need to drill a hole for your RP-SMA Pigtail. (Antenna extension wire) I chose to put it beside the Ethernet ports. Ignore ignore the hole by the Ethernet port. Thats for my USB ports. I put a piece of heatshrink around the metal antenna connector so it doesnt cause any shorts or problems once its put back together \ Its a tight sqeez but everything fits inside nicely, just be patient while your putting things back where they go. Now you can put it all back together so you can Admire all your hard work and enjoy your now Wireless Xbox. Let me know what you guys think. This is my FIRST Tutorial/Write up. Tried to give clear info, If you need any additional info ill be glad to help out.
-
Does anyone know the jack size for the 6V 1A power adapter used for this thing? All the ebay sellers that have the power supply blur out the model number and overcharge.
-
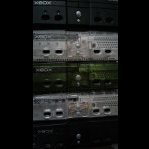
I recently found my set of Monster Component Cables again for my OG Xbox, and I always remember loving the picture quality that came out of those cables. I had been using the Chimeric Systems HDMI adapter and have enjoyed it, but it seems to be producing these "visual" lines in the image that I'm unable to fix. (Shown in the picture below) I was curious to know if there were any recommended component to HDMI adapters that would work well? I can't use component straight up as I no longer have an input source that has its own component cables, so going with HDMI is a necessity. Thanks! (Picture of the "line" issue whilst using the Chimeric Systems HDMI adapter. Screen brightness is due to the picture being a snapshot in between "fading to white" transitions.)
-
Hello guys,i have a question. How can i softmod my xbox using a modern pc and ide to sata adapter?I tried with xplorer360 but every time it says could not find fatx drive.I hot swapped drive using two methods.I heard that you can softmod it with ide to sata adapter using xboxhdm23usb.Is that true,and if yes,how to do it?
-
I know this group has a lot of new HDMI solutions recently, and has focused on the wii2hdmi mods. ( and I know there are more options coming in the near future) Here's a new option for you....I've recently finalized a completely new design (it's been in the works since christmas, but I'm pleased to announce that it is now completely functional) -supports component to HDMI conversion at all supported xbox video resolutions -Wolfson Audio IC to convert S/PDIF signal for the HDMI transmitter -Individually shielded video signals -Internal install will be an option There are two basic ways to take advantage of the digital audio 1)Direct decoding when passed through an HDMI receiver 2)Optical pass through from your TV to you receiver 3) it can also pass the stereo audio to play directly on your TV Sales are probably about a month out still, as I will be sending units out to a few trusted testers and get testing done with some of those problematic xbox systems that are around. https://imgur.com/a/QXP6lcM https://www.chimericsystems.com/product/hdmi-video-adapter
-
Hi everyone, I am new, and I was searching a forum of xbox modders. I was wandering if I could put two hard disks in my xbox, and I found an adapter that I buyed long time ago, called xdhddxx. Does anyone knows how it works and how I should connect it? I can barely find information on google. I only discovered that it is an ide doubler, and that if you turn on the xbox with the dvd button it boots the first drive, if you turn the xbox with the power button it boots with the other. Sorry for my English and thanks for any info Here are the photos
-
Hello to all, just softmoded my OGxbox. My next step will be obviously upgrading HDD. so question is, after when i upgrade HDD to 2 TB can i use Sata To USB Adapter to transfer files instead using FTP method? I got 3 ogxbox HDD ready game packs total 1.6TB. I think it woud be much faster using Sata To USB Adapter (USB 3.0)and Xplorer360. has anyone tried to do this?
-
Hello, So i revived my V1.0 PAL Xbox (TSOP modded with evox m8 bios) and ordered an HDMI adapter on ebay, hoping to get better resolution in the menues and games that support it. i bought this: https://www.ebay.com/itm/Link-Cable-for-Original-Xbox-System-No-Mod-Required-HDMI-Converter-Line-HDMI-Q/254235287449 Ive used the hexen dvd to activate the 480p,720p and 1080i in the MS dashboard. but when i start the system my projector freaks out and states that it first recieves a 480i signal, then a 640x200 120hz(!) signal. Any clue to what this could be? i'm running through a onkyo tx-nr626 av reciever and a optoma 200hd projector. the onkyo just denies passing the 640x200 signal trough. if i connect the projector directly to the hdmi adapter i get a very strange image(probably just the 640x200 data overlapped) I can change to the normal composite cable without any issues in 480i trough the reciever and projector with 1080p upscaling.
-
Well, this question goes to those of you who have done this before. I recently got a TSOP'ed v1.2 xbox with ind bios 5004, 128 mb ram, 1ghz and 160 gb hdd. I also have a chipped v1.6 xbox with 2TB hdd (segate barracuda 7200 rpm) - and i made a clone of this 2TB to put into my TSOP box. I checked that the 2TB cloned hdd (seagate barracuda 5400 rpm) worked fine in my chipped xbox. And it did. Then i took the TSOP xbox, installed a 80 ribbon cable with a startech ide2sat2 adapter (jumper pins to master) and connected my new cloned hdd. [EDIT:] I start it and it a black screen with the letters "ind bios" appear.. i hear the hdd spin up twice... and nothing happens.. then i press eject button twice and the white ind bios splash screen appears, from here it takes some 10-20 seconds until dashboard appears. [/EDIT] On my chipped xbox it takes 10 seconds. What can i do to speed up the boot process ? RUn EVtools on indbios ?
-
SO!!! I am frustrated. I had been using the cheapo sata/pata converters (ordered several on reports that the odd one may fail), the first xbox i had worked fairly good for a number of months on one and seemed fine. Just recently a second Xbox found its way into my basement... the adapter didnt work well so i expressed this to the seller and i got new ones. Now... This is where it hits the fan. The next one fried an HDD, it went together powered up and the drive started to SMOKE!!! The motor ic chip on the PCB of the drive MELTED, i had just taken it out of a functioning desktop!!! OK, so on closer inspection of the other replacements are LOADED With corrosion!! The CAPS have let go aeons ago!!! the firsts sata connector crumbled when removed from the smoking drive (likely what caused the short) but looking at them they have corrosion all over the place Firstly i need to open facepalm myself till the cows come home for not inspecting these with a fine tooth comb p[rior to install, but christ.. i am the end consumer!!! Secondly.. WHAT THE HELL!!!>!>>!> Im out a drive and am probably entitled to a whole whack more of these bastards... id rather just go out and blast the rest of my HDD's with buckshot to celebrate new years!! so now im going from a 7$ solution up to the 32$ startech solution??? Is there no in between? HUGE DISCLAIMER HERE, THOSE GREEN PCB SATA PATA ADAPTERS.... FUCK IT, i got them from hottestdealsever on both amazon and ebay, they SUCK MEGA DONG and trust me, there is a real threat to losing a drive here, all you guys with big expensive drives heed my warning, these are really really bad. you would never think that the caps were blown out and the thing was this big of a mess. UNBELIEVABLE. . Anyone got any thoughts on this? any way to fix these up or are they just poor by design?
-
Custom Red LED controller Ports with matching Red LED Power/Eject Board. Comes with lifetime warranty. If one ever fails I will replace it for free minus the shipping cost. These are very bright and match 100% although the picture kinda takes away from how deep red these really are. $24.99 Shipped anywhere in the lower 48. Can ship worldwide. Other colors available: Blue, Green, White, Purple, Orange, Red Any questions, simply shoot me a message! Thanks guys!
-
 Today I worked on taking apart controllers and cleaning them up. I figured while I was at it I would go ahead and take apart and clean up my remote power button and USB adapter mod too. I made this probably about 12 years ago. I took an Xbox Live communicator apart and replaced the circuit board with a simple breadboard from Radio Shack. I put a USB port where the volume knob used to be and a switch under the mute button. I modded my Xbox with the yellow wire remote power button mod so I wired up the switch as the remote power button. The nice thing about modding this communicator is that I can plug it into any controller and have a remote power button without modding the controller itself. It is also great for softmodding systems by plugging a USB drive directly into the communicator instead of making a USB adapter cable that I would have to search for whenever I work on modding a system.
 -
 Hi. I ordered a Monster Cable Lightwave 100X Optical Cable from eStarland to connect to the Monster Cable component cable I also purchased for the original Xbox but the dunces sent me just the 10' Monster Cable optical cable and no toslink adapter to connect it to the component cable so I can get 5.1 surround sound with my OGXbox. Is this a standard toslink adapter that is readily available or is it one of Monster Cable's proprietary monsters? In either case, where can I get one? Thanks for any help. ETA: added photo of what the toslink adapter looks like, btw.
 -
Has anyone tried this? http://www.easybuy2000.com/store/xbox/solderless_1_6_adapter.shtml


.thumb.jpg.4929c444bd6cdc12c318a61428e6b906.jpg)


Board Life Status
Board startup date: April 23, 2017 12:45:48